
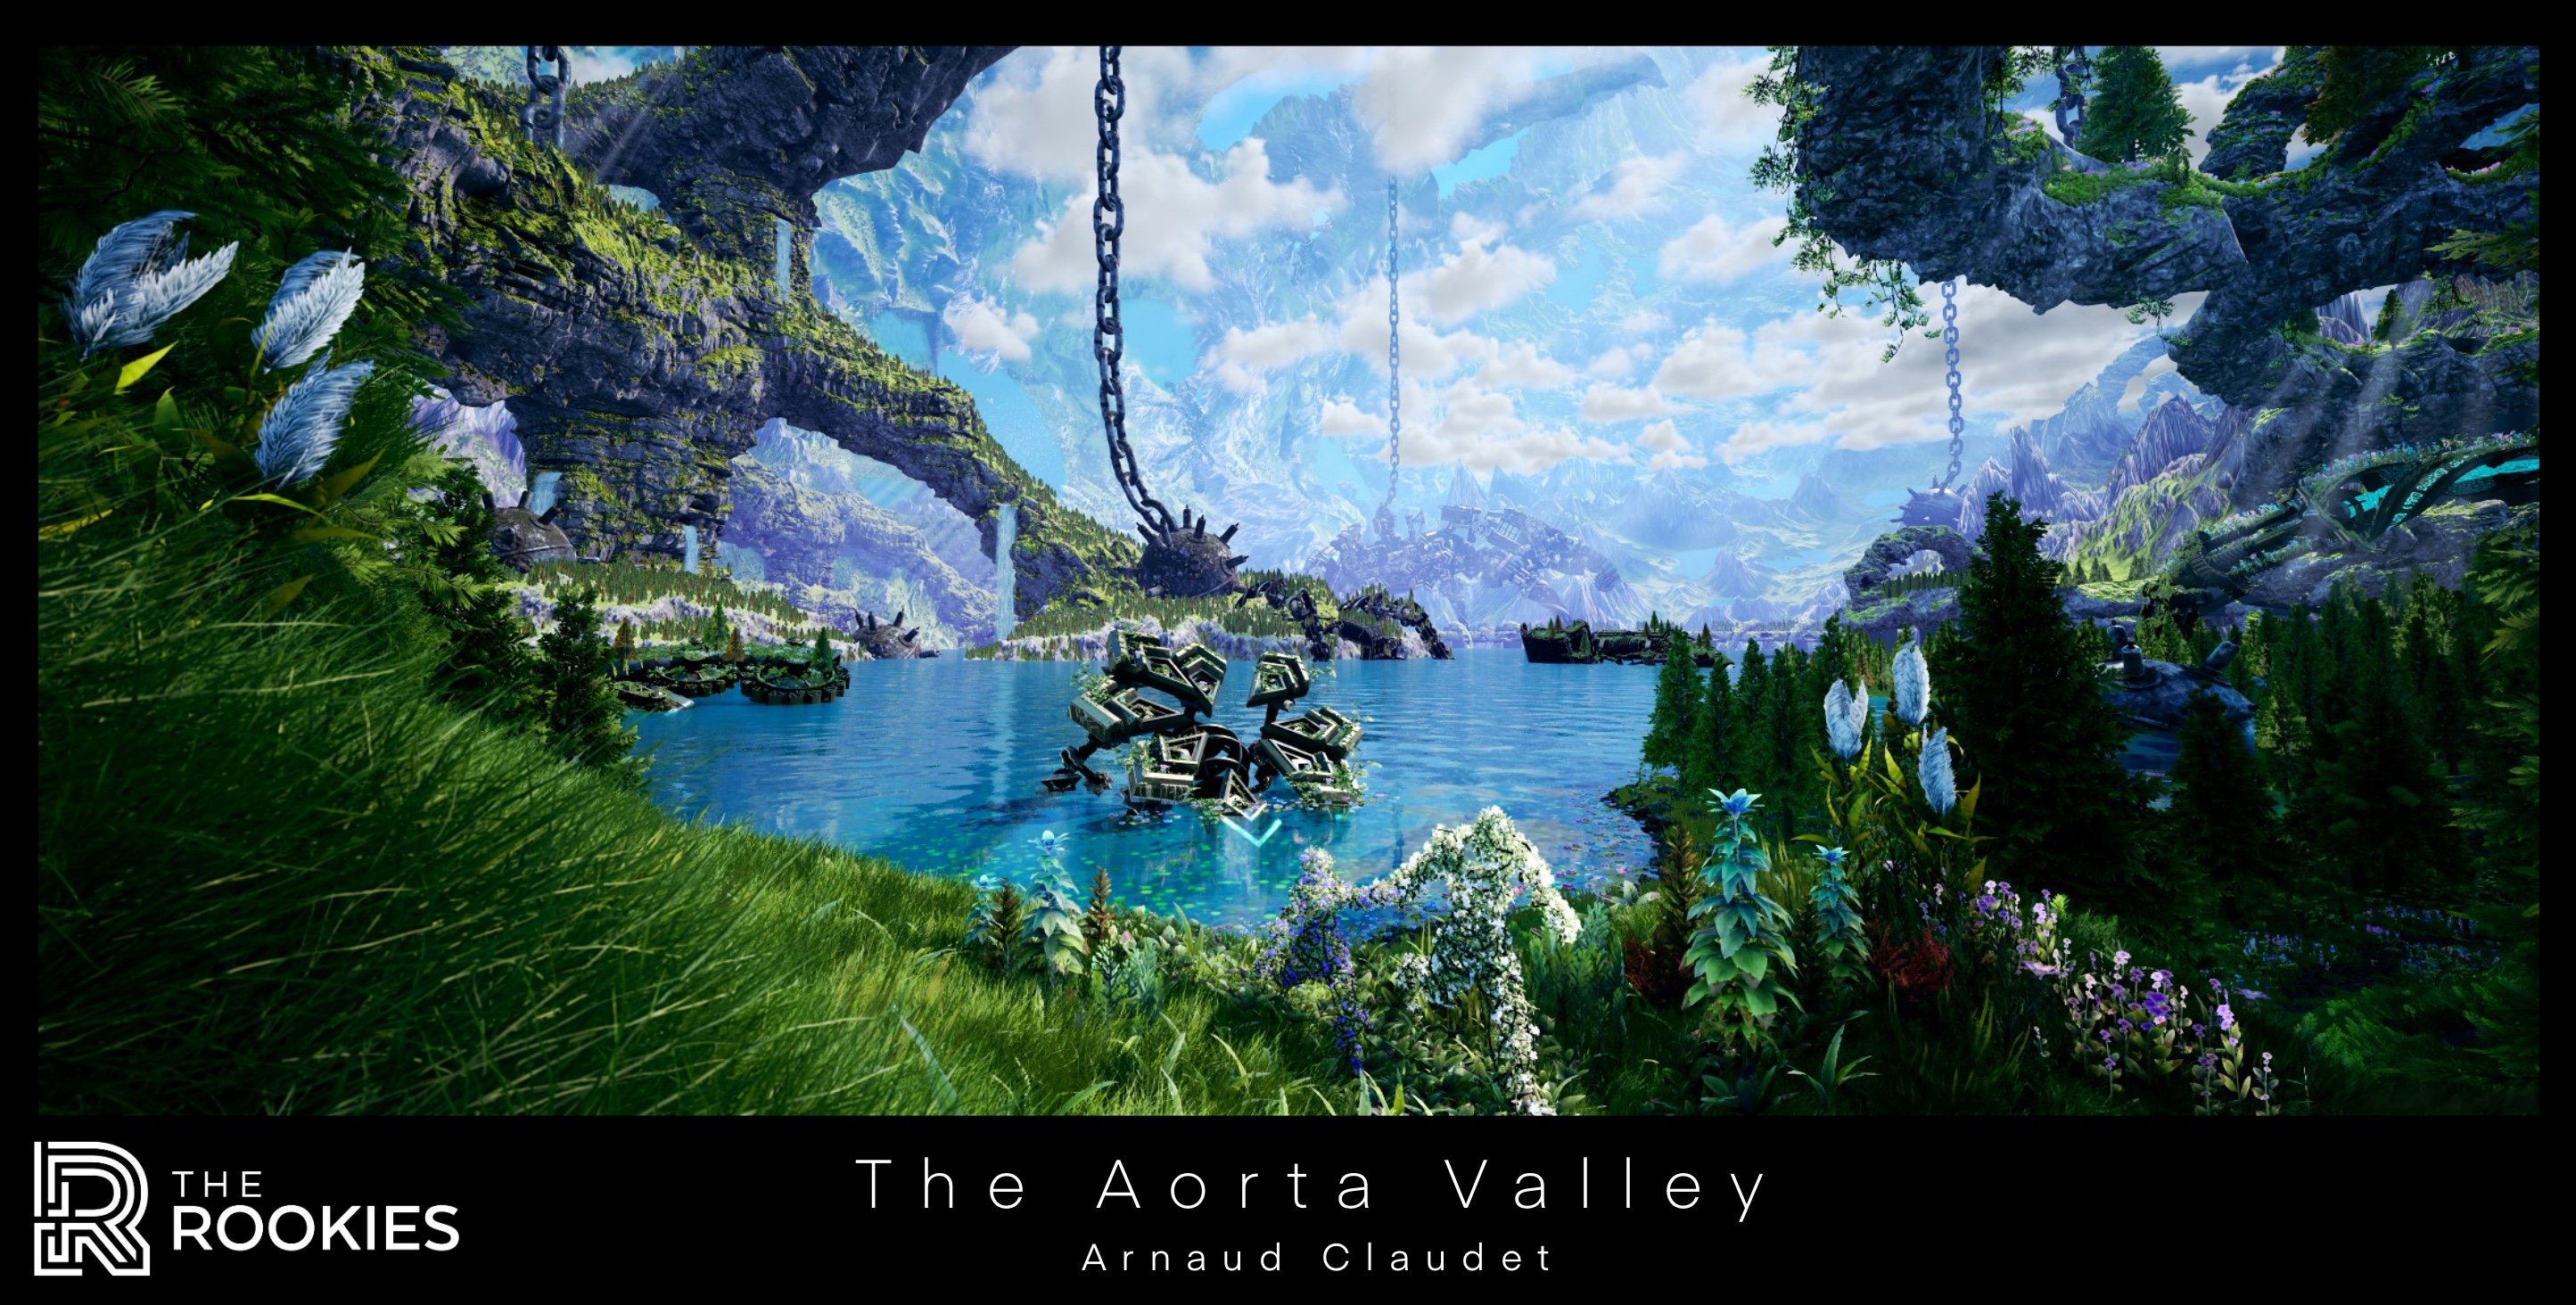
The "Aorta" Valley


Through this project, I wanted to improve my Foliage, rocks, trees, and my overall environment artist skills.
The "Aorta" Valley
Update - 14 May 2021

I really had a lot of fun doing this project. Open-world is my favorite type of video game by far and having a contest on that subject really motivated me to give my very best.
Every model and texture you will see in my entry are entirely made by myself from scratch. At first, I thought I should have used Megascan Asset to have an overall greater render quality. But, in the end, I now clearly see the huge step up I had by doing this project, and I know that if I want to work on ambitious and exiting AAA open-world video game in the future, I would have to continue working this way and improve my craft as much as I can to obtain the realistic art style I am looking for and which I would love to practice in my professional career. :)
Anyway, I hope you will enjoy my entry and the lore I had the pleasure to create through it. :)
I would like to thank my friend Matthieu Levy who accepted to do the voice acting in my cinematic.
(Please, turn the 4k video mode before watching, I hope you will enjoy it! :)


Update - 14 May 2021
A quick update to talk about the terrains I will use for my compositions. As I wanted to create a colossal environment, I then needed a lot of terrains to realize what I wanted to do. Giving the fact that a good quality terrain in Gaea could have 4096*4096 (16 777 216) polygons, I had to find a way to keep it real-time.
So for my first step, I created 14 different terrains of different sizes and shapes and for different purposes. I made sure that each one of them had smooth borders that wouldn't make them too hard to merge together. Moreover, I used the same color palette for each one to make them blend seamlessly (colors were greatly inspired from Grenoble, my hometown in the French Alpes which are also composed of similar types of lakes and peaks as you will see in my upcoming cinematic. (During holidays, I literally had to open my window to get references ^^)
I used Quadspinner Gaea to create the terrain models and textures, I then retopologized each one of them in order to make them reach more or less 30000 Tri, giving special attention to ridges with more polygons, and having less poly on valleys.
I then baked them in Xnormal as the Ray Calculator tool was giving better results in this particular case.
Finally, I retextured them using Substance Painter to avoid illogical patterns, repetitions, or baking artifacts as well as using position maps and normal orientations to give extra details that are sometimes complicated to obtain in Gaea.

Here is one of the terrains made in Gaea, and here are all the terrains put together in 3dsMax before importing them to UE4, I exported them as different objects in order to move them freely once in the editor.
(This shape is inspired by the human body's aorta, hence giving the project's name. In the cinematic, I didn't place anything on top to let the viewer imagine what could be there :)


As you will see in the cinematic, I plainly used the new 4.26 update of Ue4 with those wonderful 3D clouds and ocean materials. Finally, I have scattered trees (with orientations following normals of the terrain) to create an antigravity megastructure where nature would have grown everywhere in every direction giving the fantastic and colossal look I was looking for.
Using tree imposter helped me to keep it real-time while having more than 60.000 trees scattered on mountains in some compositions.
Update - 13 May 2021
So, for this step, I worked on giant rock arches, shaders, and a spaceship that would be needed to complete my compositions.
First, for the arches:
Some of my compositions needed huge arches in a realistic art style. However, I needed a way to sculpt them quickly. At least, quicker than the rocks that took me lots of time each.
To do so, I first created 2 different kinds of height maps in Substance Designer that I used in Zbrush as alphas. The first type was just boxes with different heights to create the overall shape of my arches. Then, I created detailed rock formations that I would scatter throughout the piece.


I first did a blockout in UE4 with boxes that I merged into a single object and exported it to Zbrush. I Dynameshed it and started sculpting on it. I smoothed the top of the arches as well as creating some paths across it.


Then I used the same RGBA mask technique as for my rocks (detailed in a previous post). For the texturing part, I created seamless textures from my colorized mountain (done in Gaea) that I will talk about soon on a next post.

Next, I'm going to talk about my shaders.
First, there is the God Ray shader I used. I first modeled a cylinder and plane with a perfect square UV so that the texture would tile in every direction without any seams.
I then widen a Perlin noise in substance designer to create god rays. In my shader, I made it pan in a direction while a border mask would pan in the opposite direction. I added a distance fade function as well as a fresnel effect. Both in order to affect the opacity and create a much more natural look.


For my next shader, I created a waterfall. I first created the water texture in Substance Designer. Then, I made it move at 2 different speeds on a shader.
I also created a waterfall-shaped mesh in which I tweaked the UV so that the bottom part of the mesh would have exponentially less UV space. Widening the texture and make it pan more quickly at the end (giving a feeling of water falling more quickly at the bottom due to gravity.
Finally, I created an opacity mask that would seamlessly pan in the opposite direction of the water texture to give a much more natural feeling.


Finally, I wanted to create a spaceship that would have crashed on trees for my cinematic. First, to gain some time, I reused some parts of my MechCrab to quickly create the model. I textured it on Substance and added some vines on SpeedTree with the same atlas that for the flower people's one.


Update - 7 May 2021
Step 4: Hero Item for narration purposes.
To create narration throughout my 5 compositions for this environment, I created different Hero Items.
First: Relics from an old religion:
As I was saying in my first post, to represent that there was an ancient civilization living on this unknown planet, I created different relics inspired by both the Middle-East Architectural Art Style and the Ocean's theme. These objects will be used in some of my compositions.


And finally, the divinity of this long-forgotten world...

For the pillar and the door, I first started modeling in 3DS Max, creating a Low Poly, only focusing on shapes and the overall outline. Then, I used subdivision techniques to obtain a High Poly model.
After That, in Zbrush, I sculpted details, using homemade VDMs and Alphas.
Retopology was a mix between Decimation Master from Zbrush and 3dsMax and the baking was made in Xnormal (as the Ray Distance Calculator tool from it allows a more precise baking with convoluted shapes such as these)
I finally created the texture in Substance, mainly using the curvature map from the baking to create a realistic render without having to rely too much on unwrapping.
For fun, I added an Invented language on the door that only these primordial people could understand…
After That, The Unholy War:
I wondered how they could have disappeared. To stay in my “Underwater” theme, I created a giant Mecha Crab, that I used for one of my compositions. Modeled in 3dsMax and textured in Substance, I used both the entire crab and some parts of it scattered throughout the picture to showcase that there was an ancient war implying giant mechs.


I also added some giant Underwater bombs and ship chains that would be floating in the sky. (High and Low poly in 3DSmax, texturing in Substance)
Here is a size comparison with my plants.

And then: The people vanished...
Or not?
I wanted throughout my compositions to create a narrative mysterious enough so that the viewers would imagine their own interpretations, so came the idea to create, for each composition, a mini theatre piece with characters who would depict moments of this ancient life: how they lived and how they ended.
So I created flower statues of people that were stopped in the middle of their movement. Have these ancient people been transformed? How? Why? No one knows...

To create them, I first posed the female and male Unreal Base Mesh inside the engine, exported them as objects into SpeedTree, and made vines grow from them with flowers and leaves. (I had already made these textures thanks to the foliage step).
To make it optimized for real-time rendering, I create an atlas regrouping all textures needed for every flower people.


Update - 4 May 2021
Quick update to show the real-time aspect of these biomes :)
Update - 1 May 2021
Step 3, rocks:
For the rocks, as I wanted to have a quick and iterating-friendly workflow, I decided to try the RGBA mask texturing process for the first time.
It is about texturing a set of assets directly in the editor with only a single “Mask Map” and normal map per object and 2 different rock textures for variations that would be displayed on all assets.
I found that solution very optimized because, given 10 rocks, for instance, I would only be using 1 normal map (With all rocks unwrapped together) 1 RGBA mask map (all unwrapped together), and 2 textured that would be tiling independently for each rock depending on their size and not depending on an RGB mask resolution (which would have not been very much high res for 10 rocks unwrapped together)
I created the rocks in 3DS max using noise displacement techniques, decimate them in Zbrush and Unwrapped in Max.
I first started with a black base color to avoid any kind of white artifact in the mask that would affect the color channel later on.
Then I add a blue layer masked by a Substance noise. The blue part will be used in the shader to project the first texture, the negative value of this mask (not blue, still black) will be used to project the other texture in the editor. I tend not to sharpen too much the transition between black and blue so that the two textures transition would be smoother in unreal.
The red mask is used to create occlusion. Everything that is not red will be used at the opposite to brighten some parts of the rock. All of that allows to increase contrast if needed in some compositions when it would be too dark to see the details on the rocks. For this mask, I like to keep it sharp, I found that it greatly increases the level of details of the rocks.
The green mask will be used to brighten the convex edges and add a little bit of glossiness as if they were worn away by the weather. I have to admit that this part is a lot more useful for large-scale rocks.
Finally, I used an opacity mask to add moss later on. The reason why I let this mask very blurry is because, once in the editor, I would be using the black and white values to control the size of my moss on the rock as I would on substance Designer with a Histogram Scan node.


Finally, I put all my colored masks to Linear Dodge, and here is the colorful result.

In Unreal, the shader looks like this:

Yellow: my RGBA Mask input and Normal input (that can be changed via a parameter in the master material instances)
Light gray: my 2 rocks texture/normal + my moss texture (the three of them created in Substance Designer and Speedtree for the moss)
Orange: all my tiling variables for each of my textures. I also used an ObjectScale node to make the texture increase with the object’s size.
Blue: how the blue channel is used to separate the 2 rock textures.
Red: the occlusion that is darkened and the inverse map that brightens the rest for more overall contrast.
Green: the curvature map used to gloss the rocks' edges and make them a bit brighter.
Brown: a series of nodes to control the hue and brightness of the moss.
Purple: taking the blurry texture from the alpha, brightening or darkening it, and then contrast it to create a fully functional percentage of sharp moss on rocks.
Pink: a dirt albedo quickly created in Designer that will only apply on the normal facing the ground.
But I found those rocks a bit sad without anything else, so I created a moss atlas generator on SpeedTree, mosses textures that I then applied on another generator to make the moss grow out of those rocks only for the LOD0.
(I also sculpted some big rocks on Zbrush for some composition needs)


Here are the rock and moss textures created in Substance Designer and SpeedTree.


Here is the final result of my fully procedurally textured and optimized rocksfor real-time rendering.

Update - 29 Apr 2021
Step 2: trees
So, my next was to design the trees for my scene. I wanted to have a different biome for my different compositions.
I decided to choose a coniferous forest, a grassland, a birch forest, and an alien-like fantasy swamp. All of them were set dressed in the scene in accordance with previous foliage created.
As for the plant, I only used SpeedTree and Substance Designer to create all needed materials.
Here is my workflow for some of them.
I found it quite amazing to have the possibility in SpeedTree to only import quickly-drawn pine needles (normal map made in Substance Alchemist from it) and end up with a whole tree.

For the tree bark, I also used Substance Designer and made a trunk texture for each of my tree types.

For the leaves, I created 2 different substance graphs:
A first one for oak-type leaves in star shapes and a second for symmetrical-type shapes like birch leaves.
This is the same generator that allowed me to create all flower petals.

To improve the rendering quality of my trees even from afar, I decided to directly bake on branch textures: my Ao at the bottom and Light at the end. It allowed me to create more depth for the trees which sometimes can be difficult to maintain in a real-time environment where Ao is not rendered in real-time from far away.
I here used 2D petals to put together 2D flower atlases and create at the end different branch clusters for my trees.

By testing a lot, I realized that to create a good cluster, I would need a good balance between empty and filled space, Leaves must not touch each other and in general, are better rendered when smaller. Having a size variety and some empty branches can add nice variations to the tree.
Finally, To add details to the trunks that were looking strange only with bark textures, I added 2 vines layers.
A first seamless texture of vine used as a shell around the tree's trunk (created in Speedtree with random branches bifurcating from one another and made seamless in substance Alchemist.)
For the second layer, As I still had some space left in each branch's atlas, I added some vine leaves that I made grow off the trunk's base.

When I imported all of them, I took care of importing all trunk textures and similar branch atlases at the same time in order to only call a few textures for a lot of trees, which would decrease the number of draw calls as only one trunk texture would serve for a whole biome.
Here are two old biome tests I did to try color and shape arrangements before using them in my main compositions.


And here are the current trees I have made so far, I will continue more important tasks before returning to them later on for corrections.


Update - 26 Apr 2021
For my open-world entry, I wanted to create a planet with colossal megastructures.
The artistical direction I followed for this scene was separated into 3 parts:
First, in order for the player to feel very small compared to the world, I wanted to use a microbiological language of shapes (for mountains, hills, and valleys, I will rather use cellular shapes for instance)
Then, to create a planet similar to ours but somehow a bit off and strange, I replaced flowers and grass by corals and seaweeds and in general, used the ocean theme to create the otherworldly atmosphere.
Finally, I wanted to create a narrative by placing items in the environment to create a feeling that there would have been an ancient war in the past that had decimated the people of this planet. To represent their left marks, I will create Hero Items that have an oriental architectural art style as a symbol of their past culture. (I find that the very geometrical architectural style of Middle-East temples gives some kind of divine feeling).
My main inspiration is clearly the Xenoblade Chronicle game series for the colossal environments, The bio-organic Artistic direction and the otherworldly colors.
Step 1: Foliage
First, I started working on foliages, I entirely created each texture only using SpeedTree, Substance Designer, and Alchemist.
For complex shapes like corals or seaweeds, I used SpeedTree to create the transparency and normal maps and then I textured them with Substance Designer. Sometimes, I put colors, grayscale value, or grayscale gradient on the different parts of my SpeedTree plants to improve my texture quality and efficiency on Designer.


I created multiple variations on SpeedTree, and once all colorized on Designer, I put them on an Atlas and used them to create the needed plants in Speedtree.
As it needs to be real-time, I tend to regroup multiple plants on the same atlas depending on their size to optimize drawcalls.
Moreover, each of my plants has 4 LODs ending up with an Imposter.
I first tried to use octahedral imposter on foliage (built up on top of SpeedTree's Imposter) but it was a bit overkill. Nonetheless, it was looking great on test trees, which will be my next step.

Then, depending on my cinematic's storyboard, I defined several biomes that will be showcased and created the color palettes accordingly. Tested them out on UE4 to see if they were looking great altogether, modified them, and imported them back.


Comments (5)