
You still believe in me? -- Ben Ramos 3D Character Art Showcase
Hi! My name is Ben Ramos, I am a 3D artist and alumnus of Gnomon School of VFX. This is my second Rookies submission and I have some new work to share since last year. I currently work at a company called Airstrafe Interactive working on the game Saleblazers. I hope you like what you see, pull up a chair and relax!
You still believe in me? -- Ben Ramos 3D Character Art Showcase
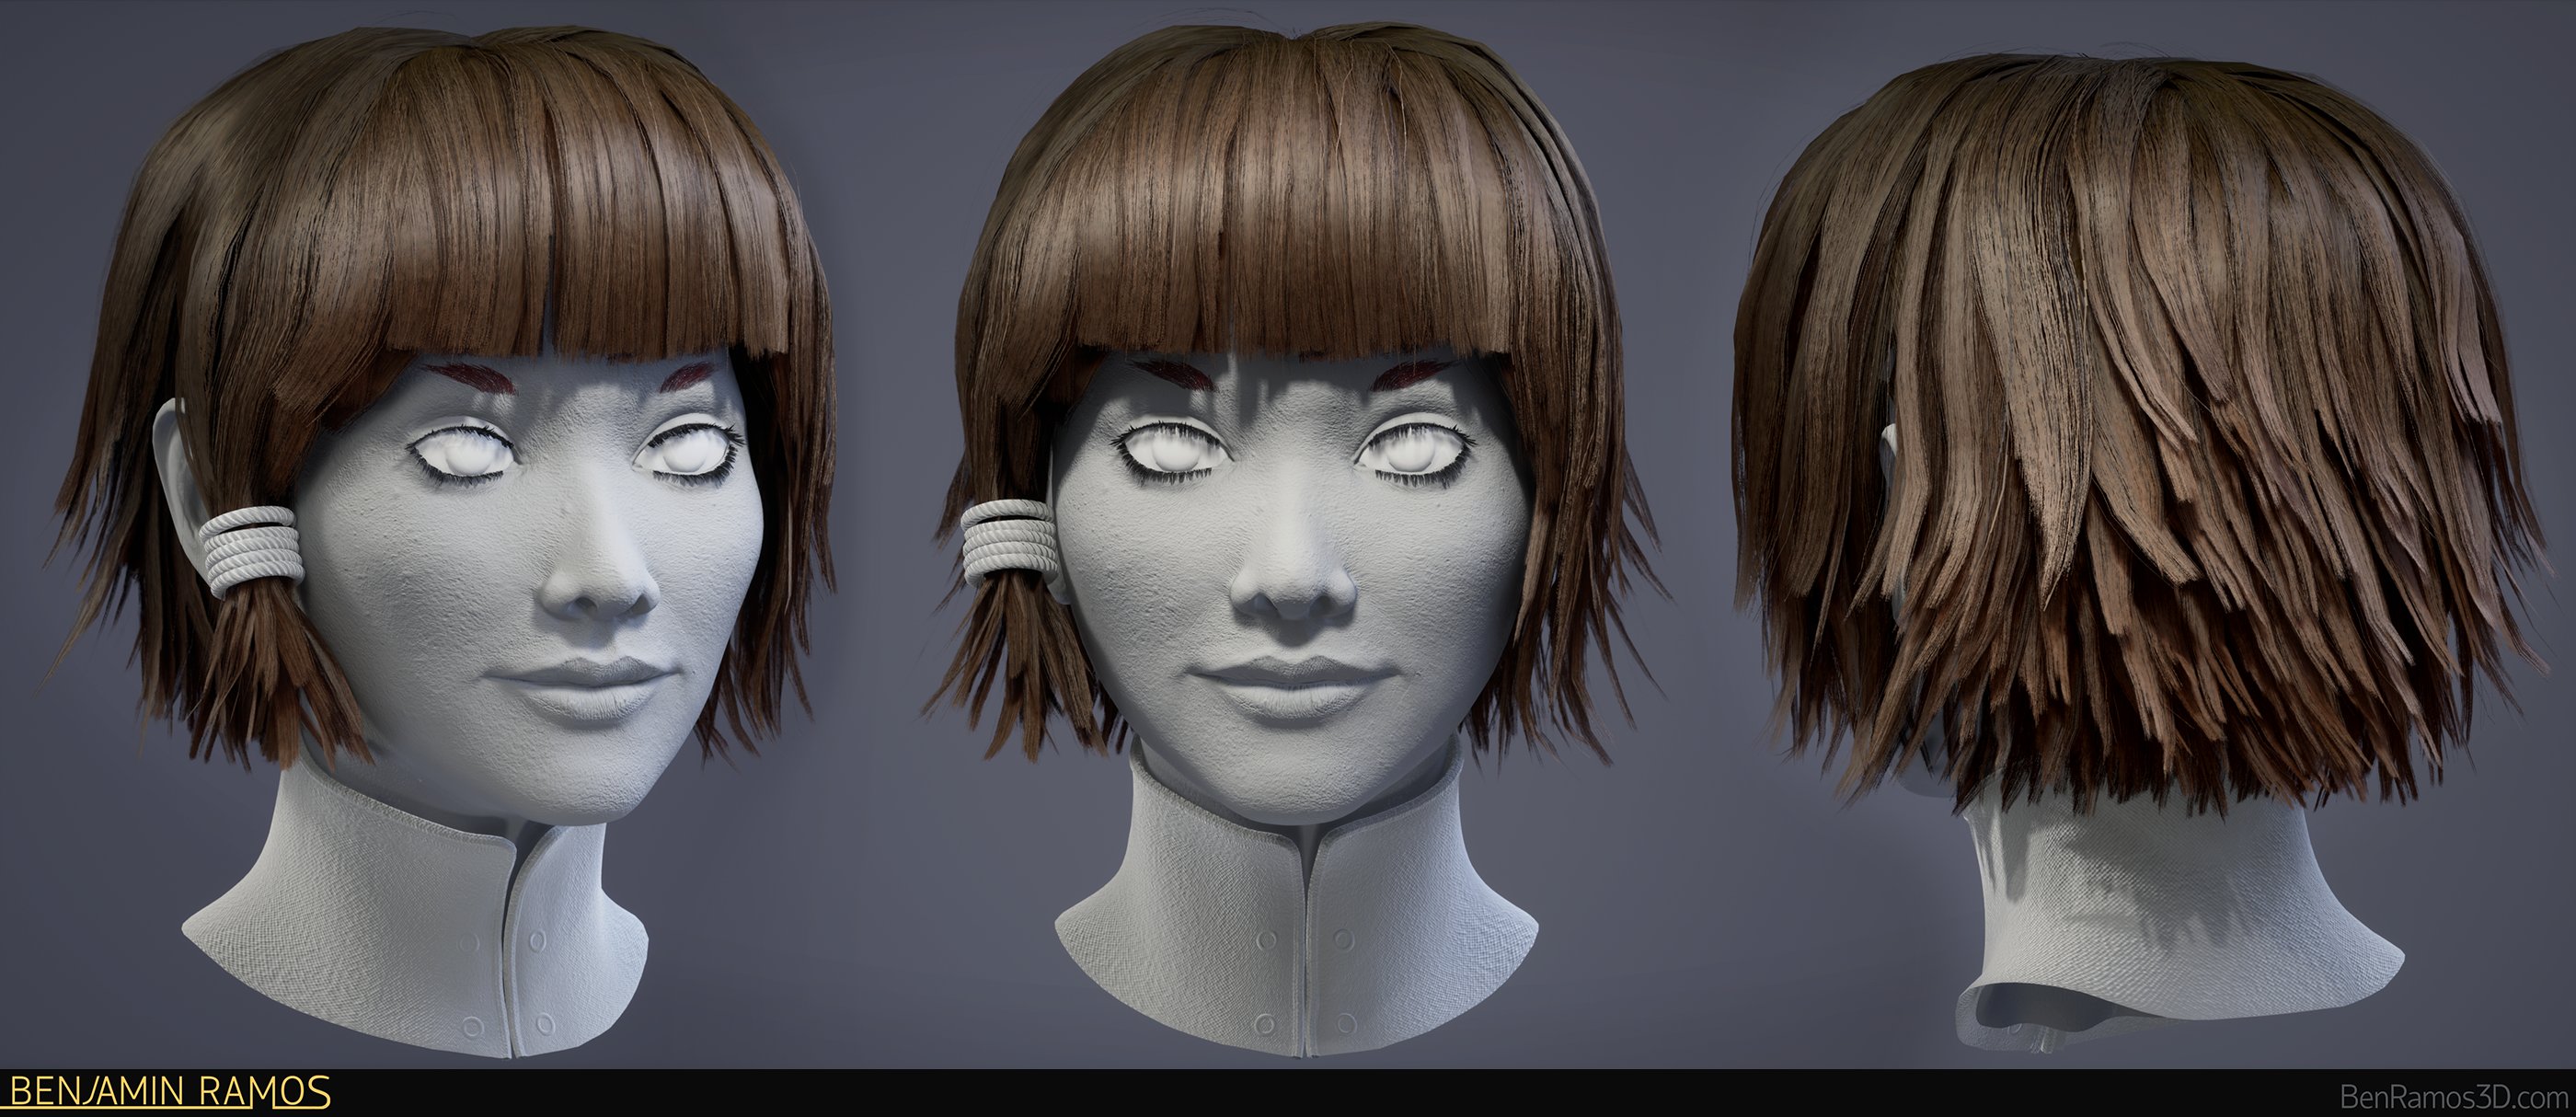
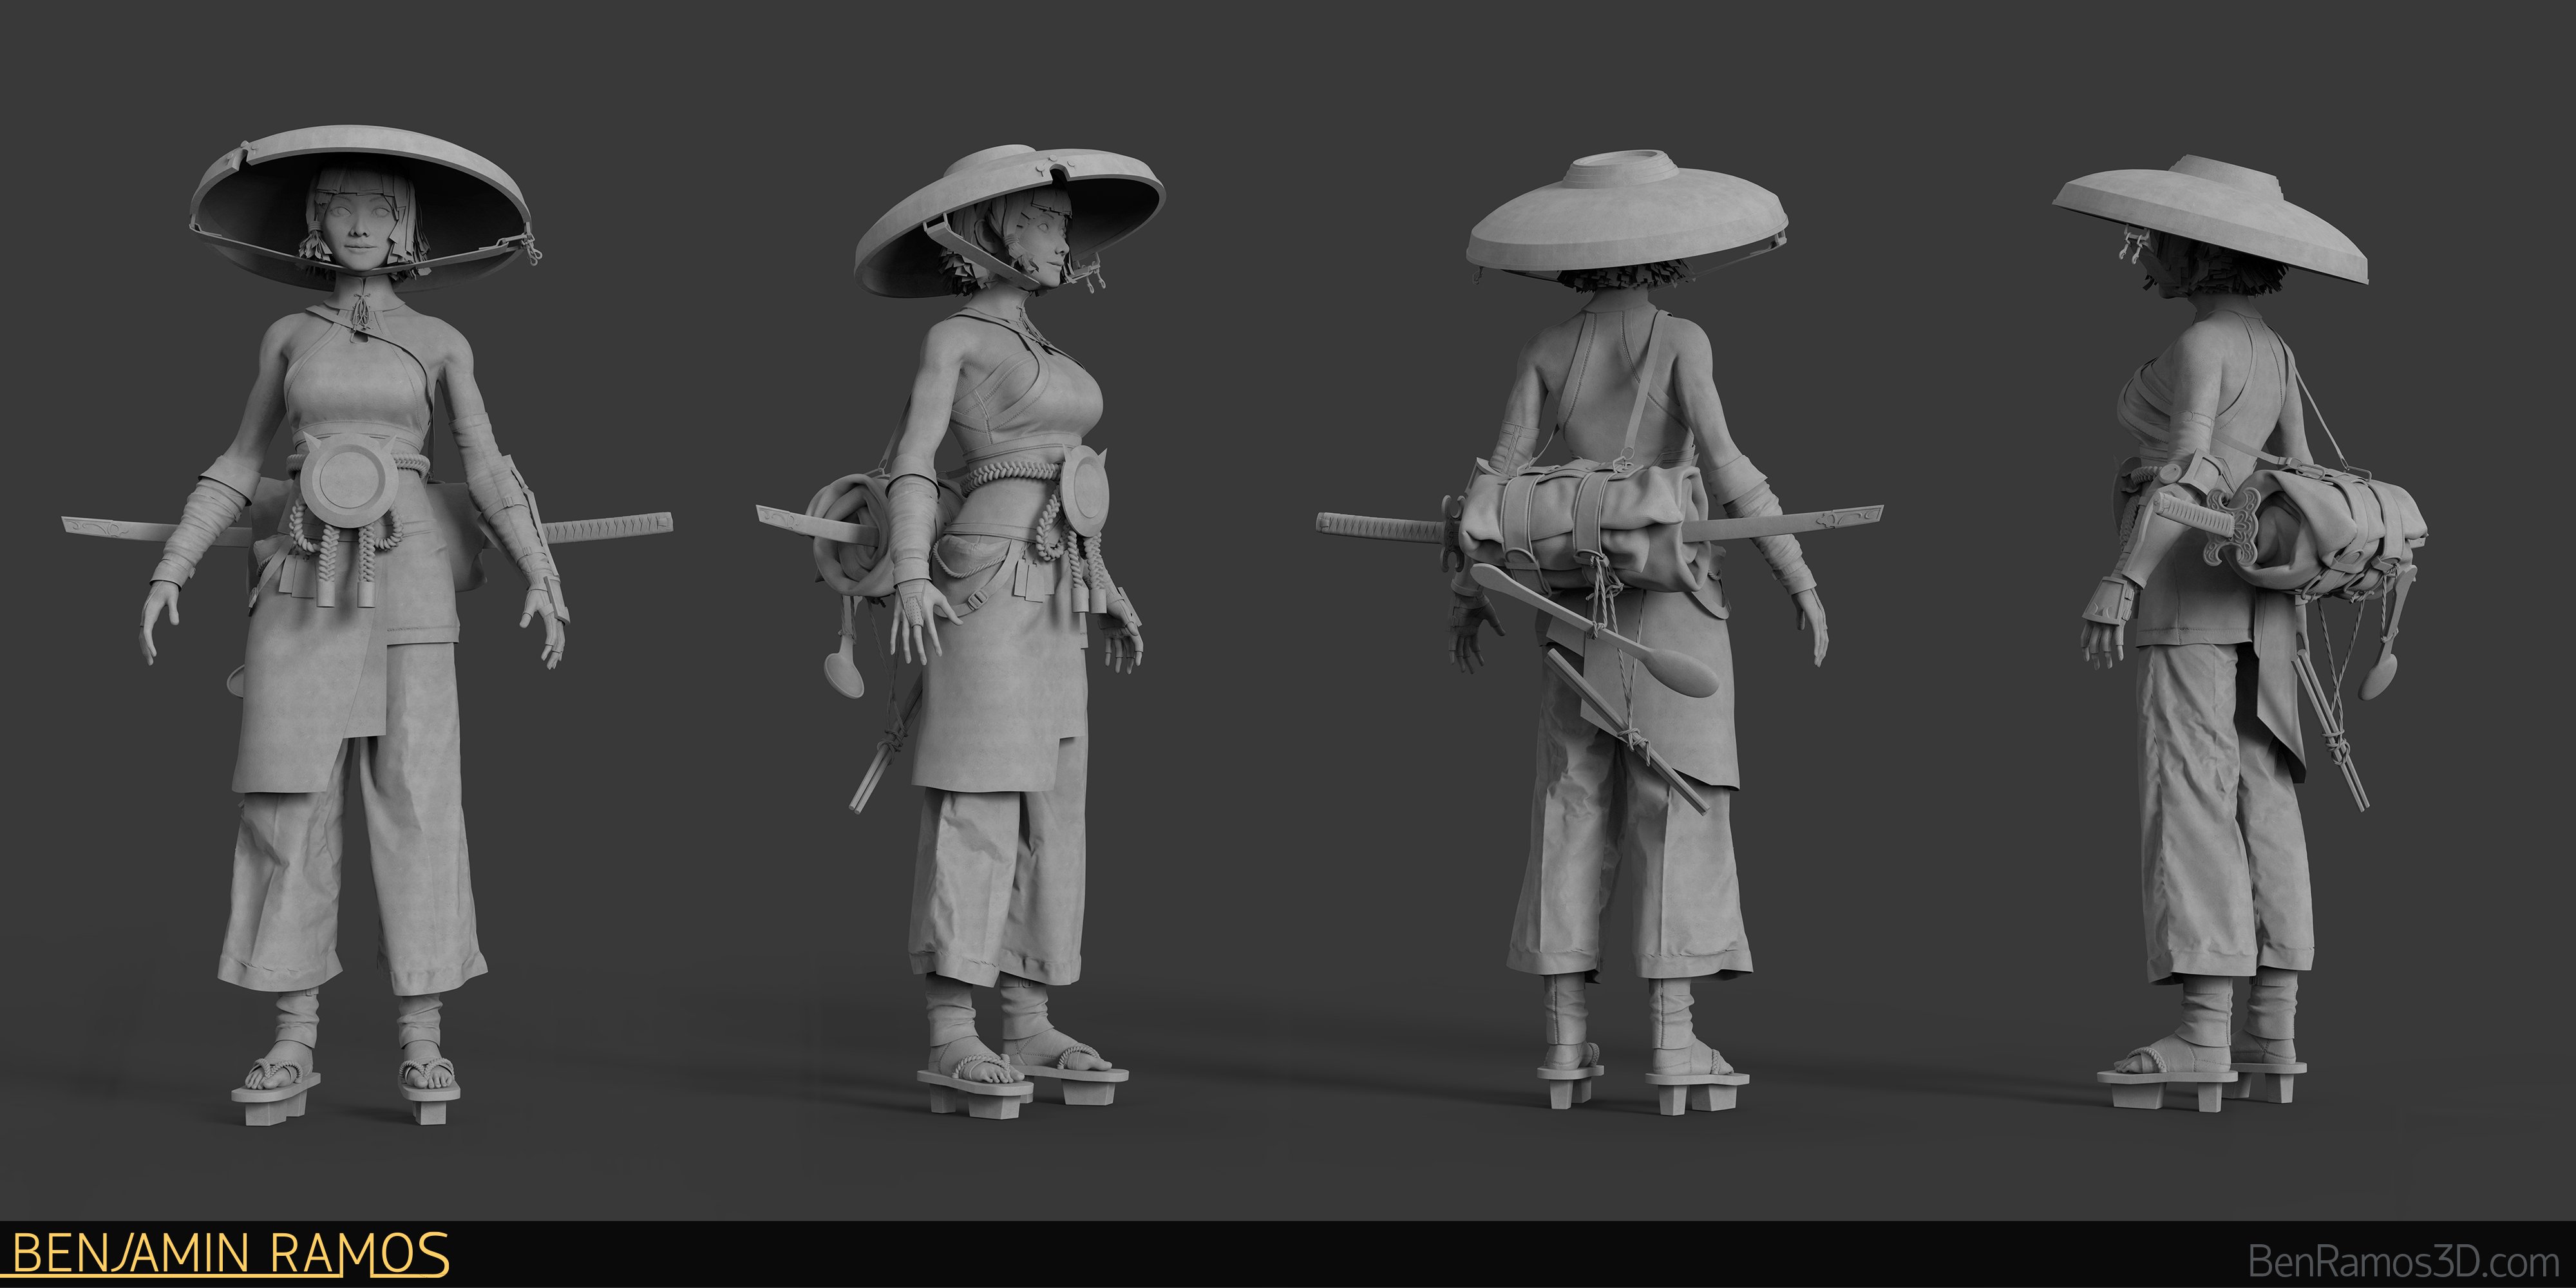
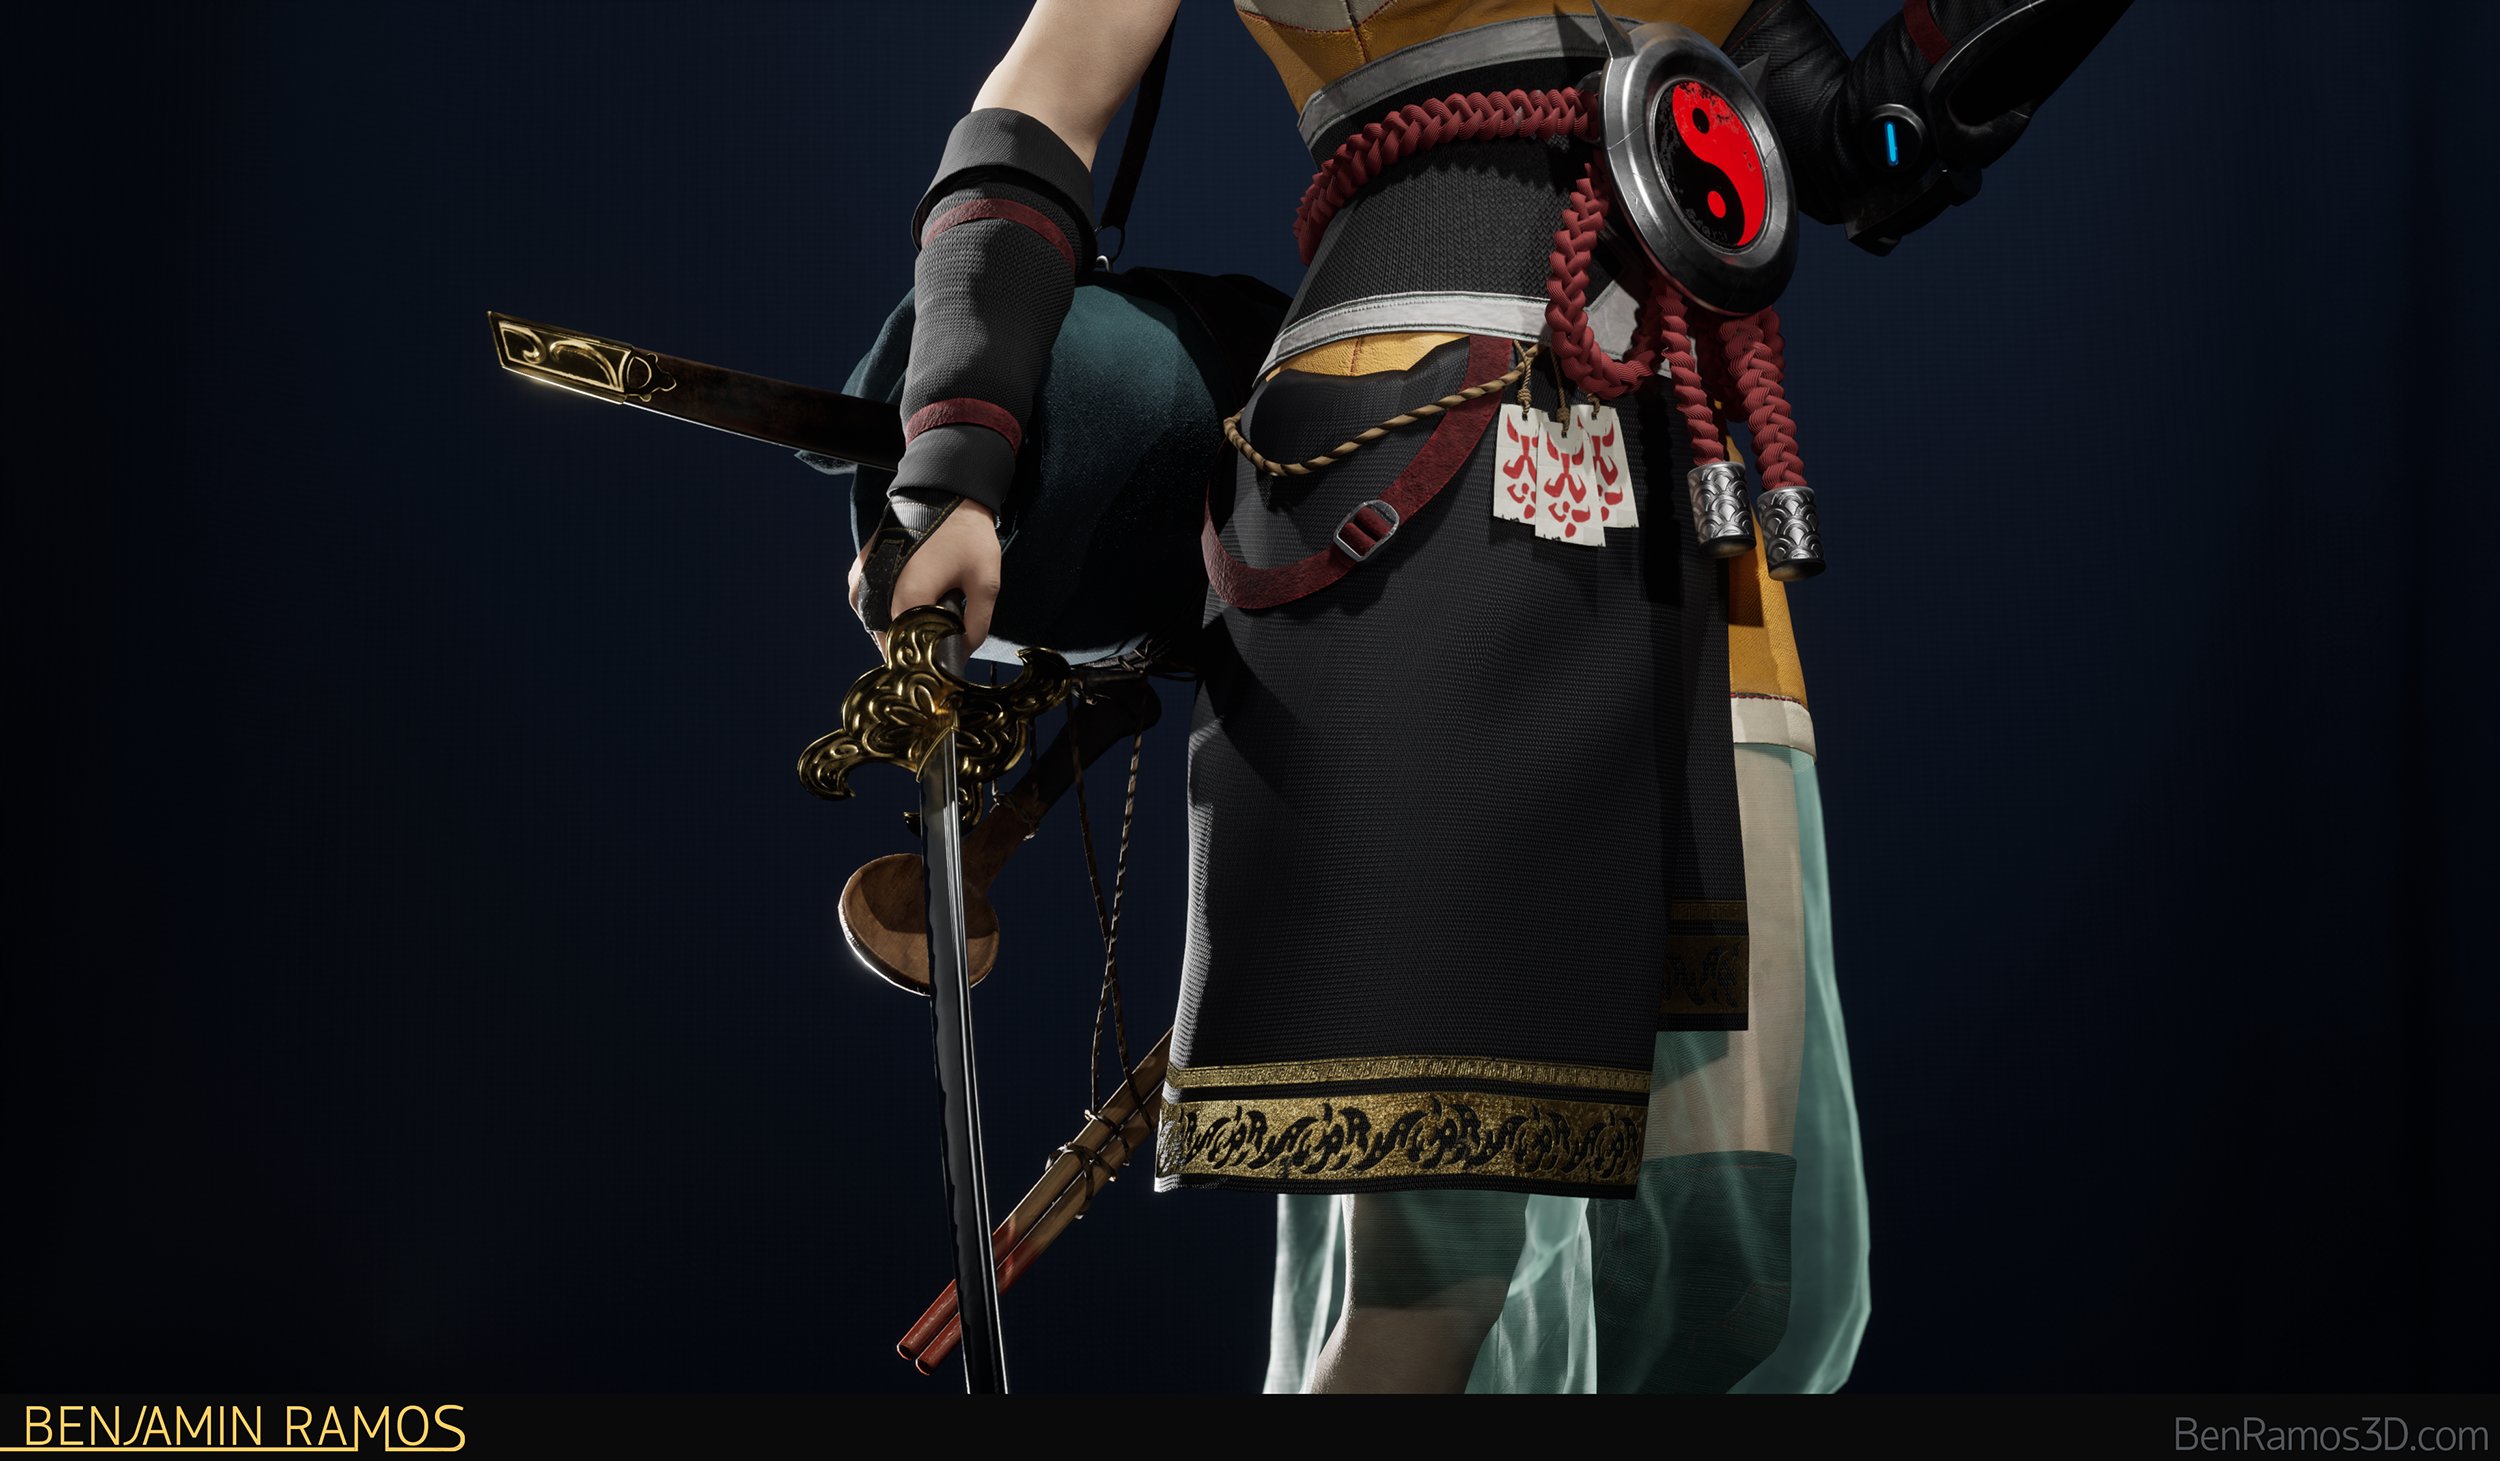
Anima - HINO
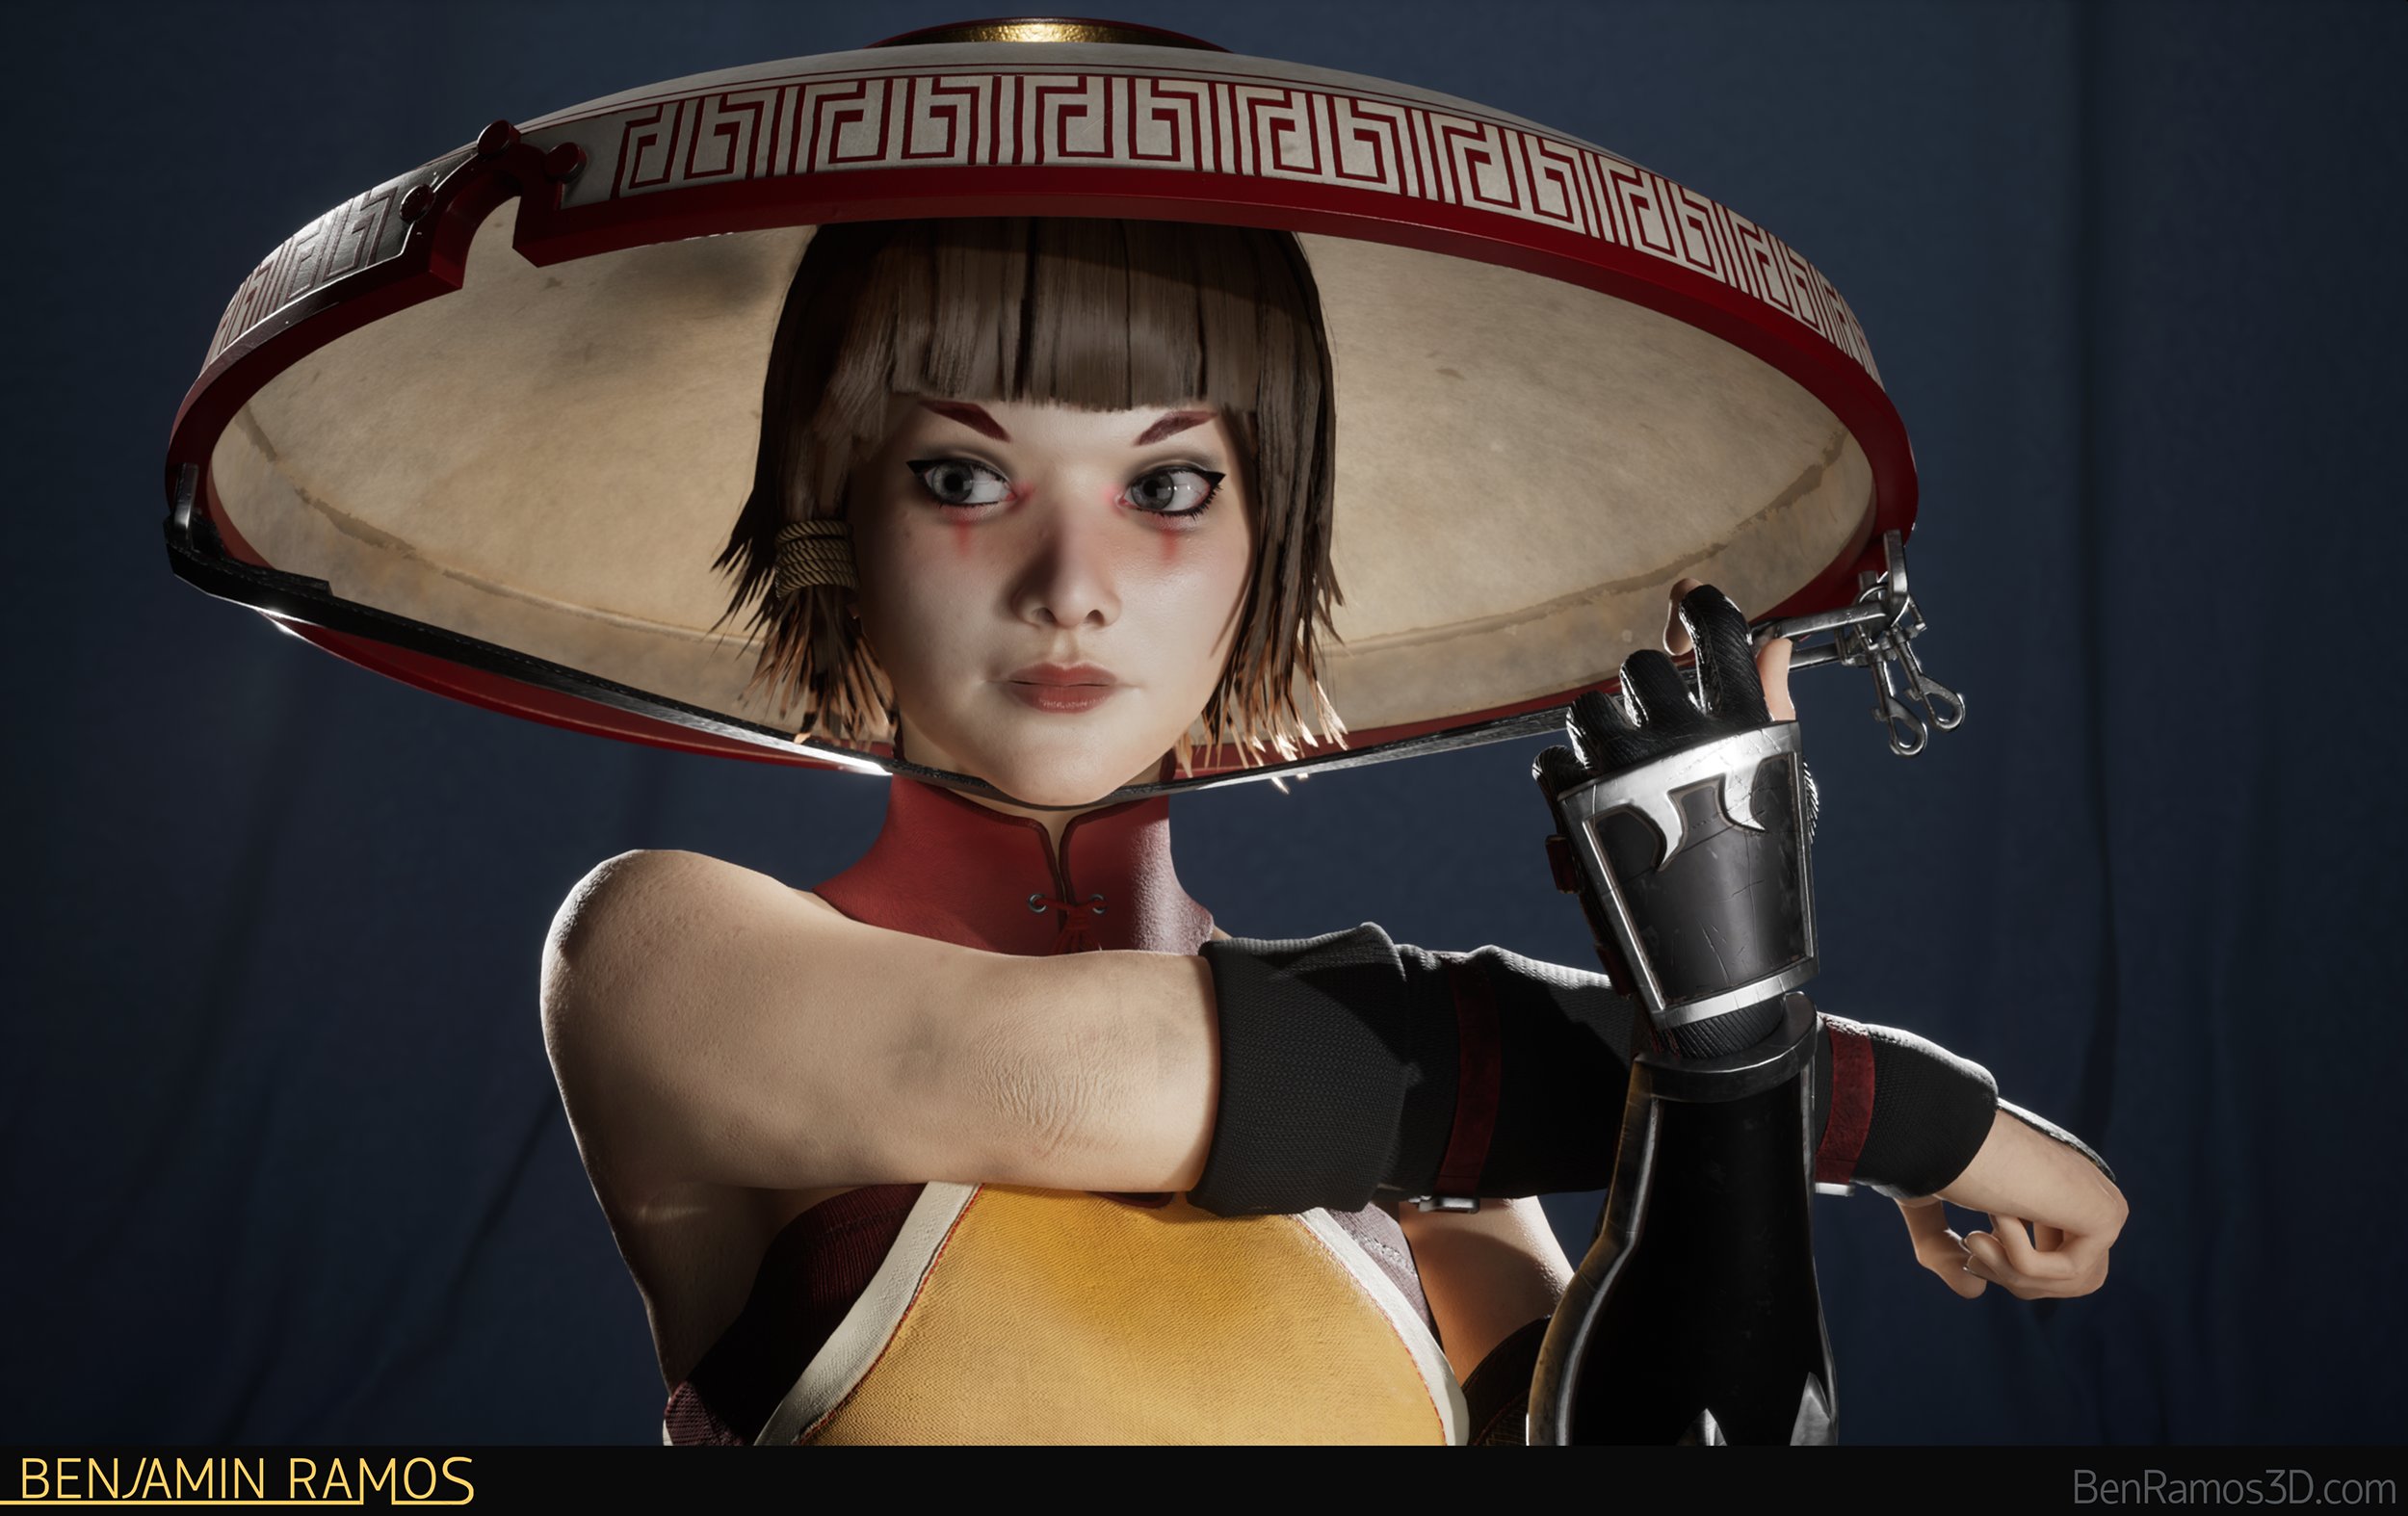
Hino was the last project I pursued as a Gnomon student under the careful eye of Damon Woods, my favorite sensei who I hope to one day surpass. For this project, I wanted to expand my texturing ability and get more practice working with hair cards. The character is based on a great concept by Garam Jeong, and the aim was to achieve a bar of quality similar to the character models in Final Fantasy 7 Remake.

During the course of this project I got the chance to implement multiple new techniques I haven't tried before, including following Yuriy Porubov's engraving guide (but modifying it to use XNormal instead of Zbrush as the wrapping tool), implementing the use of detail normals in my PBR shader through an alpha or RGB ID map, implementing a second set of UVs for my hair cards to create a stronger Ambient Occlusion effect, and building a custom fresnel material for the character's pants.
L E T S B R E A K I T D O W N


Detail Normal Graph
As I mentioned earlier, for this project I wanted to explore working with detail normals. I expanded my normal shader graph so that it would have the functionality to implement this by either using a black and white alpha to lerp the normals through, OR use an RGB mask to implement up to three different detail normals per material. Doing this allowed me to achieve a much higher fidelity in my texture quality. Can you spot the detail normals? :O

Fresnel Cloth Graph
One infuriating issue I ran into while working on this project was that when I tried to implement a fresnel material onto the character's pants, I was able to see a strange triangulation effect that I couldn't get rid of. After many nights tearing my way through youtube tutorials I realized that the sort order for my textures was reading the pants near the end, and thus wasn't able to produce the effect I wanted. To solve this I implemented a custom depth pass into my shader that would allow the engine to read the pants material first and display the transparency correctly. Shouts out to Dean Ashford on youtube for having just the right video to help me figure this out!
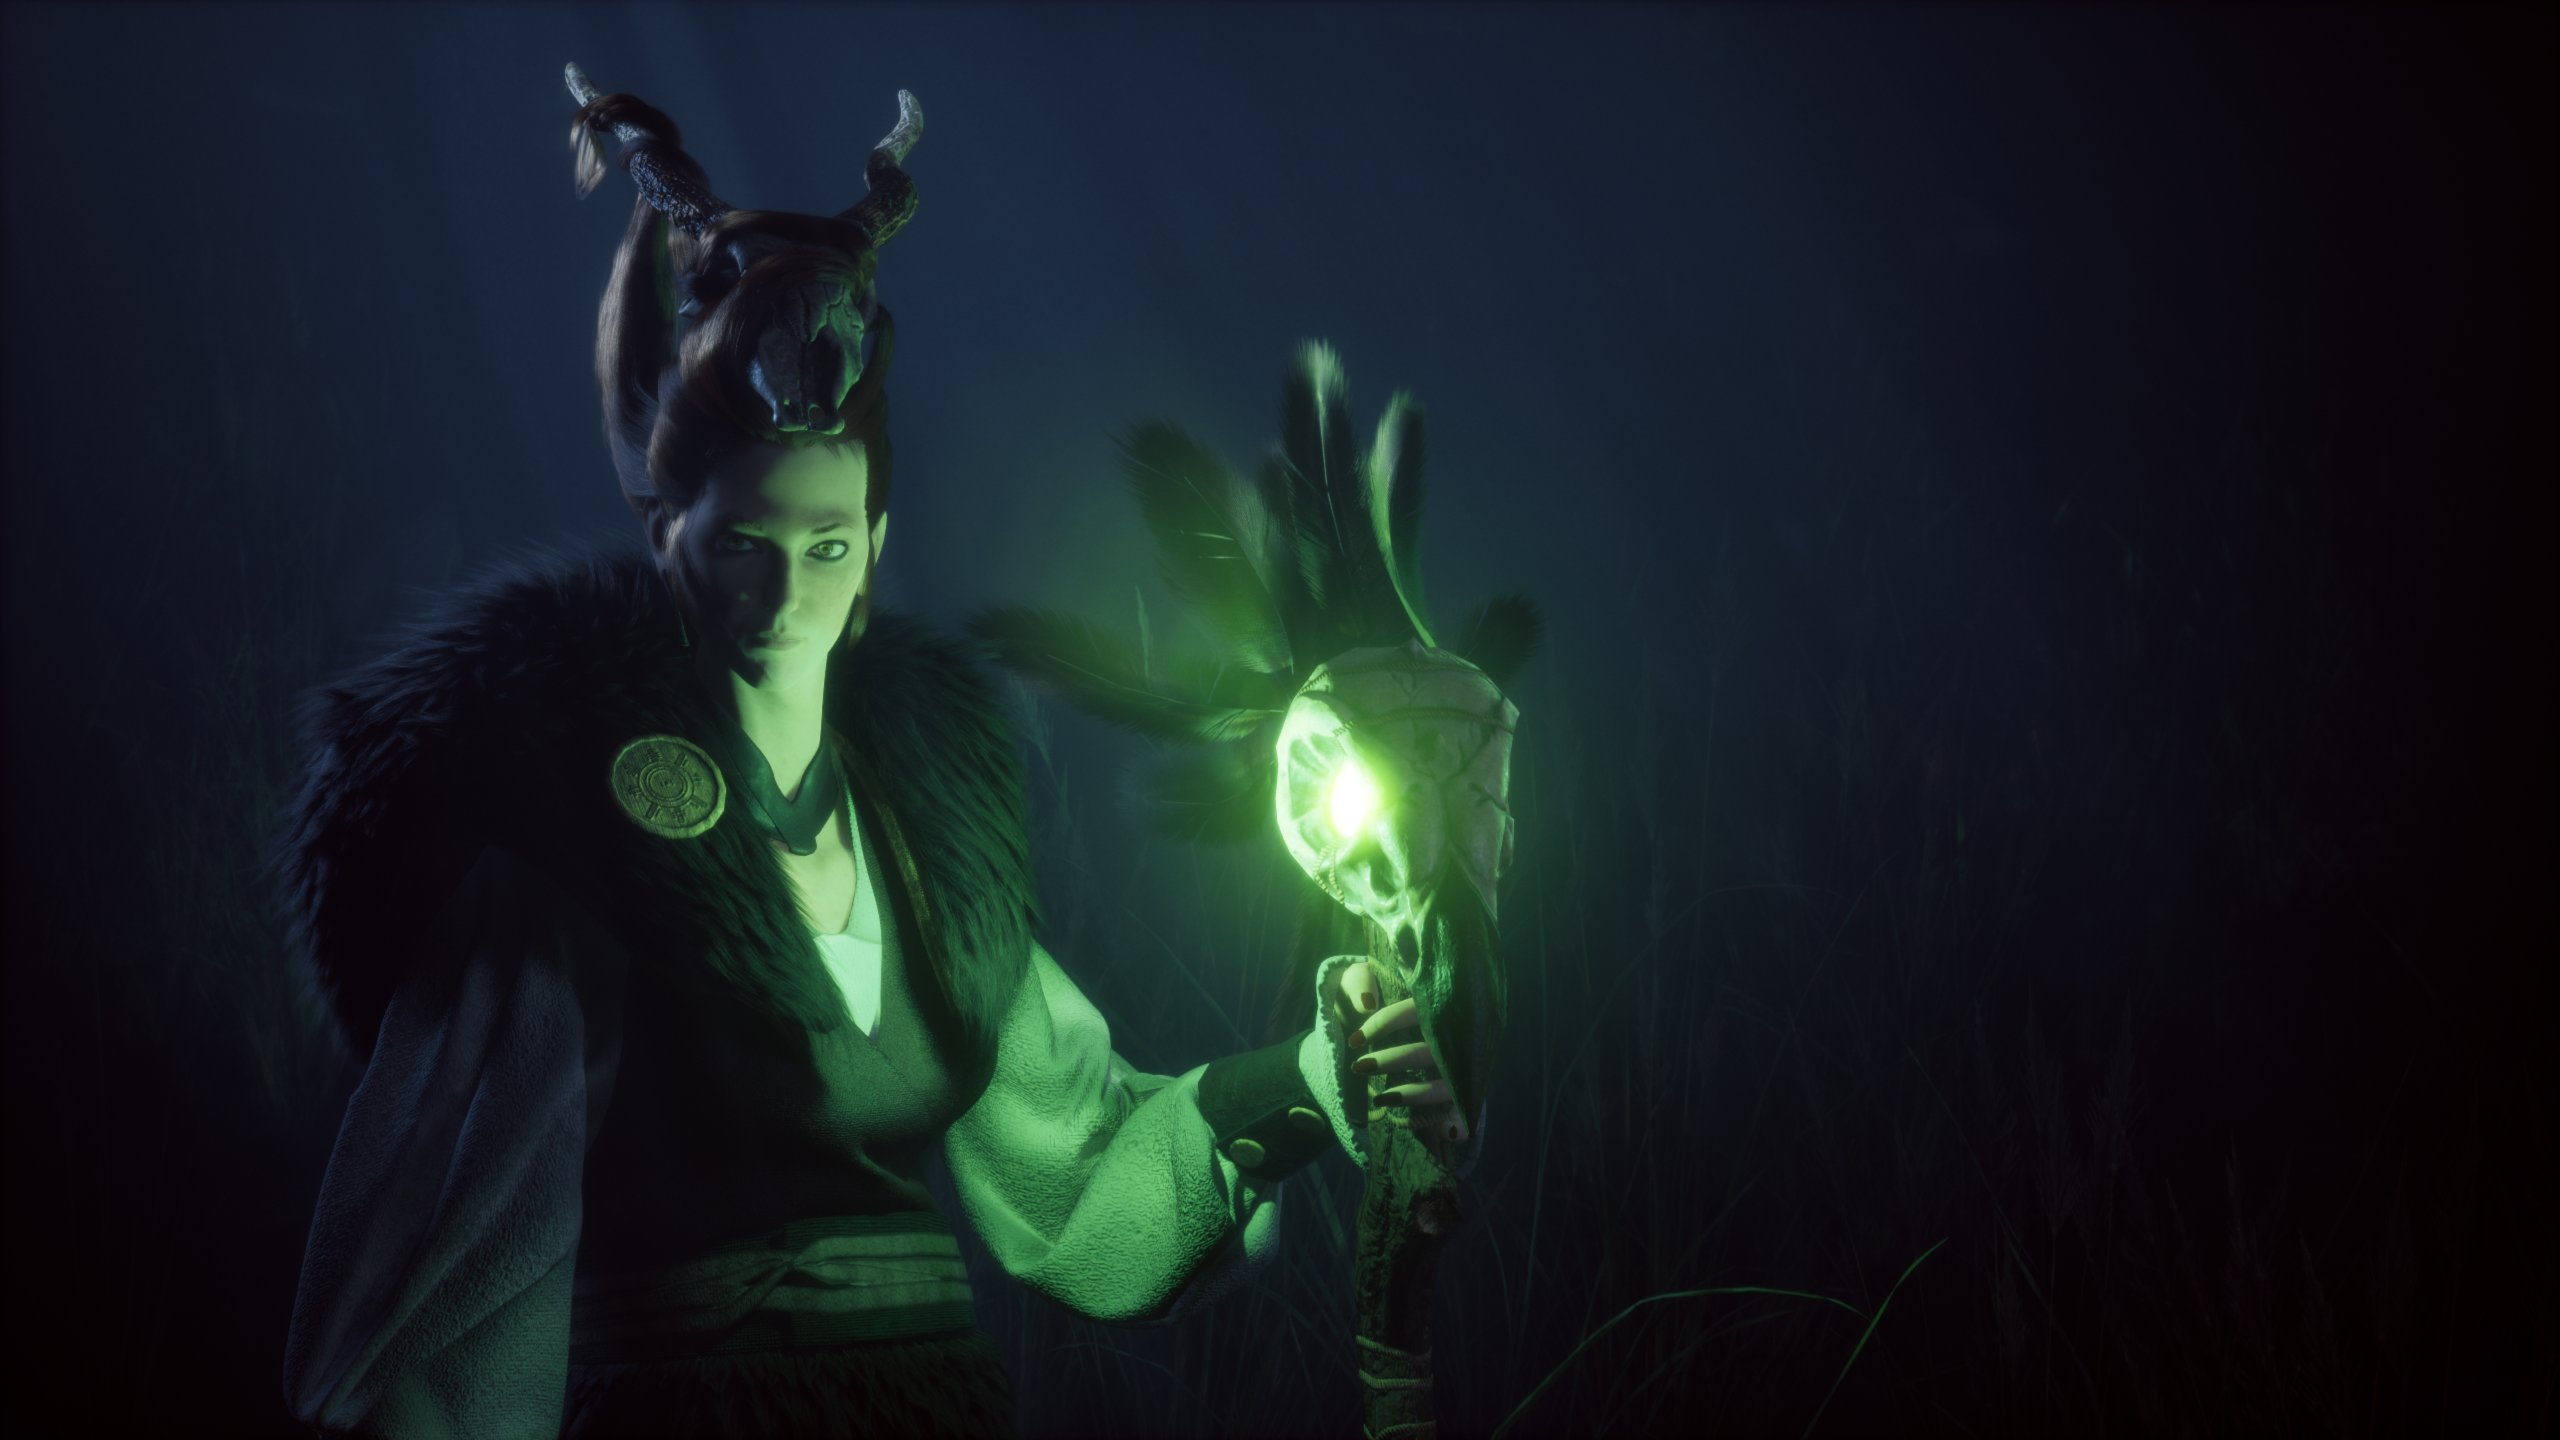
THE WOODS WITCH
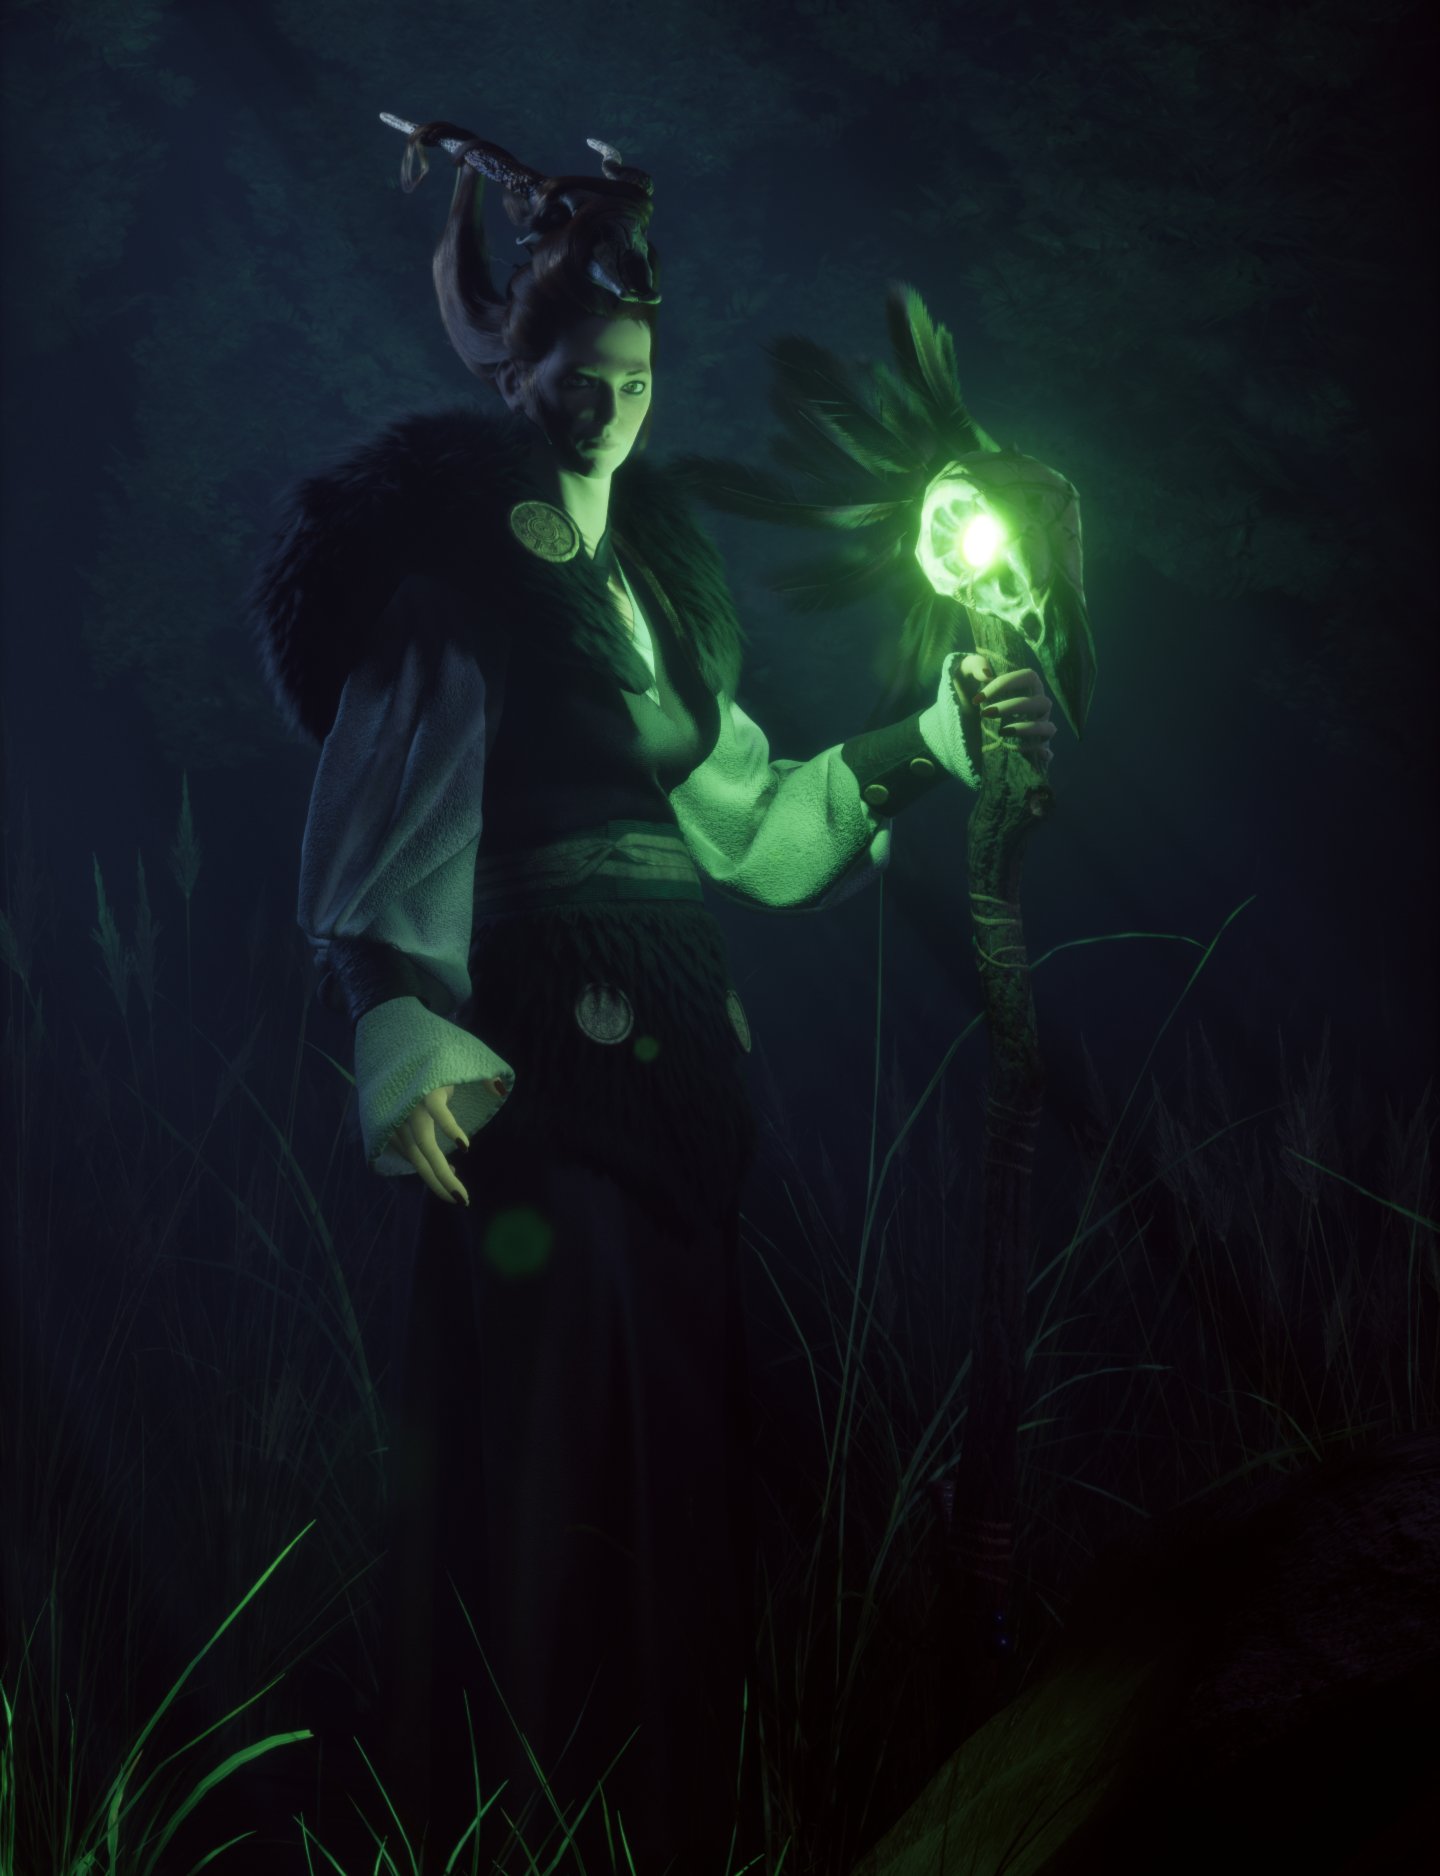
The Woods Witch was a model based on a character concept by Even Amundsen and a prop concept by Kerim Turay. The Woods Witch (or Aoife as I like to call her) was a long project that went through about four classes at Gnomon before I got it right. Kevin Hudson, Jackson Lukas, Sukru Gilman, and Miguel Ortega were the teachers who oversaw the success of this piece, and I also have my friends Pasquale Peregrino and Misha Draganiuc who helped me with the cloth simulation in Houdini.

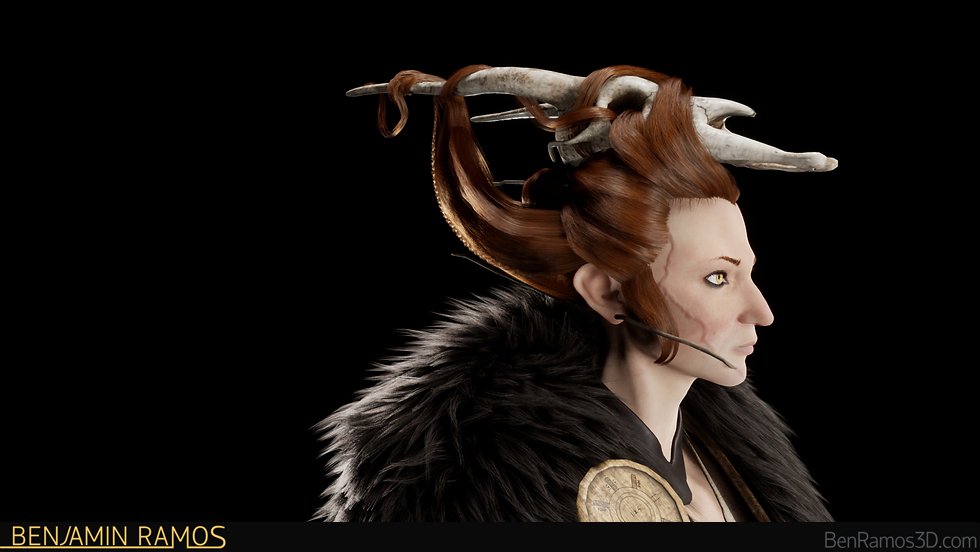
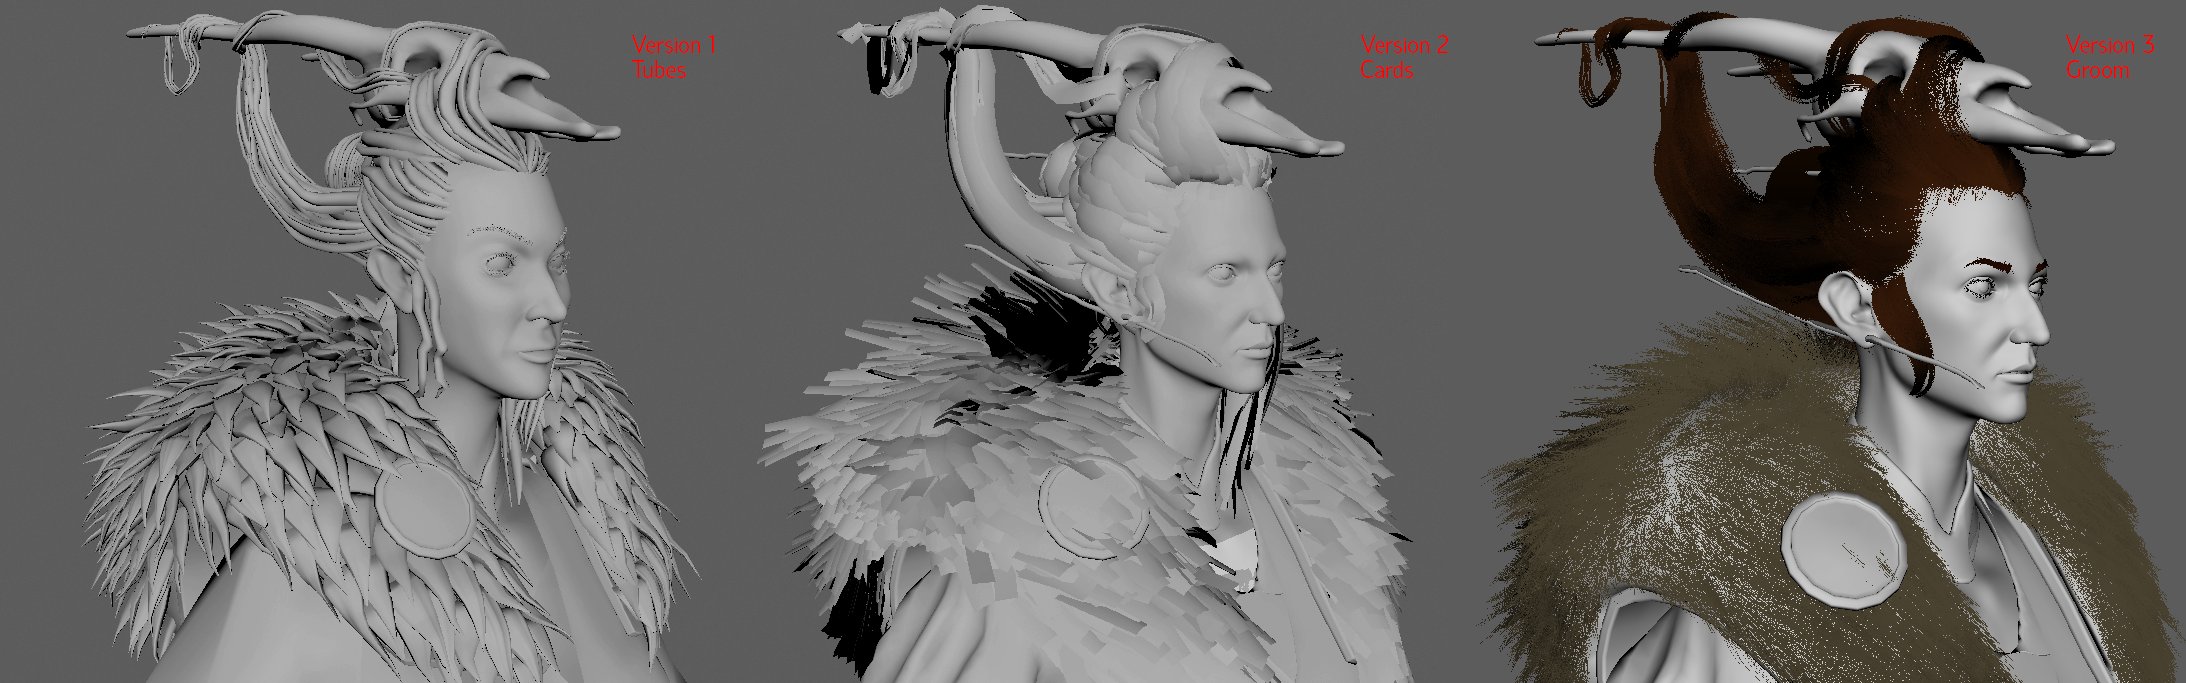
The most challenging part of this piece was without a doubt the grooming. At first, I tackled this piece with a Zbrush hair brush, before later trying cards, and finally settling on Yeti for grooming. Not only did I have to learn Yeti (which was the style at the time), but I had to figure out the alembic groom pipeline for Unreal Engine, alongside my friend Soohyun Cho, since our professor was not versed in the software. This proved to be a precious endeavor though, as I learned a ton about alembic grooms in Unreal Engine, and using Yeti, which translated into future projects. The videos I found most helpful came from Epic Games, specifically the Hair at Strand Level and Creating Realistic Hair and Feathers in Unreal Engine videos (and accompanying Meerkat Demo Project for UE4)

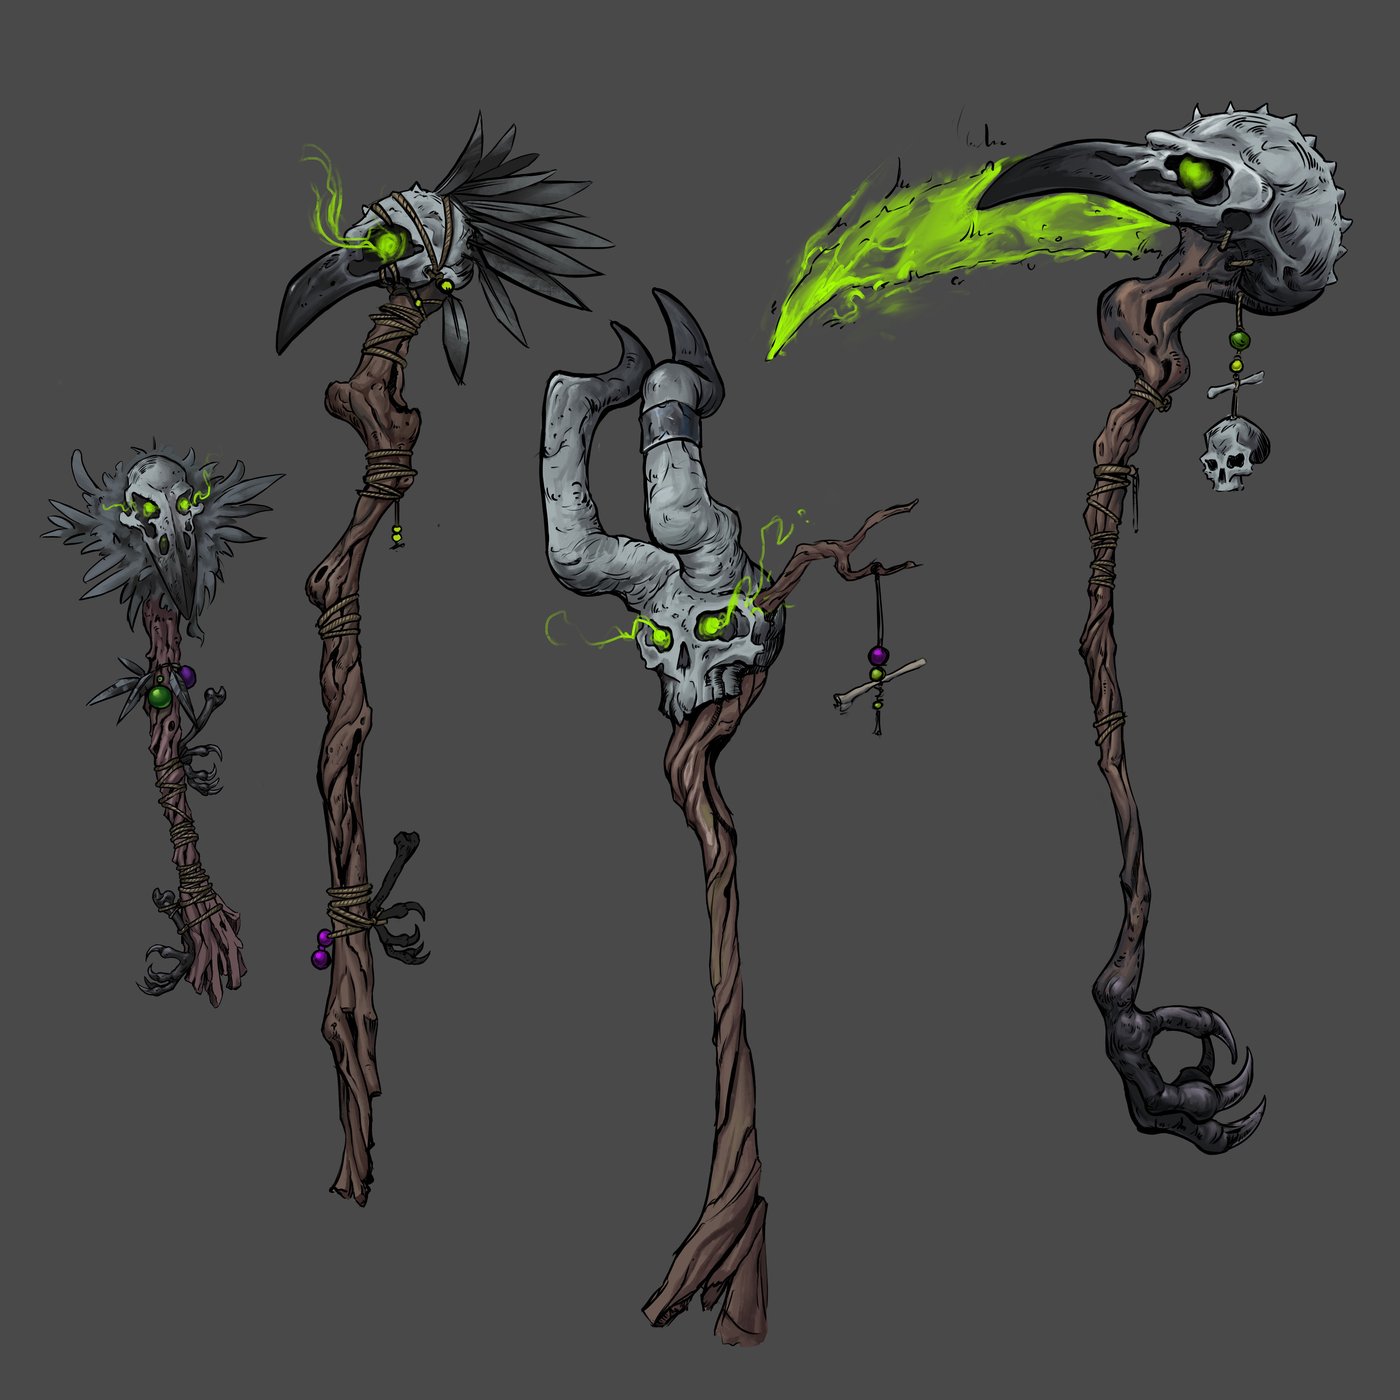
Character concept by Even Mehl Amundsen -> Staff concept by Kerim Turay
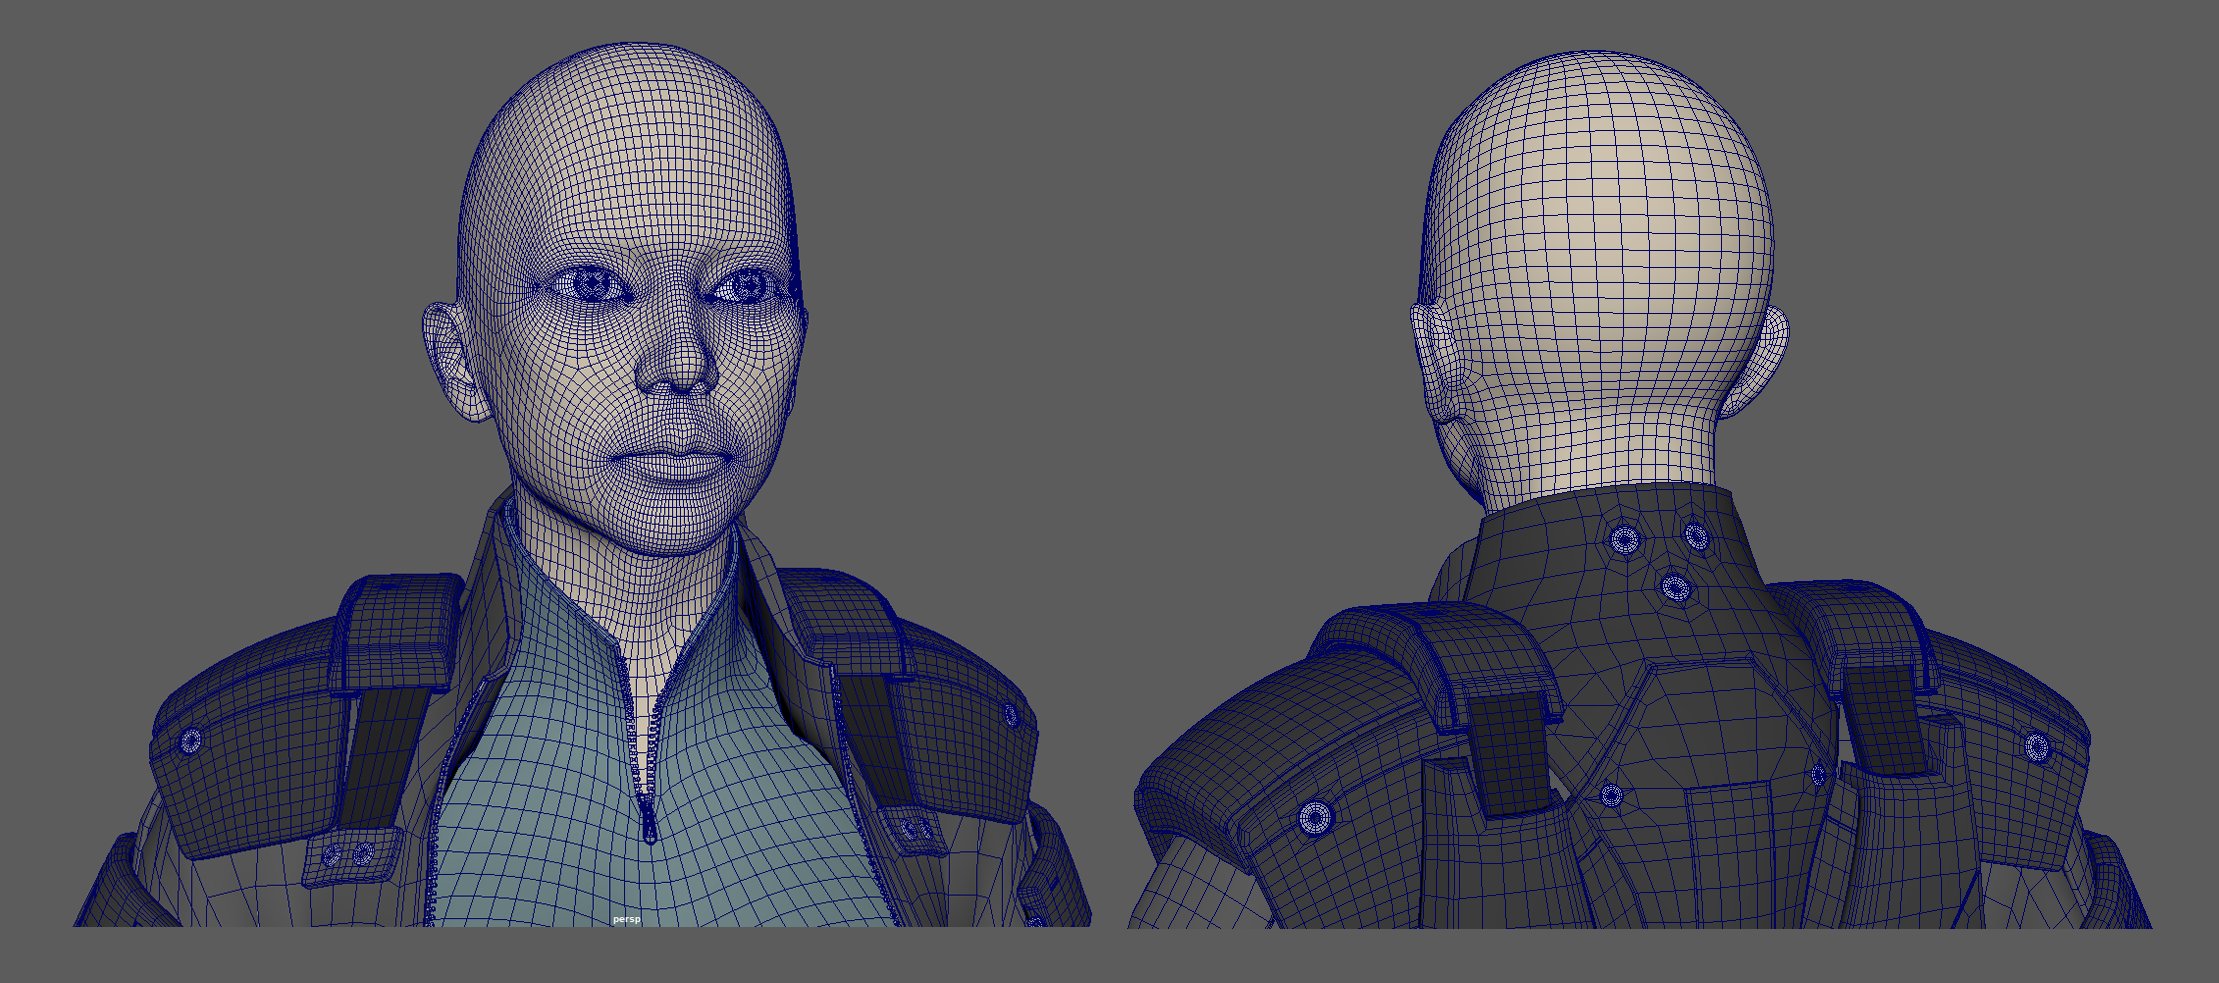
MAJOR KUSANAGI AND TACHIKOMA
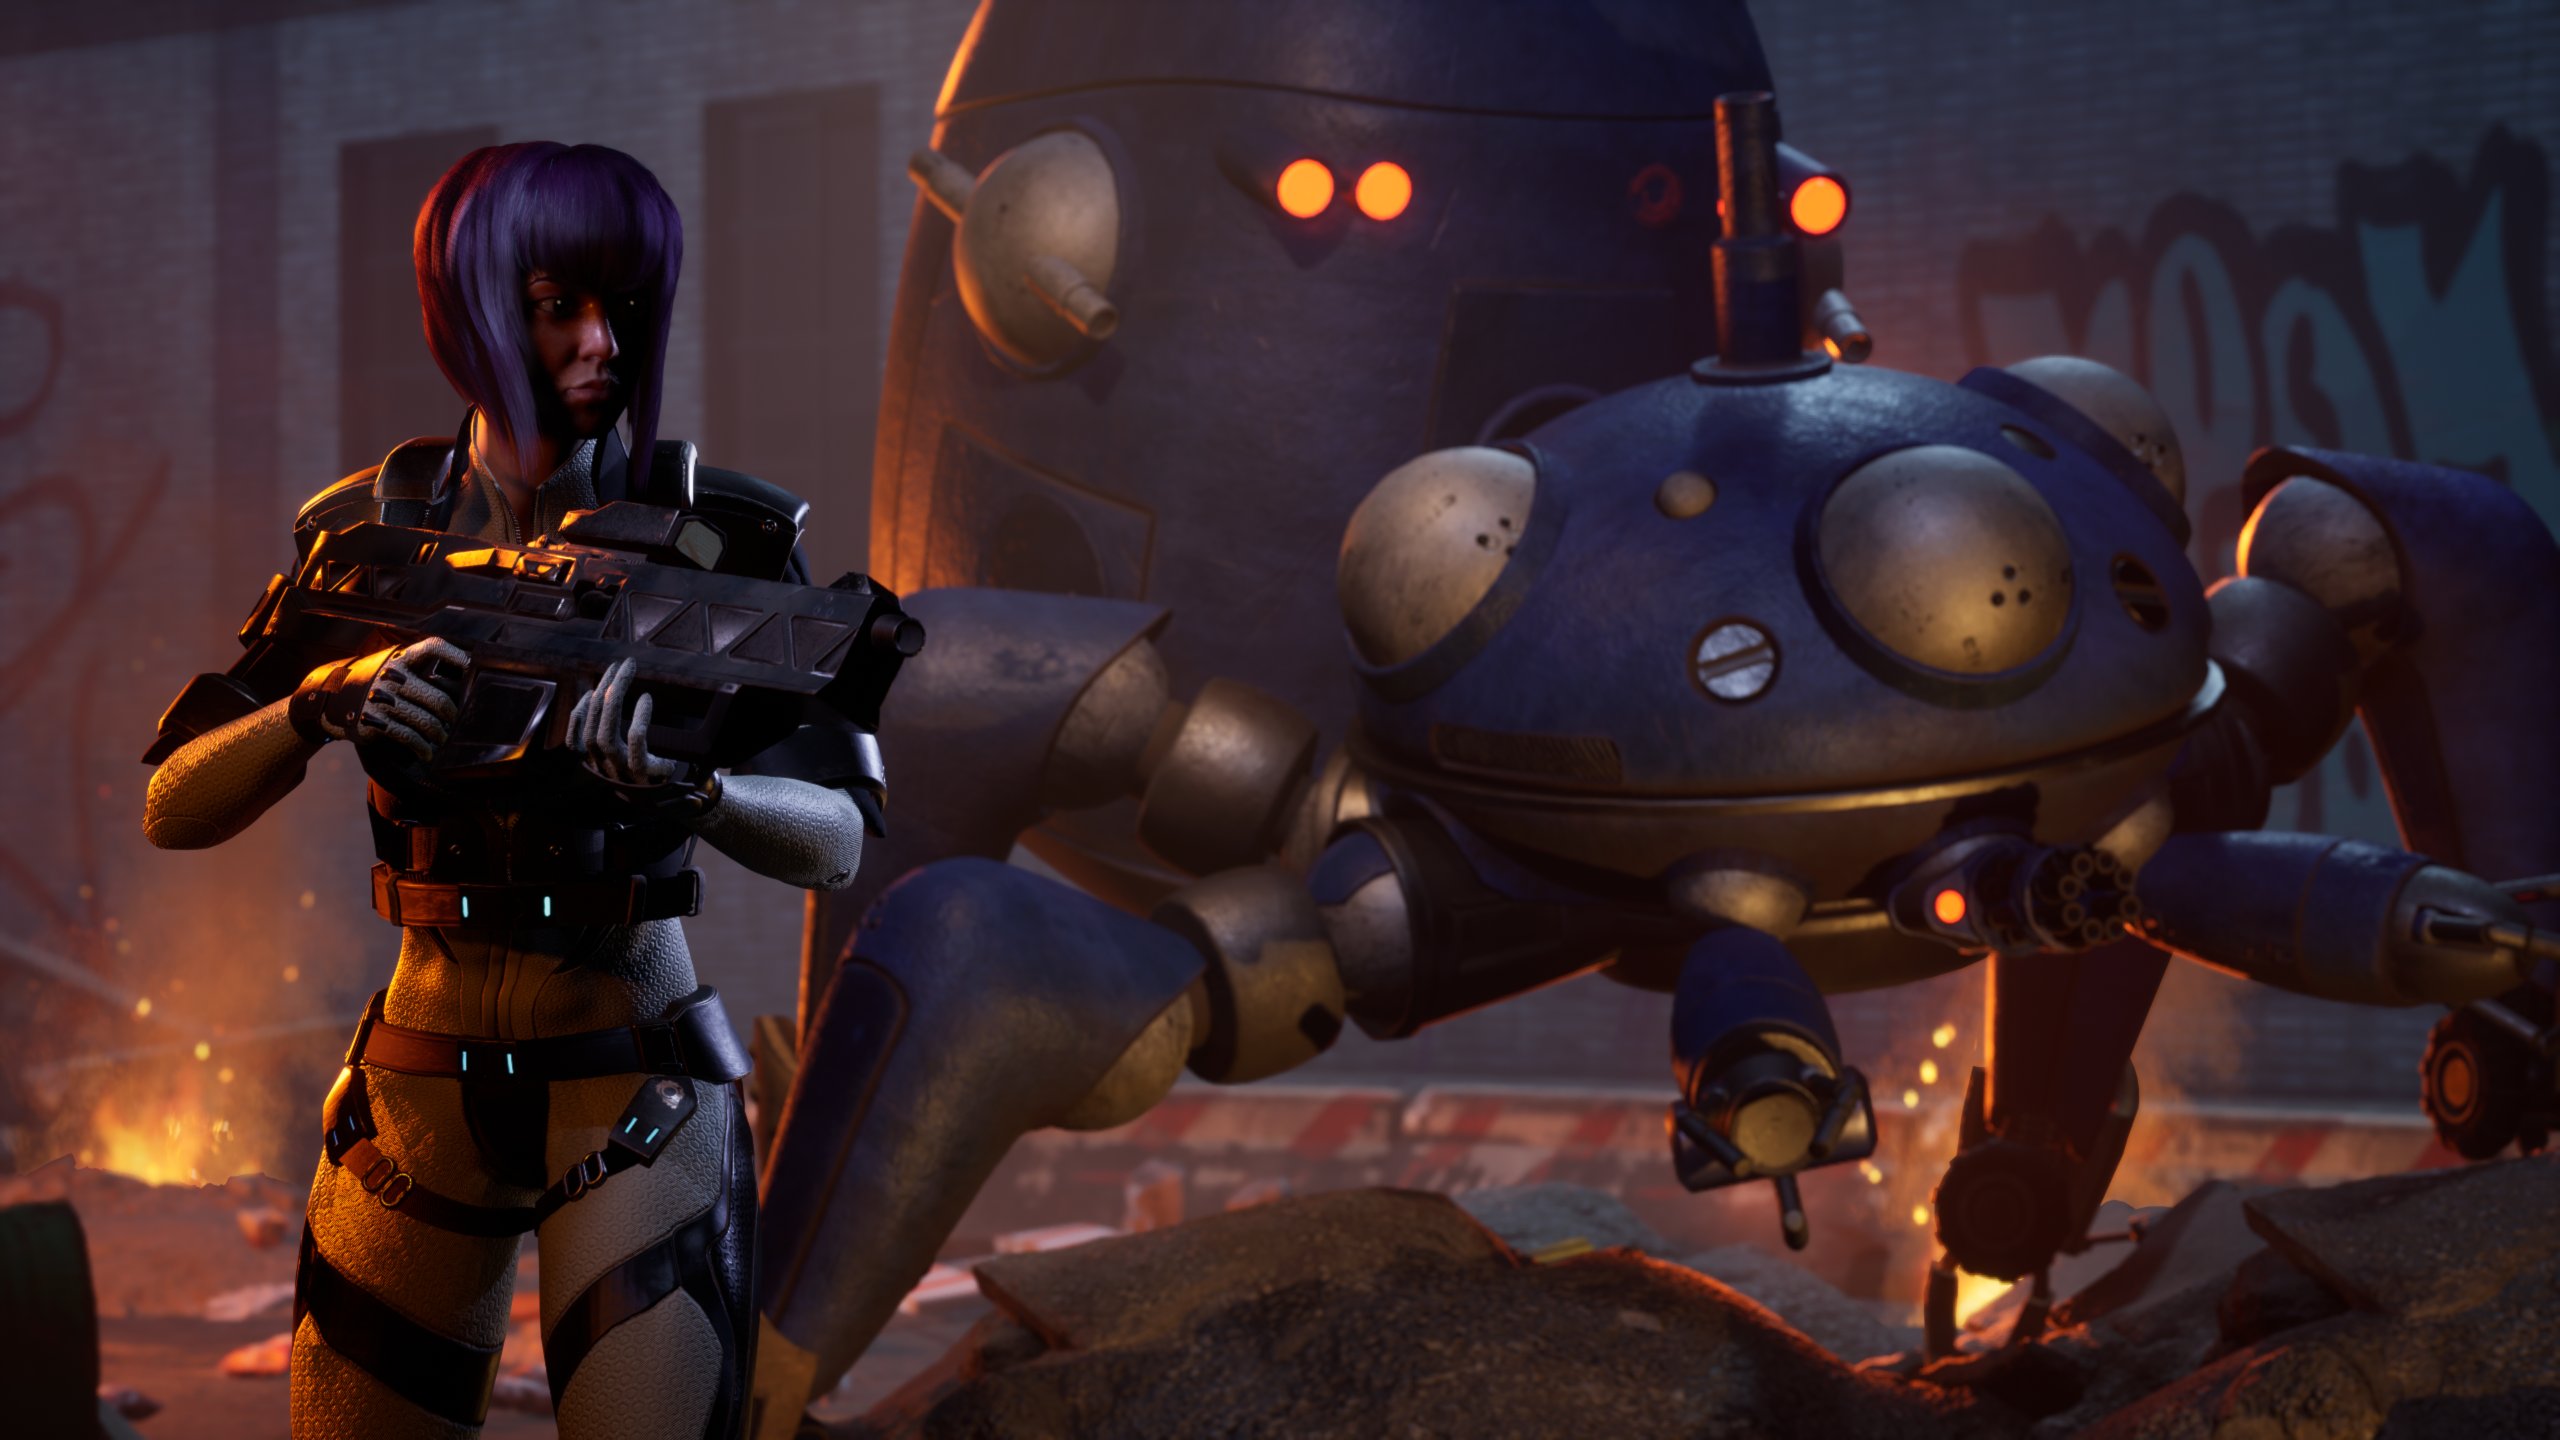
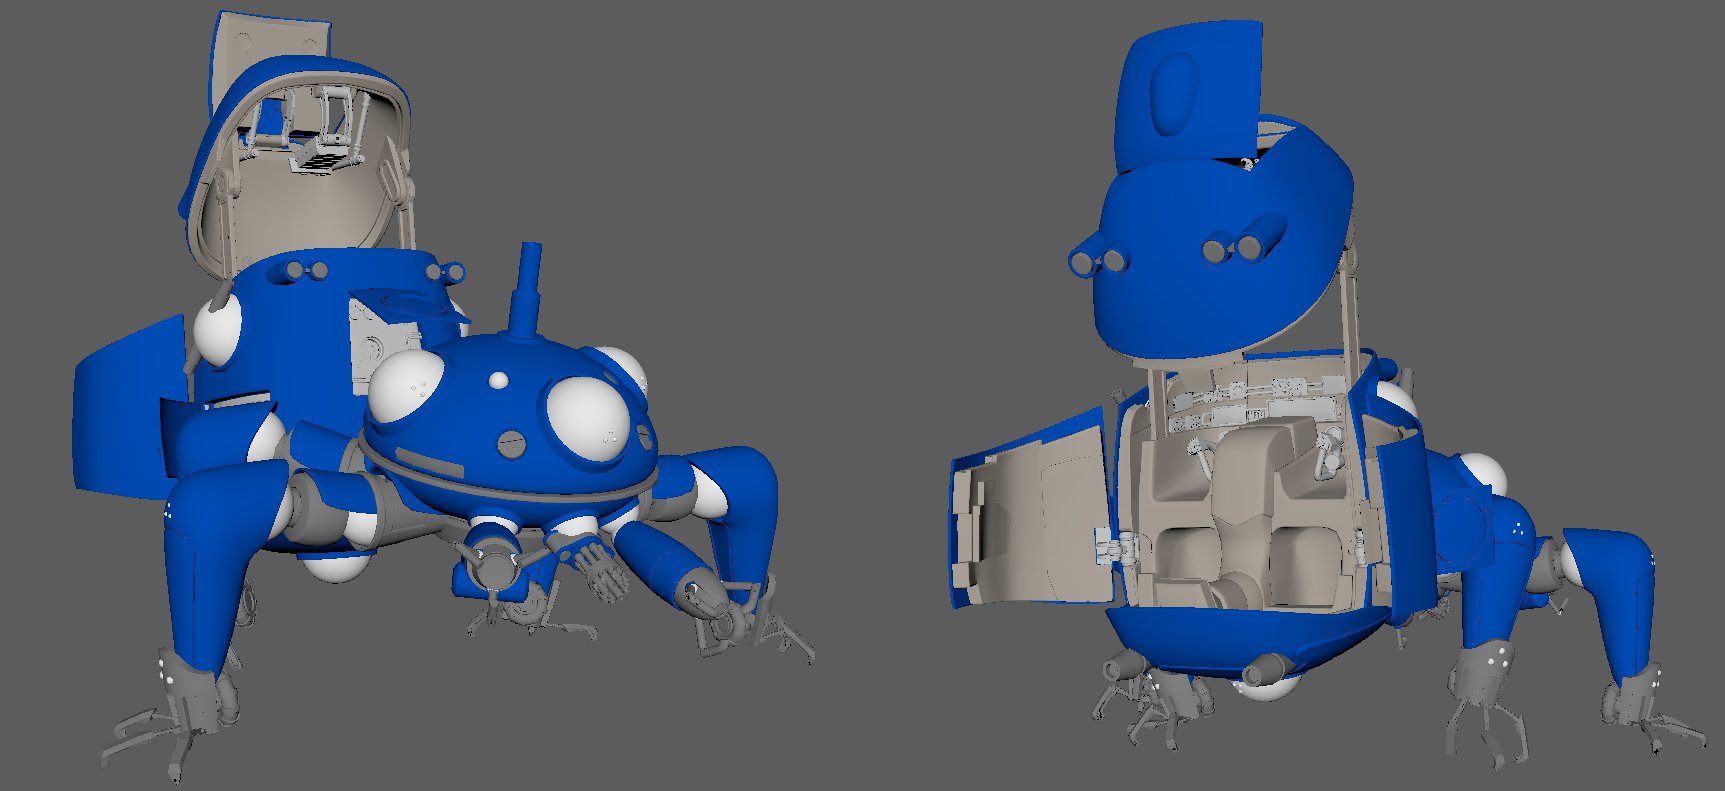
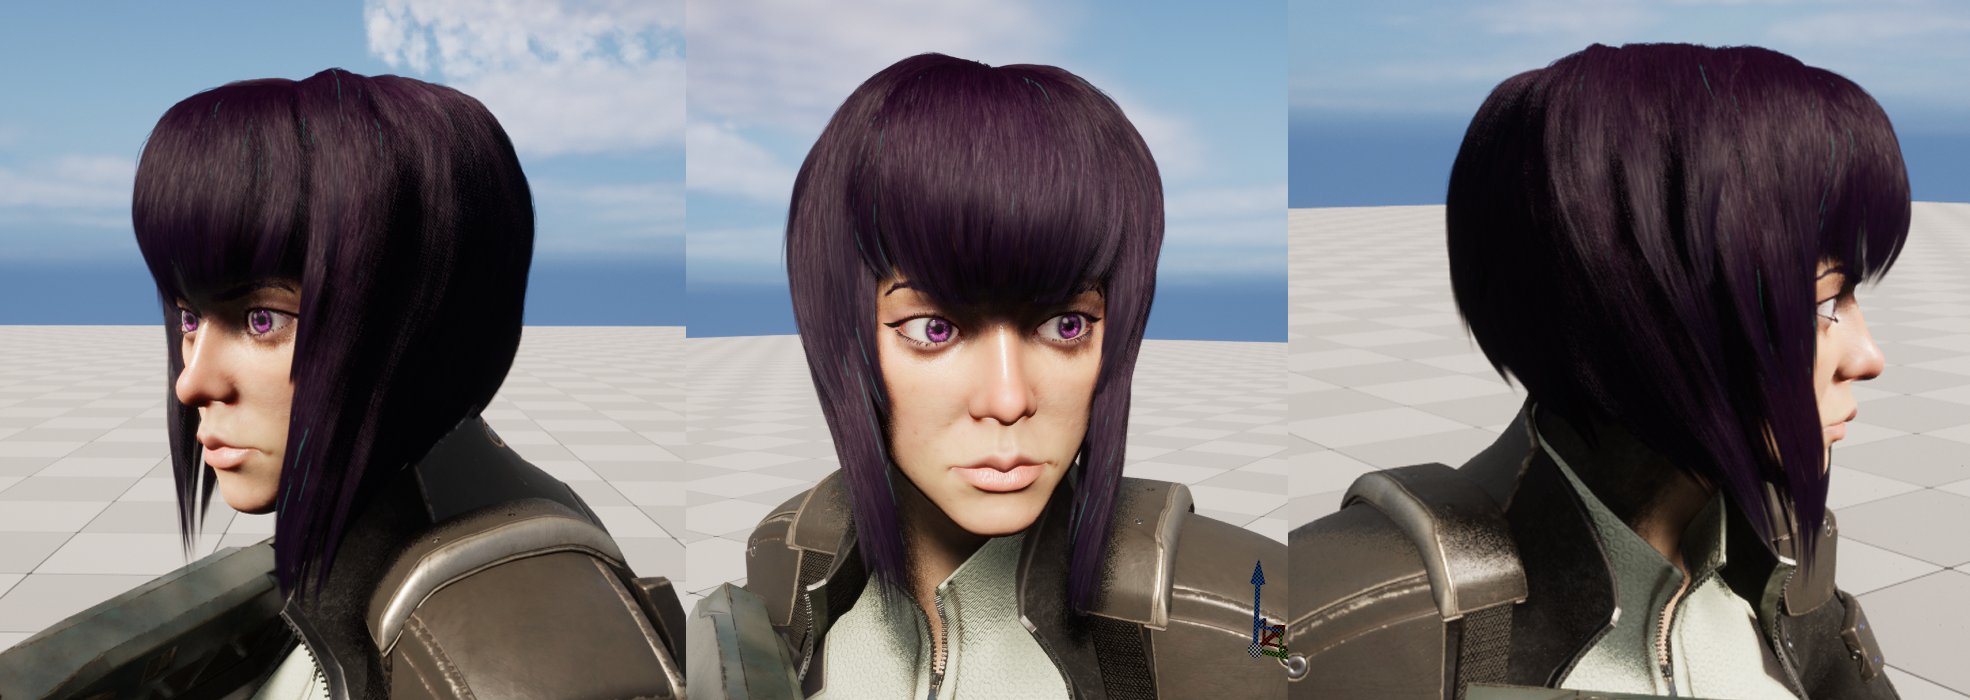
My penultimate project at Gnomon was a scene depicting Major Kusanagi and a Tachikoma from Ghost in the Shell: Stand alone Complex. This project was a 10 week project I worked on during my final Demo Reel class with Miguel Ortega, with some assistance on the groom from Jackson Lukas. I had previously modeled the Tachikoma Think Tank during David Mooy's Hard Surface Modeling 1 class, and was approached by a fantastic Rigger named Dominic Barrierre who wanted to rig a set of robots for his own reel. Taking that lead, I decided I wanted to do a real-time Ghost in the Shell scene that included the Tachikoma and a brand new model of Major Kusanagi, the show's main protagonist.
The first part of this project started before the term began. I tasked myself with cleaning up the old Tachikoma model and also modeling a brand new interior for the abdomen section of the robot. Once I was finished with this step, I passed the model off to Dom and began work on the Major.
The Major proved to be a challenge from the start. Before I began modeling, I created a breakdown of the concept and gathered a ton of references that would aid in the process. I started off using a base mesh I bought from Javier Zuccarino on the Artstation marketplace and then used Zbrush to sculpt the bodysuit and head. Next I used a TexturingXYZ full face displacement map that was fitted to the low poly model’s UVs to displace the high resolution details onto the face, and then used a set of skin brushes to fill in the spots that were not covered by the map. Because I had used a base mesh I was able to quickly generate the low poly mesh for the head, and then used an awesome plugin called Zwrap to generate the low poly mesh for the bodysuit, with a little bit of Quad Draw in Maya to fill in the blanks. Once all this was finished, I moved on to Marvelous Designer for the next step of modeling.
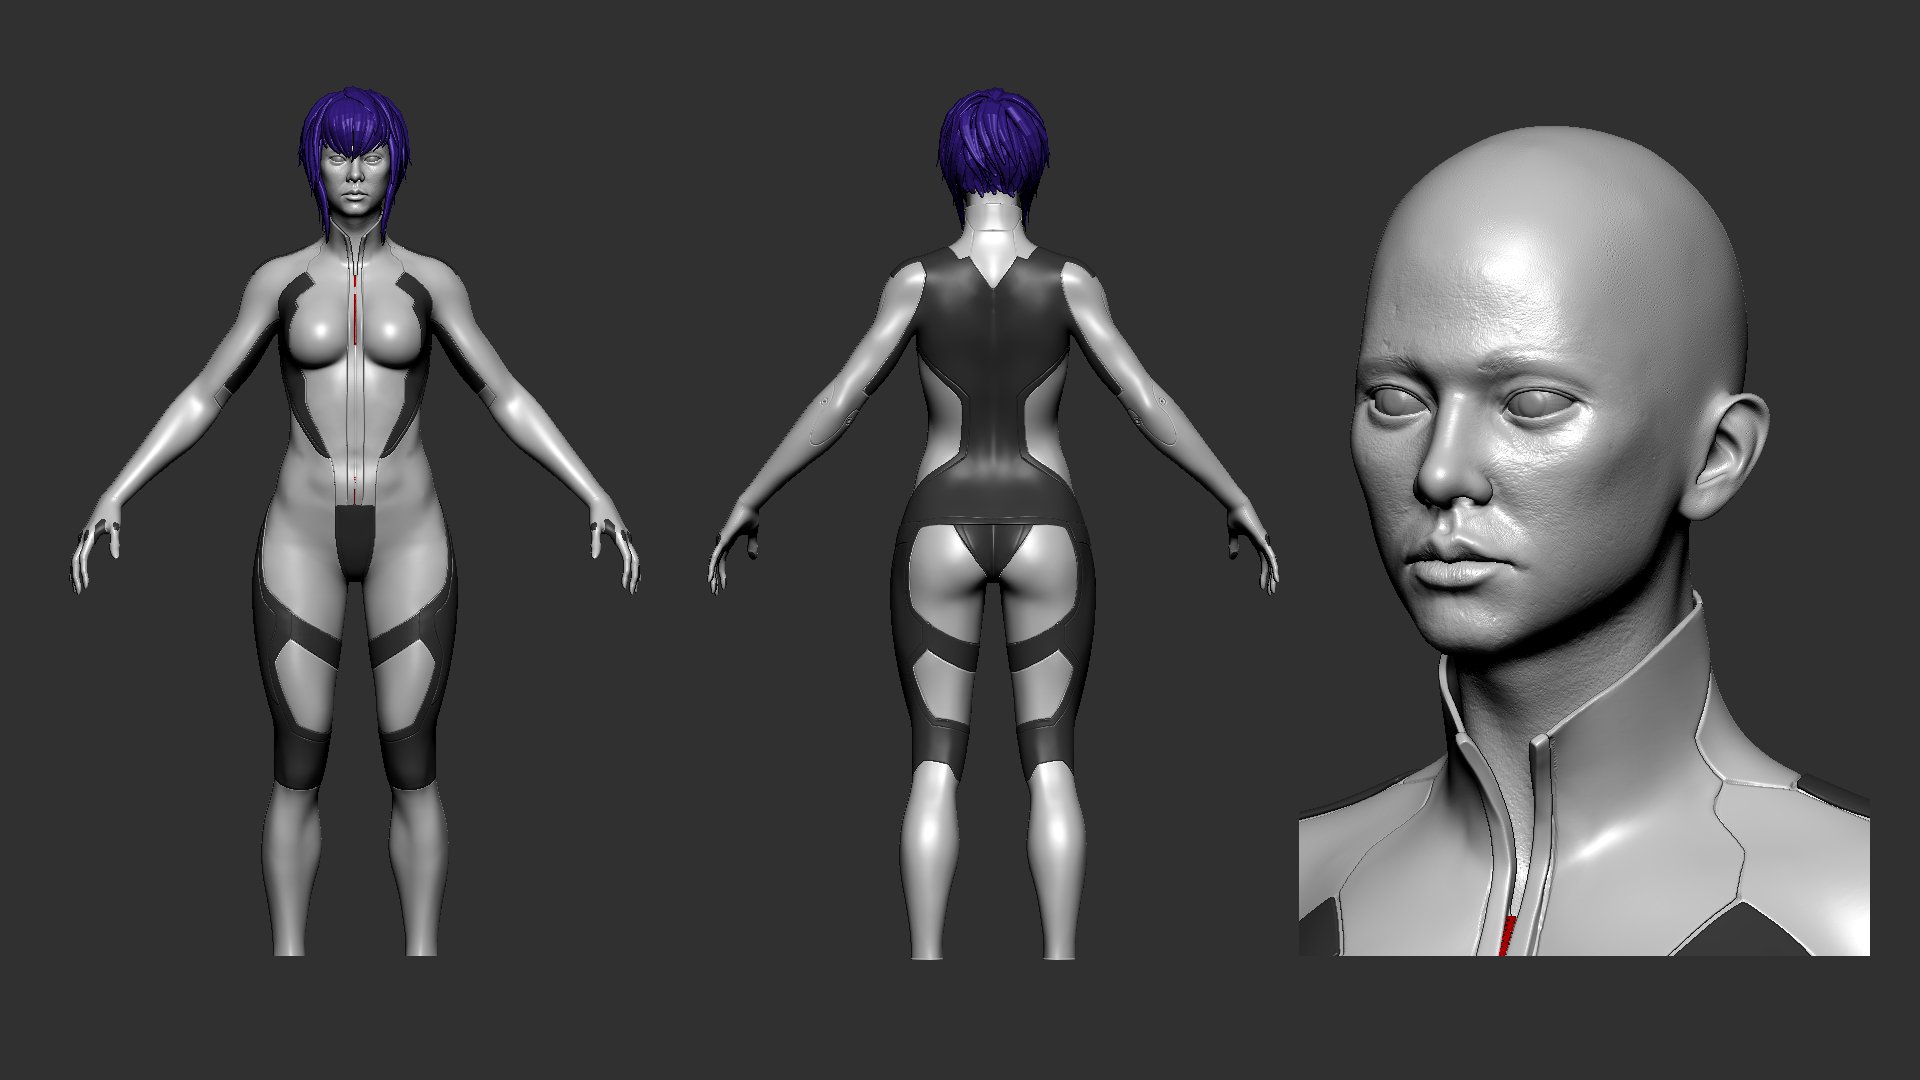

In Marvelous Designer, my main task was modeling the cloth aspects of the jacket. I used references I found online of other similar projects to create a Marvelous pattern that could be stitched together to create the main look of the jacket. As a default, the cloth in Marvelous Designer is quite loose even after changing the fabric type, so I had to use the strengthen feature in Marvelous to make the cloth act more like leather.

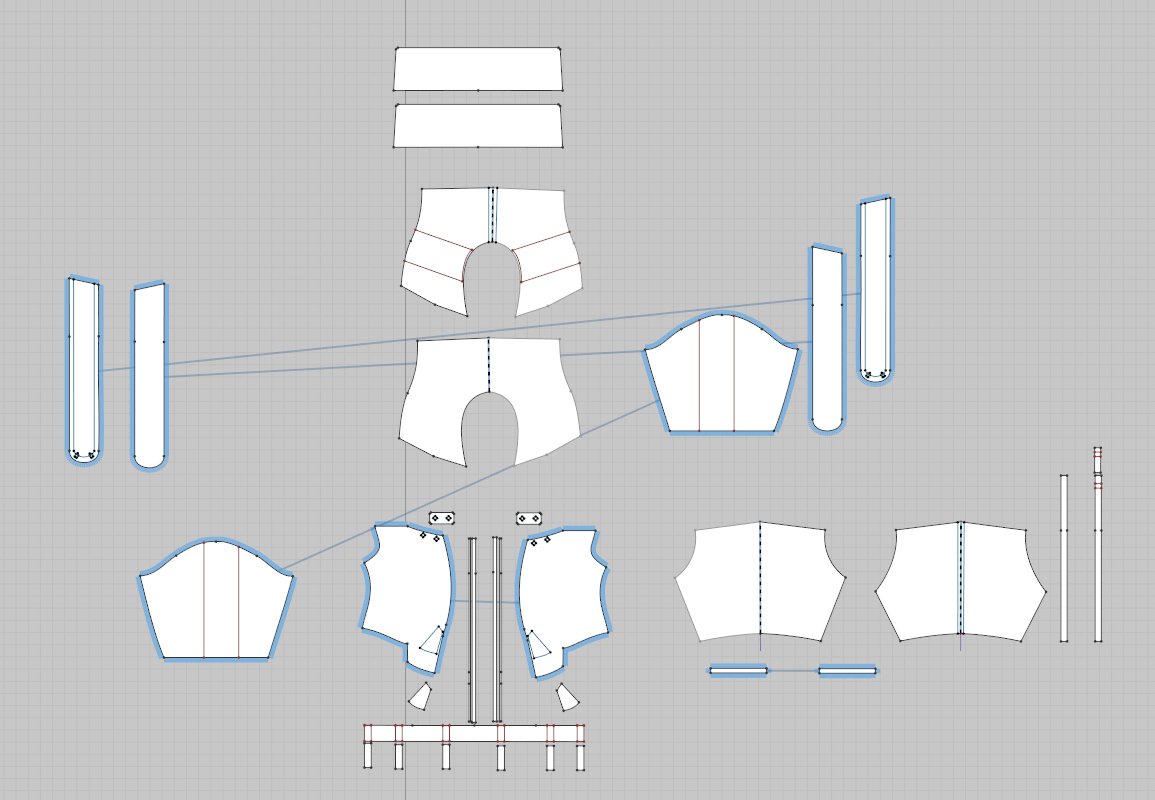
When the jacket was finished I brought it into Maya and used the process laid out by Olivier Couston, in his Artstation project “How to export from Marvelous Designer (Like a Boss),” to create new and optimized topology. Once I had the jacket finished I set about modeling the hard surface armor the character wears.


For the Texturing, I used Substance Painter as my main tool of choice. For the Tachikoma, I divided the geometry up into six UV tiles for the main pieces, and then four more tiles for all the gauges and dials on the interior of the model. I used images of tanks and used construction equipment as my main references and went about texturing it with that information in mind.


My texturing on the Major started with using the same Texturing XYZ full face map set that I fitted in XNormal to texture the face. First I made sure to bake down the hi poly head I generated in Zbrush to get my mesh maps set up, and then applied the fitted textures to the head before going any further. For the rest of the model, I used a mixture of smart materials I have accumulated over the years as a starting point and then made changes accordingly.


Quick shout out to the main man himself John Chung for the sweet gun model. I didn't have time to model one, unfortunately, but the Seburo C26-A is in the works.

In tandem with my work on this project, I had been exploring the real-time grooming pipeline offered by Unreal Engine. To generate the groom, I first began by sculpting the overall shape of the hair in Zbrush, using a hair tube IMM brush I had lying around. Next, I took the finished hair asset and brought it into Maya where I converted the longer edge loops into curves. With the hair curves generated, I could begin working on the groom itself. I had been learning a fantastic grooming software called Yeti alongside this project and decided to use it to generate the Major’s hair. I started by separating the curves I had generated into groups that would drive the fibers from different points on the head. For each set of groups I had to paint a black and white mask to dictate where the hair could grow from, otherwise, it would grow from the entire head.
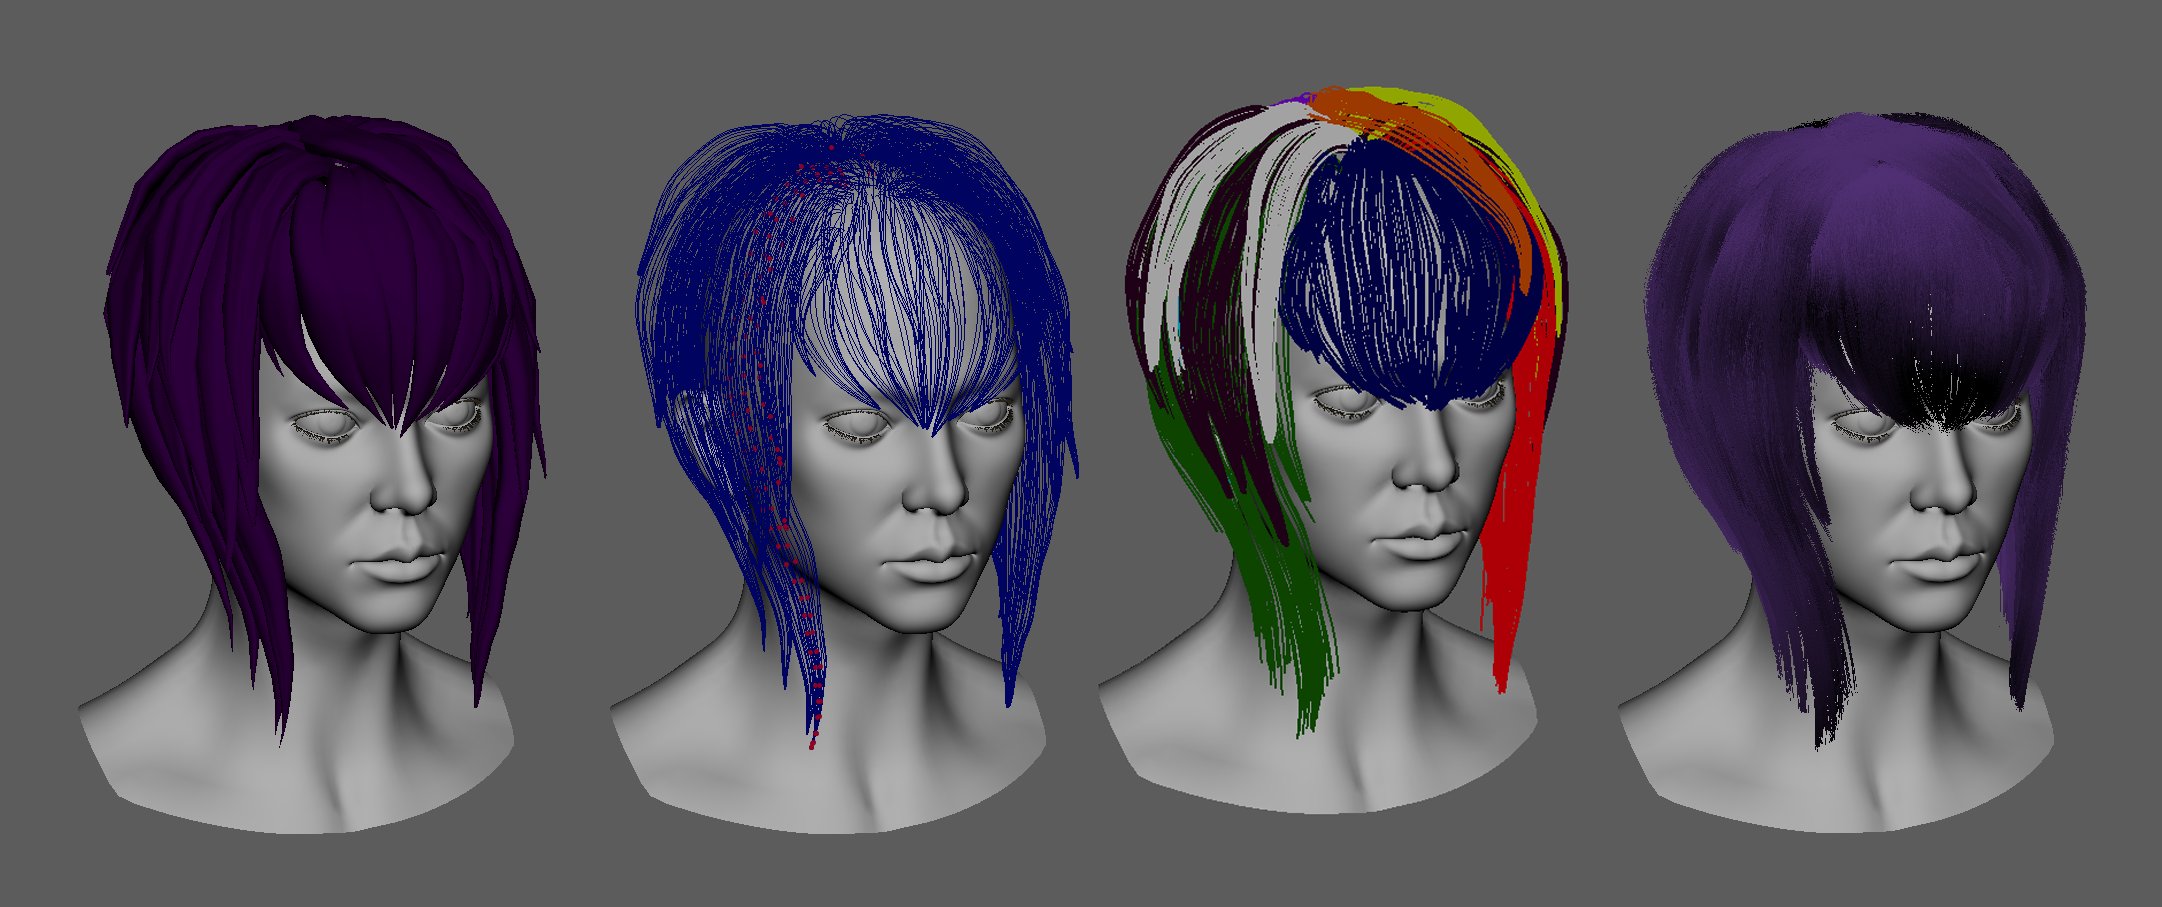
Hair process (Above)
Geo -> Curves -> Guides -> Groom
Growth Mask Examples (Below)

Because I was planning to render in Unreal Engine, one of the main challenges I faced here was working with the full hair density in the viewport. Yeti makes it easy to export for Unreal Engine, so I had to go back and forth between programs to make tweaks and double-check my work. Unfortunately, because I had to export the full density into Unreal Engine, I could not utilize Yeti’s render tools that allow you to work with a low density and render at a high density. This made working in the viewport very heavy. To solve this I plugged an expression node into the density for each node chain which allowed me to turn the density down for each node while working, and bring it back up to full for export. From this point forward it became a game of tweaking to get the look just right until I had my finished project.
I think this project was also where I really nailed down my process for generating eyelashes and eyebrow geometry, so shouts out to Damon and Jackson for showing me the way.
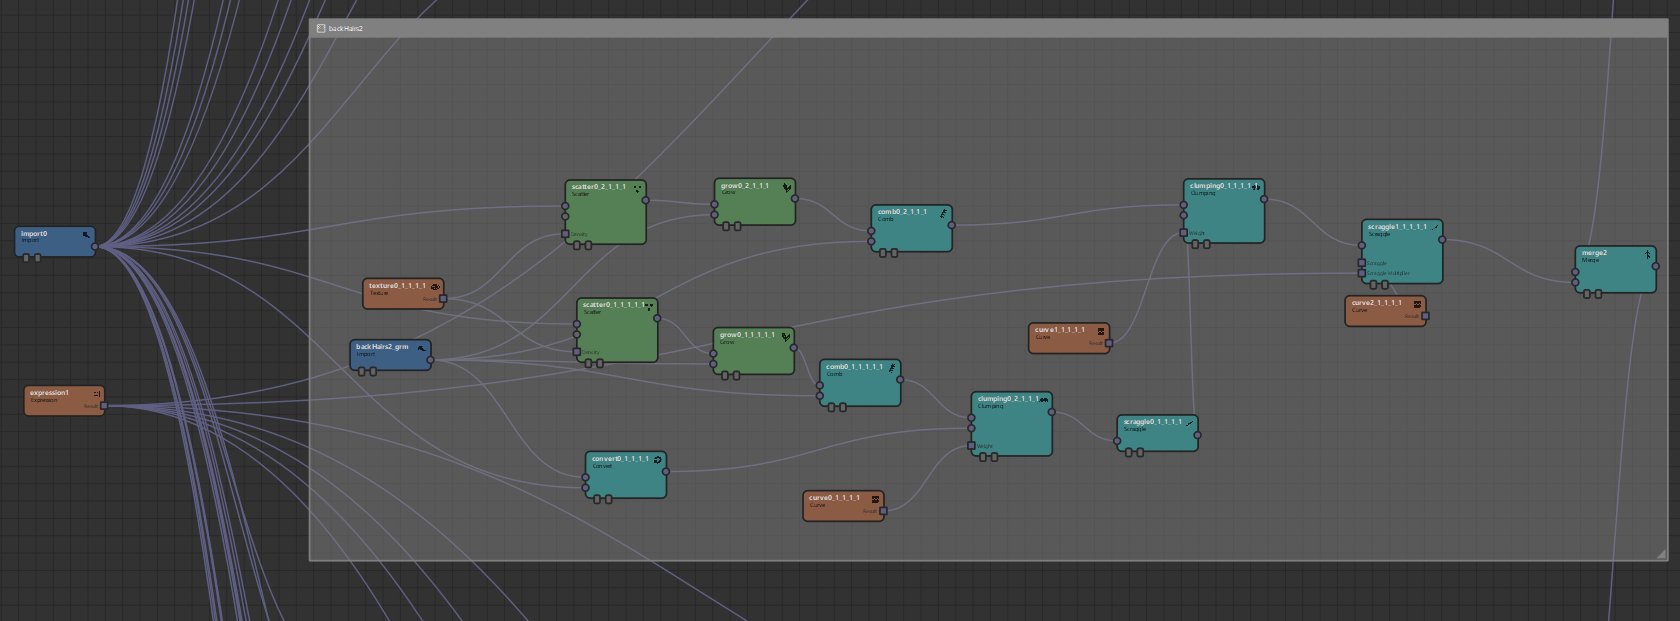
Sample of Yeti Groom Graph -> Full Yeti Groom Graph (Above)
Yeti Eyelash Graph -> Yeti Eyebrow Graph (Below)


As a final note I am E X T R E M E L Y excited to be able to say that both Major Kusanagi and the Tachikoma are fully rigged and animation ready! As I mentioned above Dom did a phenomenal job rigging the Tachikoma in Miguel's harrowing Demo Reel sessions during our final hours at Gnomon, but just recently my friend Russell Griffith rigged Major Kusanagi! Both riggers did a phenomenal job with their respective models, and I can't wait to make animations with these models.
Below are some snippets of their rigging work, but you can find more breakdowns on Dom's website and Russ' insane Rookies 2023 submission. They are both extremely talented riggers, and I count my blessings that they would take interest in making my models come to life.
If you made it this far, WOW, thank you so much for taking such an interest! Attending Gnomon was one of the best decisions I made in my life. The choice to continue toiling away as an unsuccessful artist or take the plunge into 3D and kickstart my career was a no-brainer, but also one that was heavy by its very nature and required extreme fortitude. I am more than proud of the accomplishments I've achieved during that time, and the great boon it has brought to my life after my time there was done. If you want to see more please feel free to check out my website at BenRamos3D.com, and keep an eye out for both the releases of Saleblazers, and the upcoming Stan Lee documentary I was fortunate to work on, in the near future!
Thanks again for reading, good luck in all your endeavors!
-The B E A N


Comments (12)