
Rebelway FX Challenge


Hi, My name is Mearg Taddese, a self-taught FX Artist from Ethiopia. Excited to work on this Challenge and now finally here is the whole making process and final submitting.
Rebelway FX Challenge
Update - 3 Apr 2021
Final submission
This was a fun project to work on and to finally see it finished.
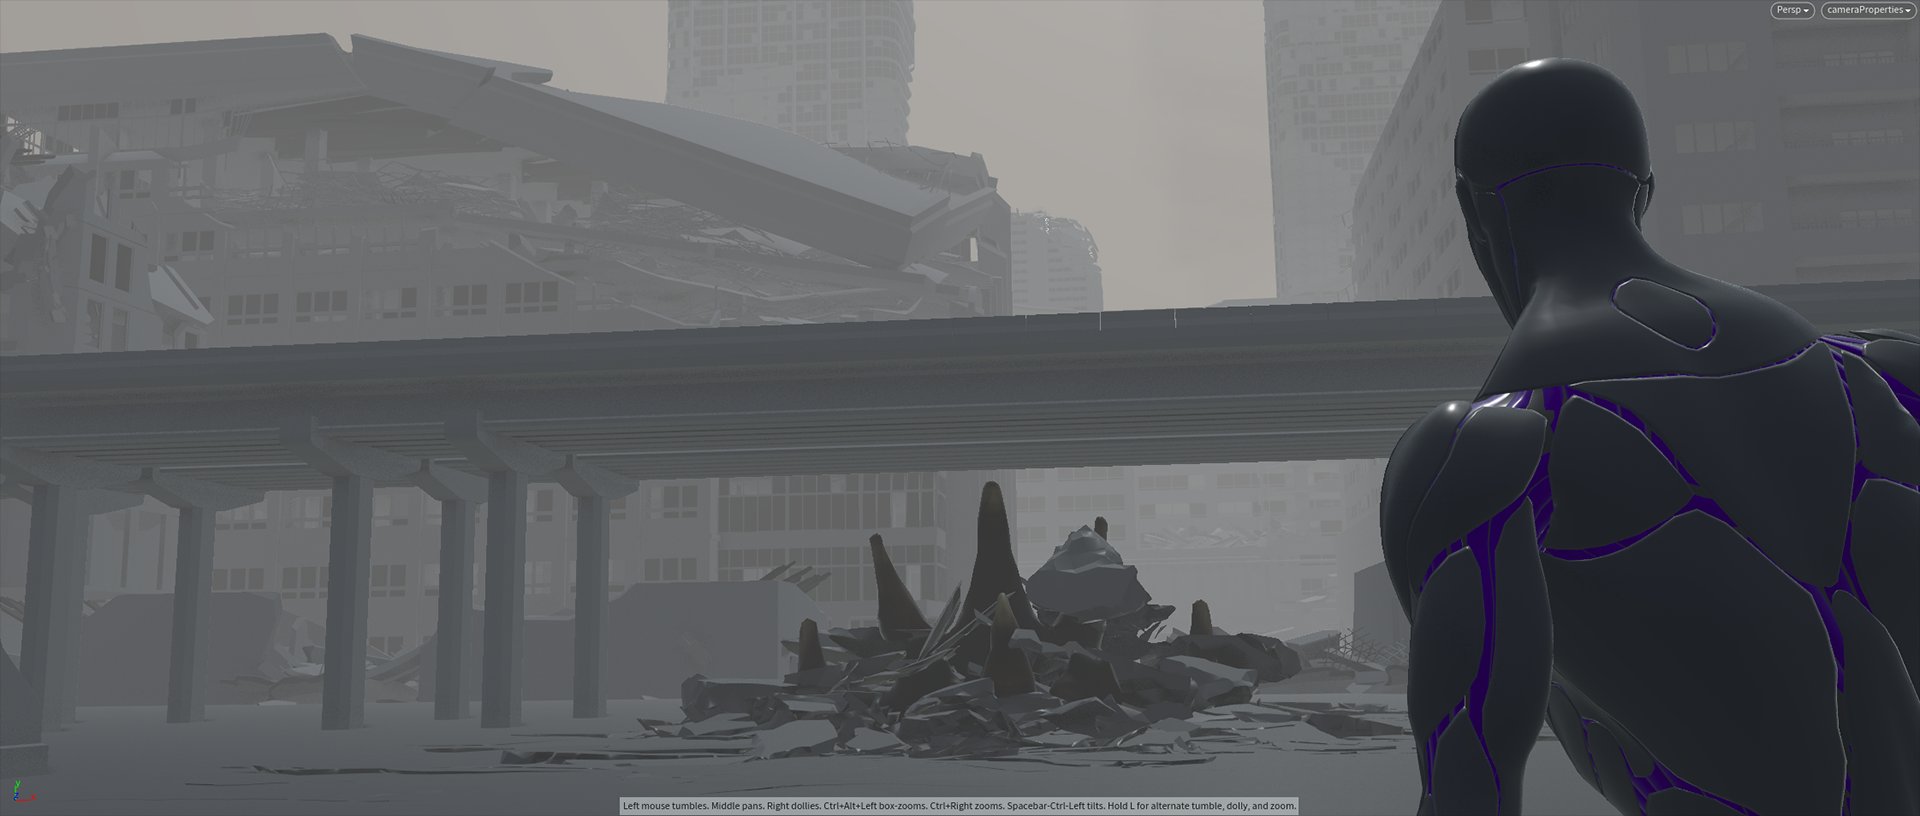
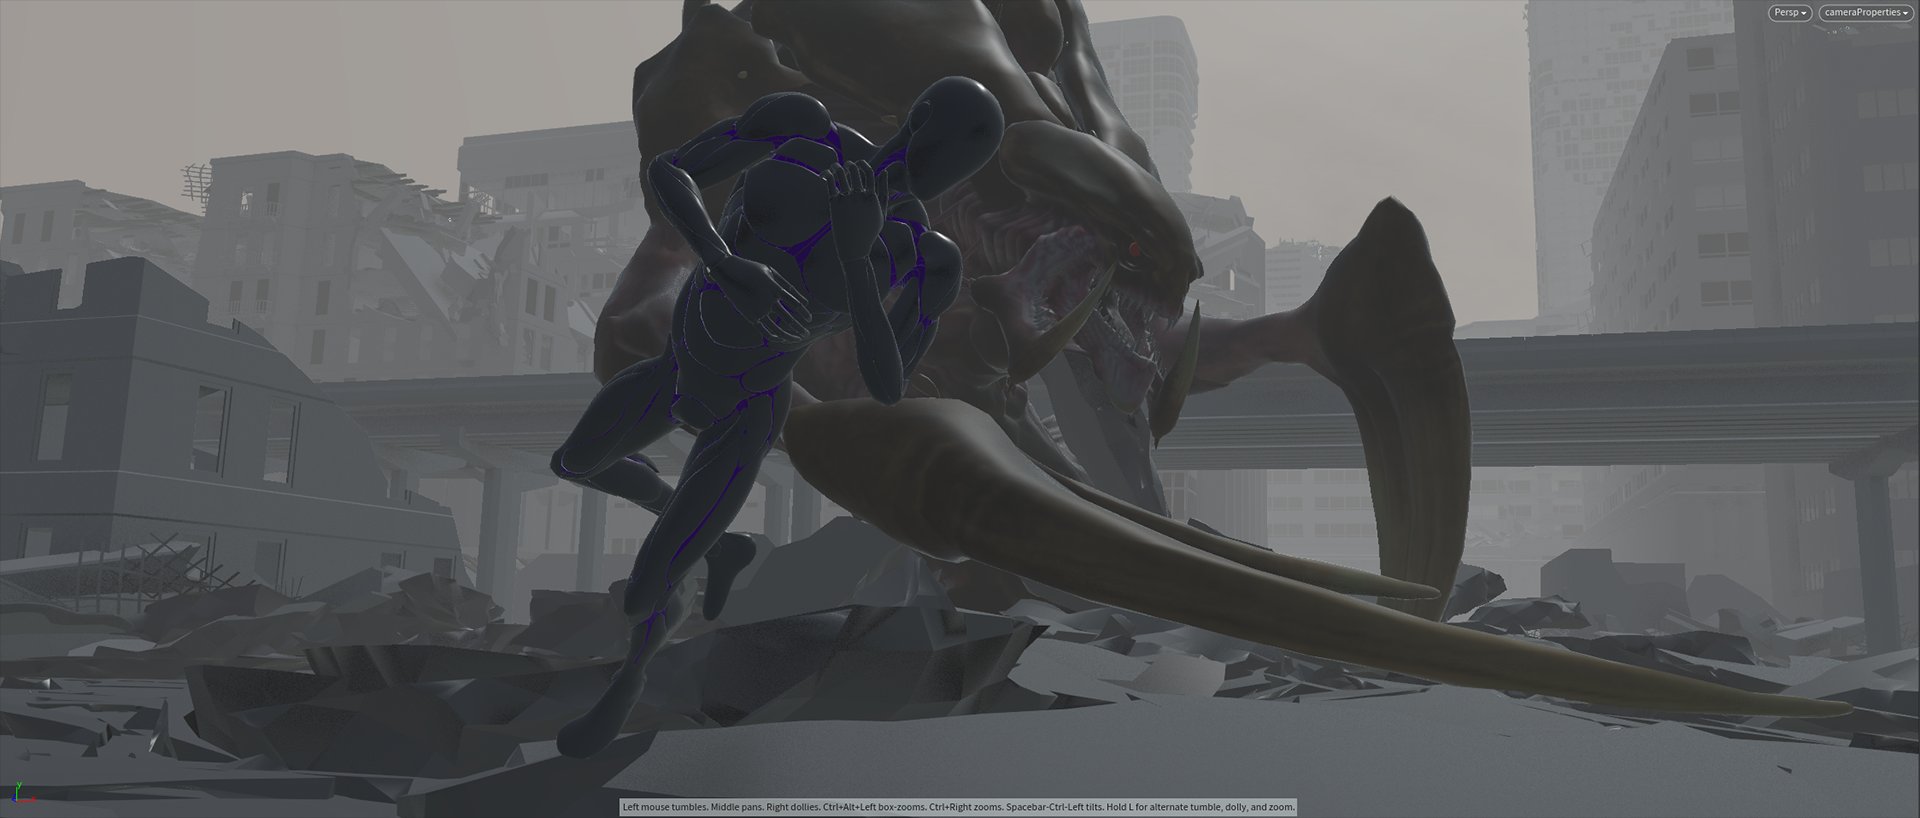
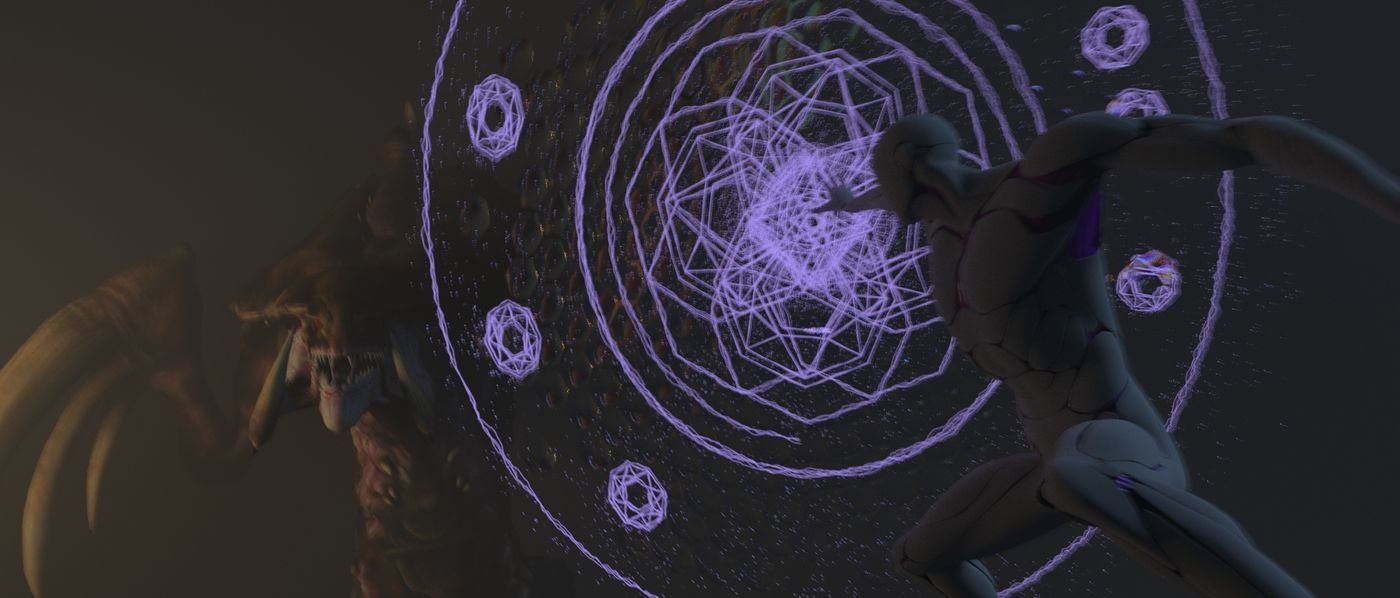
Finally, I made it here. I have rendered and composited the 3 shots plus 4th camera I added(I wanted to show the fx better from another camera angle.
Story
From the start, I didn't have a clear story or how I wanted to work on, what the environment should be, what are the actual FX I wanted to add, but instead, I went with what I enjoy the most when doing the effects and what I wanted to try out, which were destruction and magical effects. then I tried different types of effects and tricks and noticed where they is heading. Then I start to develop a series of ideas that can go together and find exact references from movies. I targeted for film VFX, not game cinematics, so the movies I picked were Doctor Strange, MIB international, Invasion (Attraction 2), WandaVision. At last, I hope the sequence starts to make a story. so the motto The art challenges the technology, and the technology inspires the art! by John Lasseter.
4th Camera
Thanks to Urban Bradesko and Rebelway for his free CG Cinematography course, I learned about camera motions and able to create something similar, that can blend with the other camera motions since he made them. and that helped me have a camera that can showoff the last effect better. I hope it was worth it.
FX
The last attack FX was inspired by WandaVision Agatha's power attack shown in Episode eight and I tried to have something similar effect and to achieve this, it was fairly the same as the previous setup, but this time, I used the hair tools also to modify the lines created and have them bend around and that result in the desired look with the help f motion blur on top of it.

Compositing
Having early comp tests helped with forecasting how far to go with the actual 3D and compositing techniques when to stop with generating particles, or how dense the elements should be.
once the render sequences were done, It was starting to be a bit tricky in comp since it was heavy and Nuke was lagging and constantly crashing. So I had to break it down into parts and export it to disk, read back and use that for the next part. To match the environment reference I picked from MIB international, I added a cathedral church picture as a card in 3D space and balance the color to blend with the scene.

Sound
I tried a bit to add sound and see how it helps the FX elements.

This was a really fun challenge to participate on and i like to thank Rebelway,Rookies and all the artists and friends that inspired and supported me to come all this way.
Enjoy!
Update - 29 Mar 2021
Finalizing Render
All renders are now done and time to get into compositing.
I used 3Delight since it is CPU-based and was fast enough to save my time with render hours. each frame is rendered, and Houdini has to calculate the next frame, so that was making render hours unpredictable, so I had to use the command line option with NSI files, which makes it faster and manageable. one NSI file was getting up to 2.9 GB (which will get around 600GB for just 200 frames only), so I was deleting after render is complete and exporting the next NSI frame ranges.


File size just got 296 GB for the render EXR files. One frame gets up to 420 MB (including cryptomatte, diffuse, reflection, position, normal, and light pass) here is a sample frame.

I rendered each and every effect element separately, so I can easily layer them back in nuke and have the most control. it was a bit messy at first and not sure if it could work. but I did quick tests and manage to make it straightforward. (at least for me!)

To render Ground destruction, dust smoke, and fire separately was a bit tricky, since one influence the other, but finally managed to get it as I wanted.

Compositing.
FX Compositing is crucial for the look I wanted to achieve and I had to rely on and give time to compositing fairly. this is slap comp to import all elements, organize and ready to get crazy with it.

Comments (1)
Update - 19 Mar 2021
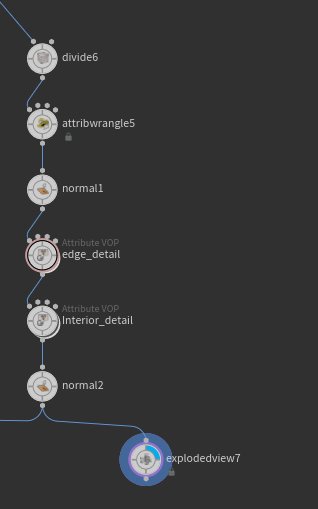
Ground Destruction 3.0
The past two ground destructions weren't good enough and i had to start over, considering the exerience i get fom the past two, the third one was more easy and efficient. I manage to add details on specific pieces i wanted and have custom edge and inteior detailing vops which were faster and easier to control than RBD material fracture.


Pyro and Dust
pyro and dust were same as previous in terms of setup but i use the geo level instance for the debris, it get's more lighter and can easily work with.
Sub-fracture
Till this version, I never knew how to do sub-fracting easily, so I went my way, manually selecting pieces that come close to the camera and have bigger size, fracture and run them over a separate dop net.
Update - 5 Mar 2021
Magical Test Render
I manage to get time to work on the Rebelway for test rendering and compositing and see if all elements are going as expected. I rendered each element separately and layer them back in Nuke, this way it has more freedom in comp time and renders faster. so far so good, now is time to optimize the scenes and get into rendering for final shots.
Update - 24 Feb 2021
Final Shot - Magical Build-up
After working on the shield for some time, I wanted to get into the last magical buildup shot and get the base FX elements, with particles and lines only. I started layering some particles and generating lines that resemble lightning effects. so far I have made 7 layers, here is the breakdown.
Update - 19 Feb 2021
Little Updates
I couldn't get any time to work on these three weeks but at-least I manage to try out some stuff and do little RND setups.
Pyro


The Hydralisk pyro and secondary shield elements. The pyro was breaking up and dropping the resolution a lot. having low res vdb collider and only 1 sub-step was the reason then worked on those and it gets better.
Secondary Shield Elements
While working on the secondary shield, I tried some designs and motions but ended up revealing a lot about the main shield designs and that was not good, plus some of them were disturbing, so I try to keep it minimal and play around with some particle layers
Cyborg LookDev


I tried to create some simple pattern designs to shade the cyborg outer surface. the wires are solid and Emmit electricity when releasing some power. so for the outer metal, I tried to go with a darker look and ended up with something that looks like a Black Panther suit. not sure if I will settle with it, but for now, it is good enough.
Issues
Render time can cause some series problems with the time left, so I am planning to render shield elements, cyborg, Hydralisk with fire and environment each separately. there might be some tricky areas with reflections and matching lights, that I might face over time, but for now, it seems a better option.
Time starts to get tight and I am trying my best to update and progress consistently.
Update - 31 Jan 2021
Shield
I started working on the shield design and sample motion while considering the references I picked for design, look and motion.
The overall work flow is, design in Photoshop and illustrator, recreate it in Houdini plus improvise in the way.
Shield Design

For the design I started with a silhouette resembling doctor strange's and added geez letter elements and come up with a design that works for me. the geez designs are just imported to Houdini with trace node, the lines are crated procedural in Houdini. I did some variations and picked the one I liked

Shield Motion

For the motion, I started with simple carve node and see how the main shapes look in motion, plus from the camera view.
The started to add particles, more particles, Advected particles and pyro
I animate the shield elements at the origin and then, locate to cyborgs hand. that way, it is easier to iterate and have less surprises.
Comp Test
when working with particles, I noticed, rendering and compositing does affect more, so before getting into details, I did a simple render with 3delight and comp in nuke. This helped me how dense my particles should be and how far I should go with actual 3D and how much of it does the comp to get the look I wanted. so far, I like how it turned out as this is my first iteration.

Comments (2)
Update - 27 Jan 2021
Ground Dust and Debris Update
Dust and debris were done in a way so that it can get lighter. I first run 2 particle sims; voronoi fracturing a box and copy to point sim in 2 variations. The dust were done separately for each (the main ground destruction, the ground shock-wave and arm swing) using Axiom

Fake Dynamics


I didn't want to wait for more sim setup and cache times for a little screen space and duration, so I prefer to use deforming option. I use a simple point deform setup on a specific arm to ground contact area. on top of that I run a particle systems, one for debris, one for dense tiny particle render.
Arm Swing

For the arm swing part, I had to use actual dynamics. I created a box on the specific area I wanted, fracture and sim it. Then run the debris and dust as usual. One thing I had to consider was, not to cover the whole screen.
Axiom to the rescue

For all the dust, I used axiom and it saved my life there. since I didn't get comfortable that much with combustion in axiom yet, I used the sparse pyro for the Hydralisk fire reveal. So far Axiom seems to handle it all good and well as expected.
General notes
I have layered all the elements and see how it fits into my scene, then I will get into UV, pscale and density for rendering and push it further in post.
All my destruction are cached in points and after cache I transform pieces to the mid-detailed pieces. So, now I can add more details without re-simulating or caching anything.
I am happy with Axiom, I will stick to it as much as I can and use sparse pyro as needed. The smoke elements needs some sub-steps and Voxel sizes. I will run sims later on.
Comments (1)
Update - 23 Jan 2021
[ Issue Solved ] on Ground Destruction
The one issue that I had was, the pieces sticking to the creature surface and not moving as fast as needed. I was limiting the speed at SOP level, now that I set free the pieces, they behave well, and had to tweak the constraints a little bit, finally got a result I wanted
Update - 23 Jan 2021
Start Over
The ground destruction I have been working was setup in a way that was hard to iterate and heavy for the PC to work with, so I was being limited and had to wait longer to update. so i had to start over, I know time will pass by. Using Boolean fracture was making my scene heavy and sourcing debris was very slow.
Early test
I build a setup that can be handy and fast to sim with low res meshes and transform the detailed pieces later. this way it gets lighter, free for more iteration and got more details easily. , sim time went from 2 hour to 10 minutes.
A simple 5x5m box got all the look I wanted, but when I try to apply it to be final ground size, things get a bit complicated and I end up adding more fake collides and constraint tweaks.
Ground 2.0
I researched more on the ground crack and how it should behave, and picked the style I prefer to go with. I use simply voronoi fracture but the scatter nodes layered in a way that I can put the details where I wanted and with 'rbd configure' and 'rbd contraint from rules' nodes helped to easily setup the weight and acceleration of the pieces plus constraint behavior.
Once the overall look and feel is right, I can up the pieces count and run again and again, considering the time it takes to cook.
Issues
Pieces that used to vibrate, when the constraint and bullet sub-step gets higher, it gets solved.
Intersecting the Hydralisk, I still couldn't get rid of that, so I add hidden collides to push them. so they don't remain stuck.
Debris and Dust on the way...
Update - 15 Jan 2021
Debris
I started to work on the debris source and sim. this is the first iteration and test I get. The base destruction was heavy to use so I did isolate the side surfaces from each active pieces that move around (had velocity greater than 0) then save those to disk and started working from that.
I didn't use the good old debris source node, it was not acting as I expected it so go manual on the debris sourcing. I have more iterations to do, with the weight and density and overall motion, but here is my first test I had.
Update - 10 Jan 2021
Ground Destruction final RNDs
I kept doing different RND, here are 8 that made it to flipbooking. one issue was the layers, having 5 of them and doing fairly dense fracture, was making it slow to sim and I finally reduce them to the top 3 layers.
A simple glue constraint and after breaking changing it to Soft, kept it neat and fast to calculate, much predictable results. the first mess setup was hard to predict and so slow.
Final Destruction choice
the version 8 seems to be better result and it has only the top 3 layers, debris and dust will obviously cover most of it, but I think I will stick to this one and maybe.... the anticipation part might be updated, incase.
Update - 2 Jan 2021
Ground interaction update
After playing around with constraint, I found out that simple glue and bullet soft constraint are enough for the kind of destruction I wanted. I had hard constraint before but it was a bit slower and harder that the soft constraint. so glue and Soft constraints for now.
one challenge I faced, some pieces get inside the collider and behave weird and affect to their neighbor pieces.
There is one thing I like to add, having layered destruction for the asphalt concrete layer. so if one fracture got up and fall to the ground, it's edge crack. that would sell the FX. will see how I come up with that.
Update - 1 Jan 2021
Ground interaction
Here is a flipbook video to test RBD for a collision object moving from side to side and coming out of the ground.
I did some study about Asphalt and it's layer types and measurements. I took those data and applied in Houdini, this time with RBD only.


Asphalt Concrete (AC)
One of the key point to get when starting of was the top layer for the asphalt. it has that rectangular like pattern when it cracks, with disturbed edge out line. and little fracture around the edges. I tried t get that first. this first approach seem to work fine for now. if I come up with better option, I will update it.

The remaining layers, I did with varying voronoi fracture sizes for now. i will have to try how grains would fit here(this might make the FX more interesting). The debris and pyro is for next step.


A sim without constraints looked fake, glue constraint only got the look better, hard constraints helped too to add some variation for the voronoi fractures. I tried other constraints too and/or layers multiple glue and hard constraint, but it made it slow and complicated. I still have to do more RND about constraints, i don't get them always, a bit tricky for me.
Issues to solve
Proper constraints - I have to build constraints for each type of material to match with my references.
Flickering fracture - This happens all the time and i have to find a way to solve this
Update - 30 Dec 2020
Environment update - video
I rendered the whole sequence to see if it is fitting all camera movements, I preferred rendered than flipbook to make it a little presentable
Update - 29 Dec 2020
Environment Update
The environment I wanted to go with is inspired by Men in black International. i found out that there is a dedicated website that lists the actual locations were films are shot.


I am not sure is sharing screenshot from the movie is allowed. But, The battling the hive twins scene was shot in Ludgate Hill, London EC4. I download OSM data of that location and get basic box blocks. That helped me to start with and tweak/edit the setup of the buildings, to fit in the locked camera shots and the character poses. This is direct set imported and I didn't like how the hero frames are.

so, I did some adjustments to make the effects shine and make better composition considering the camera and character animation.


For the buildings, I used megascan assets and build 4 building variation to start with. But I will model/refine my own, to make it easier for render time, and destruction ready.


Update - 16 Dec 2020
WIP 1 Render
Here is compiled video of my first WIP. It was a lot of fun, I will keep on designing the FX and refining. I always wanted to work on destruction and magical effects, I haven't locked the environment, so I can't keep more on the destruction for now, but I have tried on the shield and power effects part. Everything is in Houdini, I rendered with redshift for speed matter and have done rough comp in nuke.
Comments (2)
Update - 15 Dec 2020
Rebelway FX Challenge Progress
Here are the first version FX elements I have been trying to make. I am trying RBD, lighting and sparks, procedural animations. These still images are collection of my progress I had in the last week.


Comments (3)