
SkullBoy
Find a new Body for your father by jumping from skull too skull in this hand crafted Rage inducing, narrative platforming game. Death comes for us all.
SkullBoy
Find a new body for your father by jumping from skull to skull in this handcrafted Rage inducing, narrative platforming game. Death comes for us all.
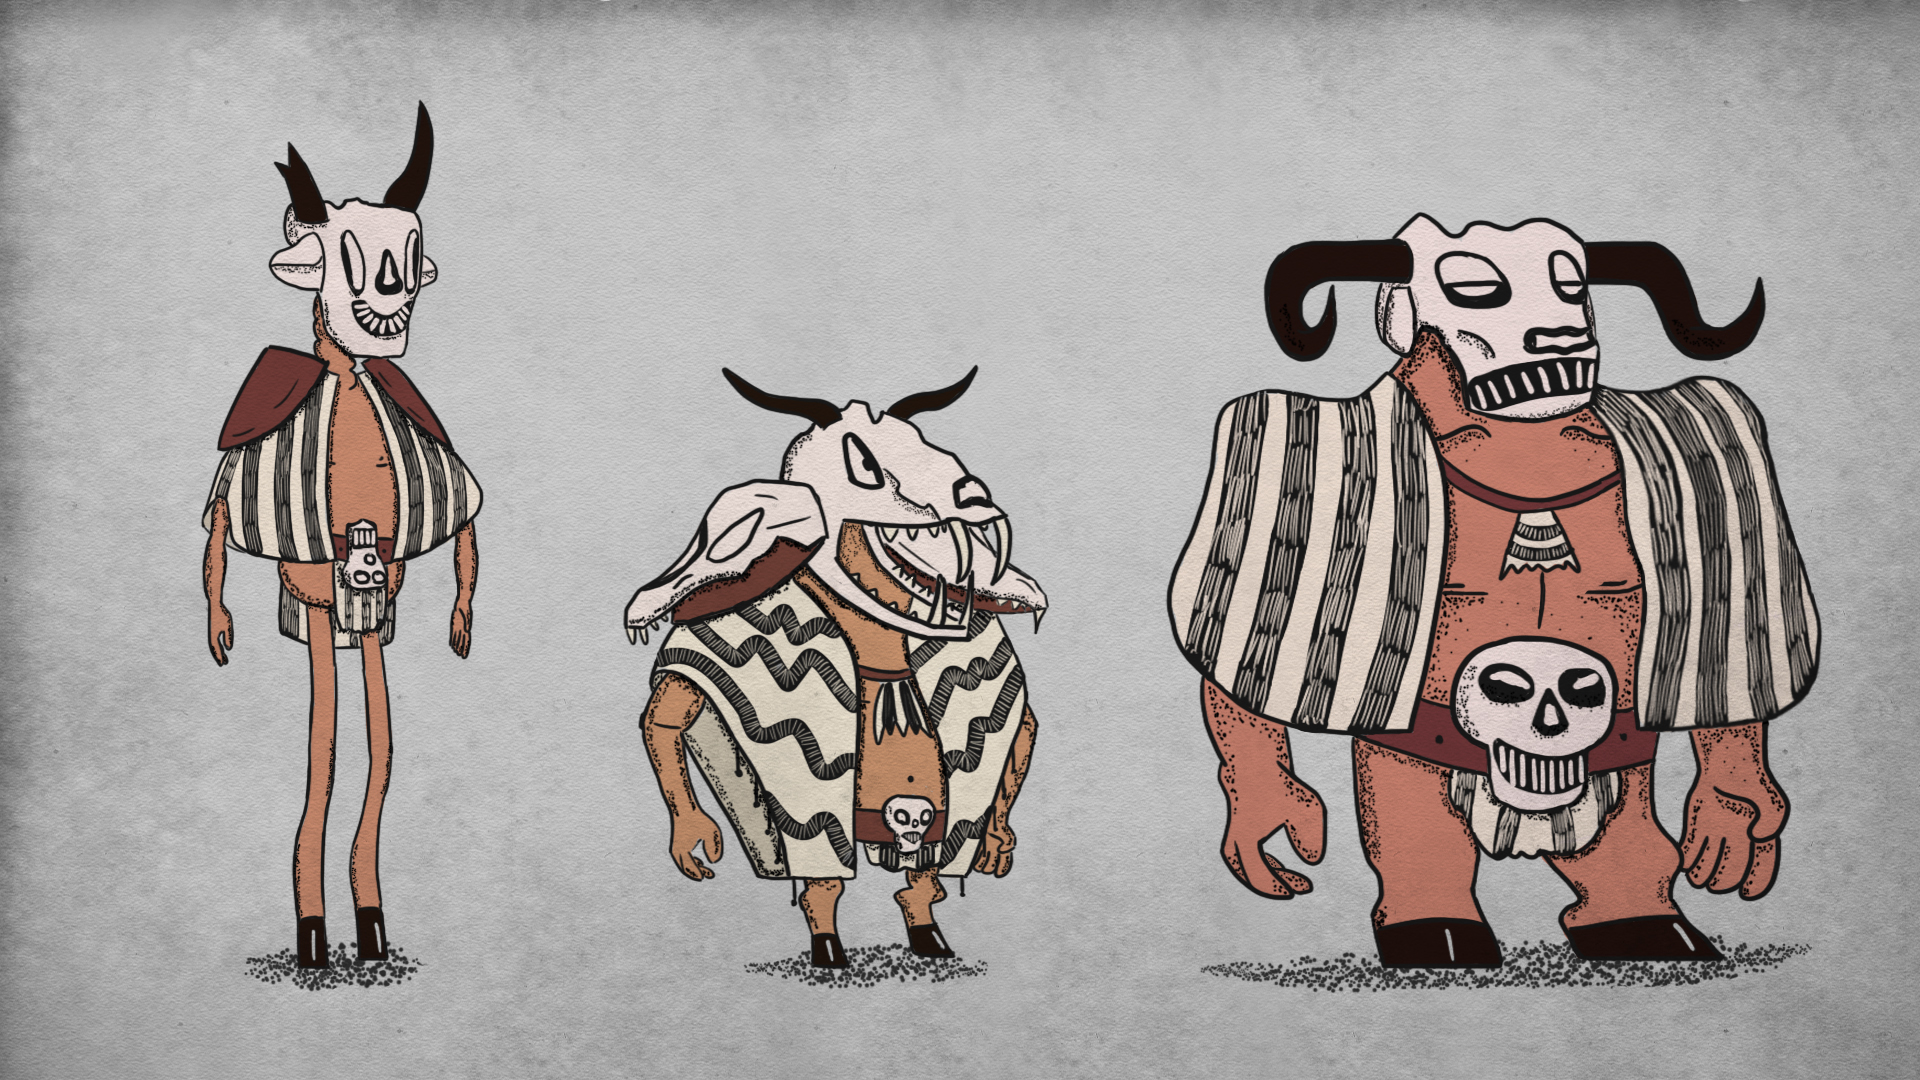
SkullBoy Was developed by me as a solo project for the Game Design 3 Course in DAE Kortrijk.In Skullboy, you play as a young warrior from the Cha‘tar tribe, the remnants of a demonic race, that have renounced their masters thousands of year ago.
These days they are just a peaceful race living the hunter gatherer lifestyle. That are basically skulls, and often create bodies for themselves using herbs, plants, rocks and of course bones, gathered from other dead creatures.
In a recent battle, to protect the village, your father has lost his body, and it is your job, to help him scavenge together all the pieces needed for a new strong body, so he might be a warrior once again.
However you do not have to go on this perilous path alone, his flying head will accompany you on your journey, sharing his wisdom, encouraging you, and also scolding you at times.
Play SkullBoy Now!
How To Play
Skullboy is Only playable when using a controller.Its unique twin stick platforming playstyle lets you take control of SkullBoy and his father’s conjured jumping skulls, by only using both joysticks, and the triggers for jumping.
Use the left joystick to spawn a Jumping skull and control it by moving the left joystick around, when u release it, the jumping skull will manifest itself in the world.
Skullboy can use these jumping skulls to make extra height and distance, whether the player Is still controlling them or not.

Camera
Movement:
The camera will follow the player using cinemachine, using a little bit of lookahead and vertical buffering, to make jumping feel smoother.
Depending on the next puzzle/jump in the level, the camera will lerp and zoom in/out towards a central point of that puzzle, creating a better overview for the player to perform the section.
Some more spaced-out puzzles will follow the player on a dolly camera or by using a target group containing the sections camera and the player.

Perspective
The camera looks at the game from a 2d side scroller perspective. The Camera is however not 2d itself, it is a 3d camera, allowing for a lot of parallax effects to happen during the game.
Because of the precisely crafter camera transitions in the game the parallax effect come to life even more.


Camera Shake:
Light Camera shake when the player bounces on a Skull (moving or static).
Heavy Camera shake when the player dies (ramping down over 1.5 seconds), when moving blocks/ level effects hit walls etc and when moving blocks/ level effects hit walls etc.

Level Design Philosophy
-Levels consist out of multiple Puzzle Sections with rest sections in between that linearly follow up on each other
-There is a Save checkpoint After Every Puzzle Section
Apart from the ground walls and spikes, every Puzzle Section will consist out of one or more of the following Components that make the section function as a level.
1. Dialogue: Some sections will have dialogue implemented, the dialogue will play one or multiple times, and will play the first time the player passes by, or after x number of deaths on that section.
2. Camera Movement/Zoom: While inside the hitbox of this part of a section the camera will move towards the centre or a specific section of the level, giving the player a better overview and perspective over the section, additionally this really makes the level feel more polished and makes the parallax effect pop.
3. Animation Stacks: These parts of the level make objects like switches interactive and cause the level to be more difficult/ interesting, add camera shake, and sound effects.
4. Spawners will spawn certain objects, pickups every time the player dies, or on a repeating pattern.
When the player completes a Section, he will deactivate the former Section and activate the next Section. This keeps performance Up and ties in directly with the games trail and error design pillar.
Example Levels
Here's an overview of 2 of the midgame levels, as they give good examples of the design philosophy we will employ.
Overall Design Philosophy:
• Every Section always has multiple ways to be solved / different paths that the player can use to get to the next section.
• Harder / out of the way paths are often incentivised with a collectable herb, which will only be permanently gained after completing the level at the next checkpoint.
• Players may see better paths to take after dying a couple of times during the puzzle, embracing the trial and error design pillar philosophy.
• Oftentimes, the first jump of a puzzle will require newer players to place skulls before starting, however, expert players can start without placing any, and get to the required height and or distance with just the two mid-air skulls.
• Puzzles are “designed” to cater to new and expert players, and even speed runners, apart from the default routes, there’s always multiple ways to even complete the shown routes.
This however is more thanks to the mechanic itself than the level design, but its useful to know, to prevent level breaking by expert players.

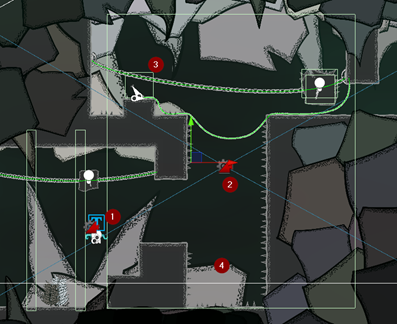
• Red lines: Red lines show the optional Path / harder path, used to collect the herbs, be more challenging.
• Green lines: Indicate the “easier” or “basic” route through the puzzle, these often line up with the harder path at the start, end or throughout the puzzle.
• Blue lines: Indicates movement of Obstacles and the triggering connection between them.
• White skulls: estimated location where the player would hop on a skull during the level.
Level 2-2

After Playtesting different skills levels of players, the levels outcome is the following.
• Novice: The player will make a staircase of skulls at the first vertical climb, triggers the switch, and tries to jump over the incoming block (if they done freeze up).
• Medium: The player oftentimes prepares 1 or 2 skulls, and then also preforms 1 mid air skull jump before reaching the trigger. To make sure he clears the jump over the moving block he also mid-air skull-jumps it.
• Expert: No preparation skulls are used; the player only uses mid air skull jumps to clear the level.
In this level there’s not to much path variation between different player times, except for the herb gathering that makes the level harder. However, there is still a lot of different ways to solve the puzzle, depending on player personality and skill level.
Level 2-3

After Playtesting different skills levels of players, the levels outcome is the following.
• Novice: Will place 2-3 skulls at the start to get to the first herb, after that realises, he will have to perform the mid air skull jumps shown on the image to complete the level.
Some give up and take the easy route, others successfully complete it and learned along the way.
• Medium: Will place 1-2 skull on the way to the first herb, picks up the pickup and uses 2 mid-air skulls to get to the end.
• Expert: Doesn’t place preparation, and just flies in, gets the herb and skulls pickup reset, and uses 1 more skull jump at the Bottom to get to the end.
Speed runners however might skip the herb and go for the short approach.
A less Linear level, different personalities and skill levels will play the level completely different, or even take different routes.
Art and Style
Art Style is loosely based on Creatures and style I made and used for a 2DForGames assignment I did before this project.The main takeaways are the Linework, shapes and the Dot Shading.
for the colour scheme I went for a more technical approach in unity itself, more on that later


Lighting and Level couloring
While the style above uses colouring in the images itself, in unity itself the colouring of the sprites will mostly happen by using different coloured Point Lights.


As seen on the top image, the Objects in the scene still hold some colour. This is because this gives a much better result when the lighting actually hit it including giving a lot more variation.
Luckily this is not done manually, I wrote a script for this instead. With the click of a button you can automatically Set the Colour of each sprite to a Random colour value and saturation value, depending on the sprites current Z/Depth Placement in the 3D world.
Additionally, the script also automatically configured sprite rendering order.


Comments (0)
This project doesn't have any comments yet.