
Highlands Animatic
This project was a school project for Kristiania University College. I explain how I got the end result and what programs I used from start to end.
Table of contents:
1. Introduction
Short introduction to the project.
• Task description
• Synopsis
• Inspiration
• Idea brainstorming
• Storyboard/blocking
2. Implementation process
Detailed description of how the project was carried out.
• Expectations
• Creations
• Research
• Resources
3. Conclusion
Concluding thoughts
• Feedback
• Self-evaluation
• Sources
Introduction
Task:
The purpose of the subject is to provide students with relevant studio experience in a larger 3D production. The production is preferably done in a team, but can be carried out as an individual specialization where one adheres to a production plan. The production may be a larger game, film/animation, VFX or visualization project or other 3D graphics relevant project. The content of the production is developed through the subject, and it is open for collaboration with student groups from other programs.
Synopsis:
A medieval war is about to begin. There has been a small skirmish before and now reinforcements are coming. The commander of the red team speaks about how sad such a war for power is and why they are doing it. We hear his thoughts just before the war is about to start.
• The whole scene should be realistic with a hint of artistic flair. It should be clear what is happening in the scene.
Inspiration:
The inspiration for this project mainly came from a song I heard on YouTube, "Blackmore's Night - Catherine Howard's Fate". I stumbled upon this song one day and immediately created a war scene in my head as I listened to the song. The war scene was to be set in a medieval period and much of the inspiration was drawn from the "Lord of the Rings" series.
I have a small passion for writing and now I finally had the opportunity to create something for what I had written. So the first thing I did was create a script of about 80 words. I knew that the whole sequence should not last longer than about 1 minute, so I was able to write the script in a relatively short length in relation to the sequence.
Idea brainstorming:
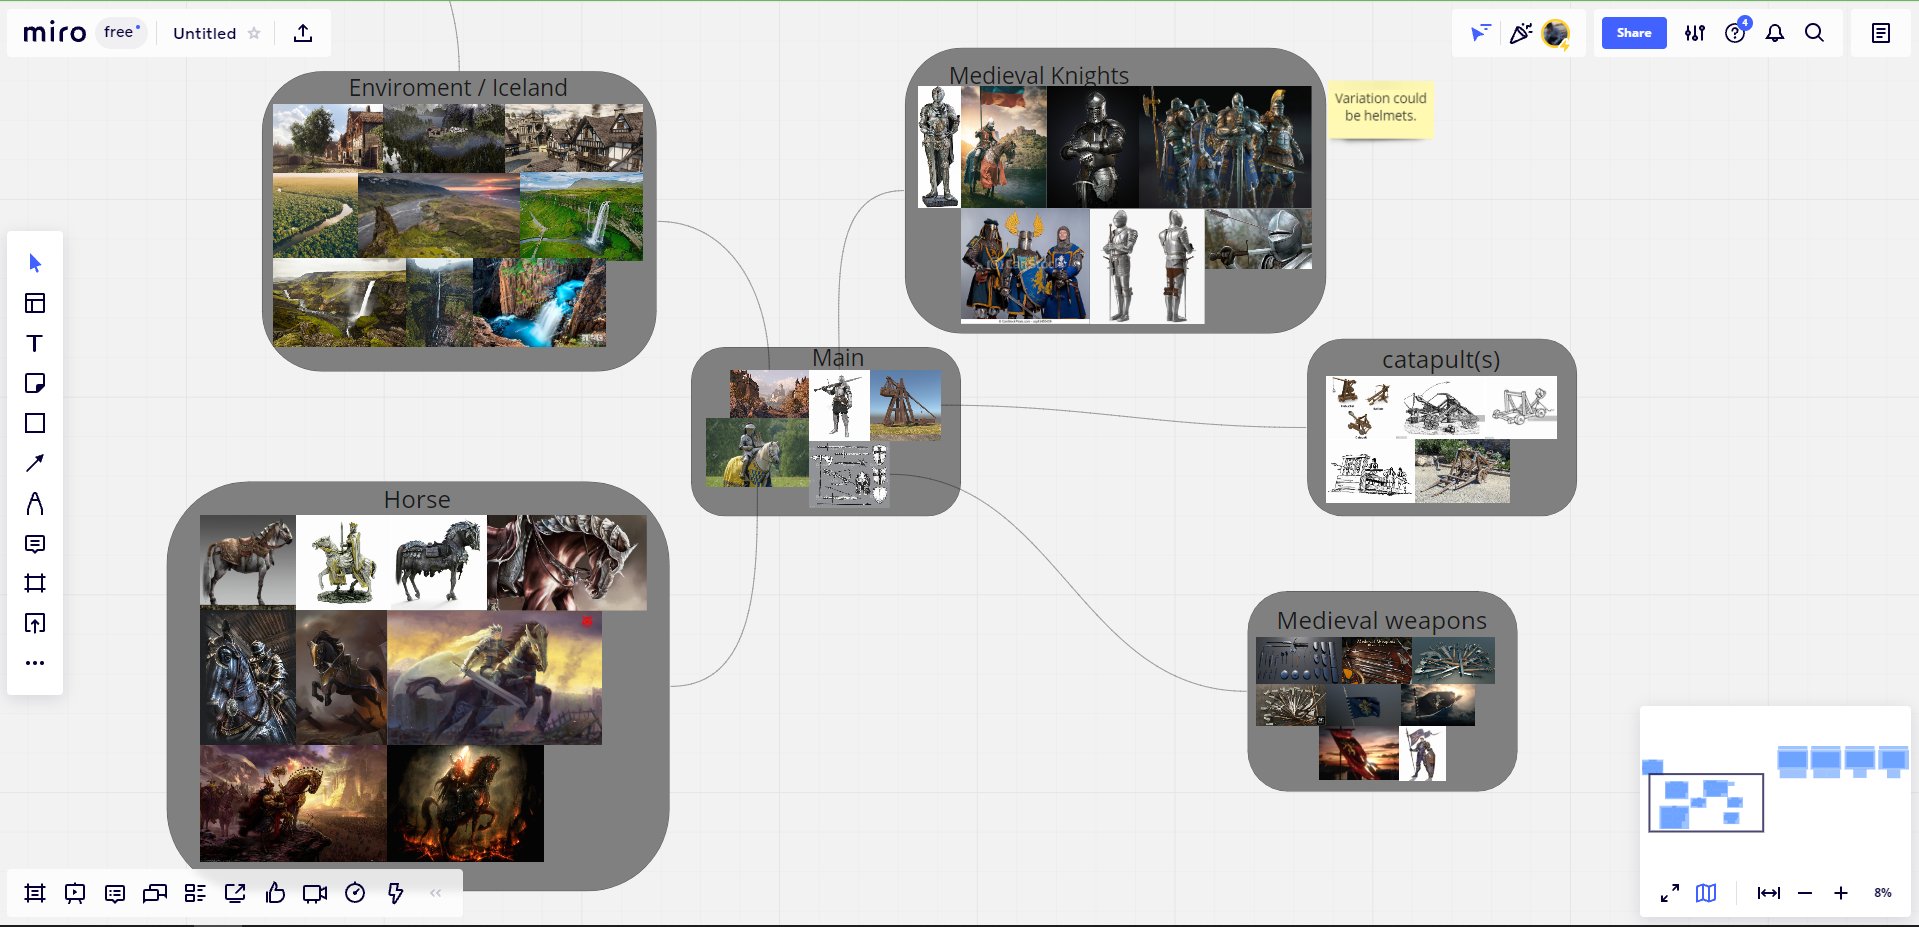
I created a mind map/mood board in Miro as soon as I had the opportunity. Here I pasted all the pictures I found on the internet that fit the animation sequence I was going to create. Many of the pictures played a big role in how the sequence would look at the end. I was good at sticking to the Miro board I made, which helped me a lot in choosing the right things for the scene and knowing what fit best together.
Storyboard/blocking:
I created a storyboard with 3-4 pictures where I explained well how I wanted the camera movements and what should be shown. I am not very good at drawing, but this helped me understand what was going to happen and how things were going to happen. The Miro storyboard looked like this:

On the storyboard, I wrote shot numbers under the highlights, but shots 1-2 were connected and shots 3-4 were connected. This was just to explain what was going to happen as accurately as possible.
I am extremely glad that I made a very rough blocking of the scene at the beginning. This helped me a lot both in explaining the project better and in knowing myself what is going to appear and what is not so important to focus on in the scene. It took no more than a day to create the blocking of the scene, with the main focus being on showing the script and camera movements. I am a bit fond of editing videos too, which was extremely useful considering that I almost always had sound in the animatics and blockings I showed. This helped a lot in giving a proper overall feeling of the scene and clearly showing what was going to happen in the sequence.


Implementation process
Expectations:
I had high expectations for this project. The goal was not only to create something I could be very proud of showing off, but something that really pushed me to achieve goals I didn't know I could accomplish. Therefore, it was very important for me to give myself a very big challenge that I could handle on my own.
I asked a fellow student if he would like to join such a project, but unfortunately did not get the answer I hoped for. This turned out to be mostly negative, but a bit positive, considering that I got many more tasks that I had to solve on my own. At the same time, I solved the tasks alone, which was extremely educational for me. I am sure that with a team of a few other students this animatic would be on a whole different level and we could learn much from eachother, so one could argue that a team on this project would be much more educational.
Creations:
Unfortunately, during this project, my laptop charger was damaged, which led to some things being redone and other things being downgraded as my private computer was no longer working. This was unfortunate because many of the things I started working on were not included in the end.
However many things was luckily enough saved on the cloud so I could easily retrive it and continue working on it. Most of the work happened inside Unreal Engine, where I did all the optimization of landscape materials, objects, assembled things, and posed characters. This was great because I got instant feedback inside the Engine on how the character poses looked in relation to the sequence.
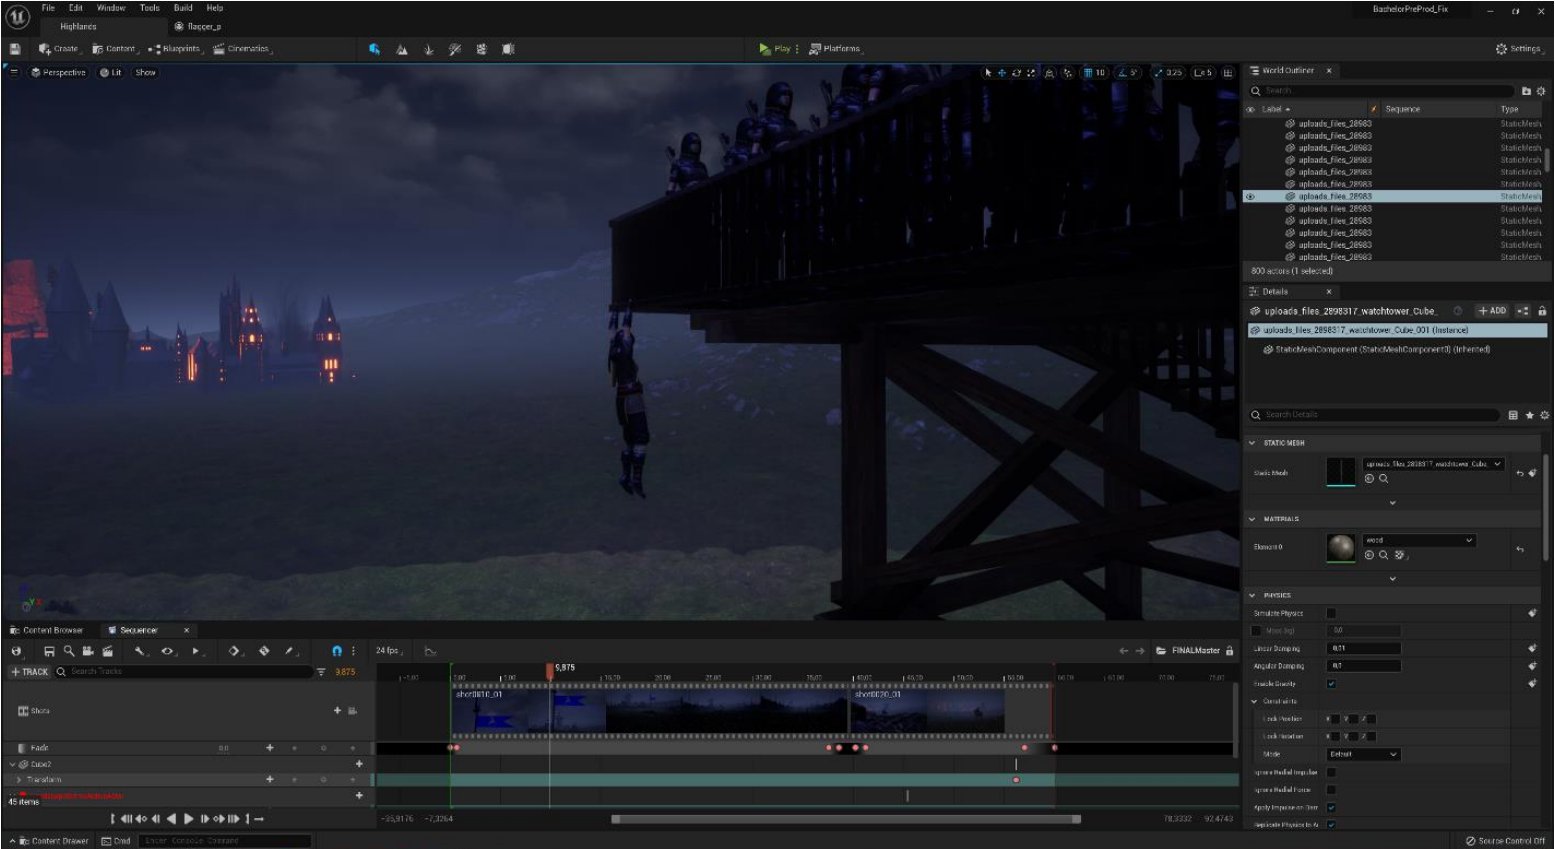
I also added small "easter eggs" that I thought were a lot of fun to add, and it made a lot of difference to the whole sequence, like for example the knight hanging from the watchtower:
During the project, I also learned about decals through my lecturers. This was something very useful as it created more details in the picture by just adding an "sticker" that I found in Quixel.

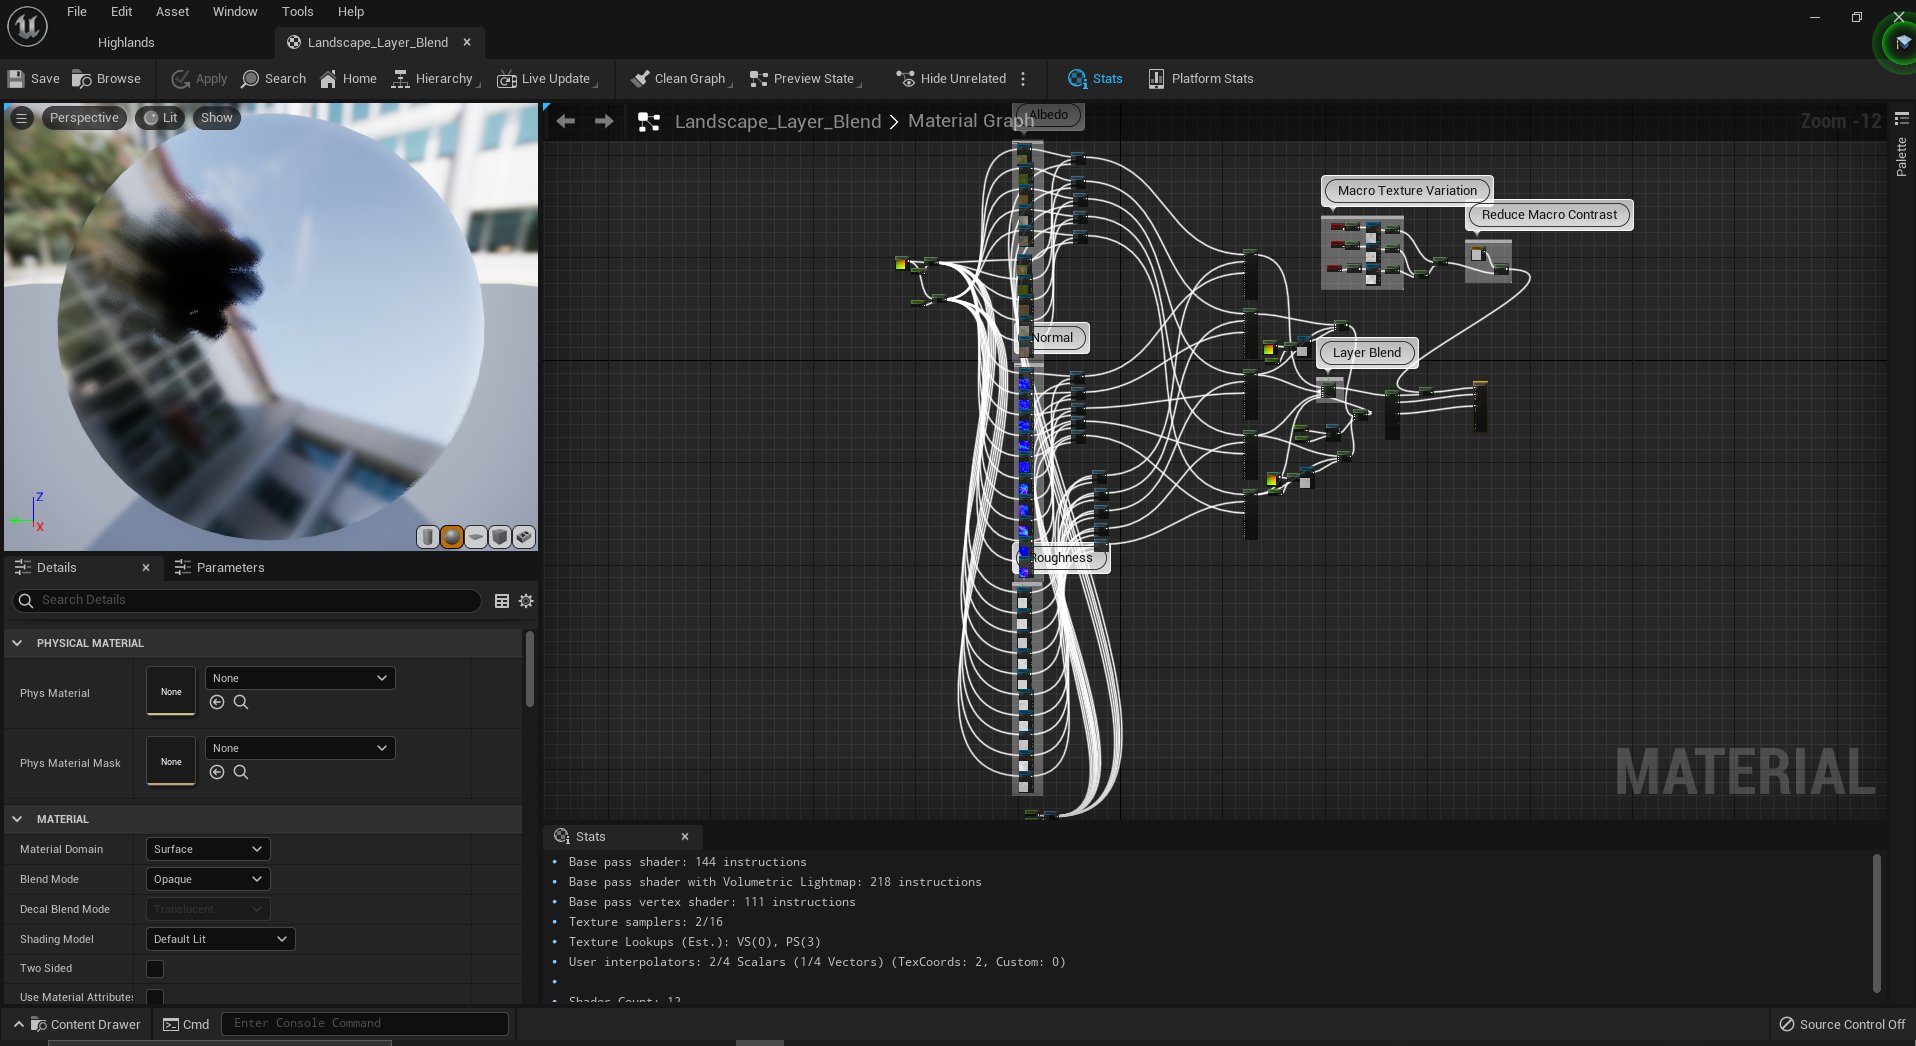
Below you can see my landscape material that got a lot of nodes on it. The material was set up so that the further the camera was from the landscape material, the material furthest away was scaled up. This was to prevent tiling in the grass and stone texture that was further away from the camera. The grass and stone texture were combined to create a nice landscape "blend" where large cliffs in the landscape got a stone texture and flat areas got a grass texture. I was able to create the this master material thanks to a Quixel tutorial on their YouTube channel explaining this in detail.
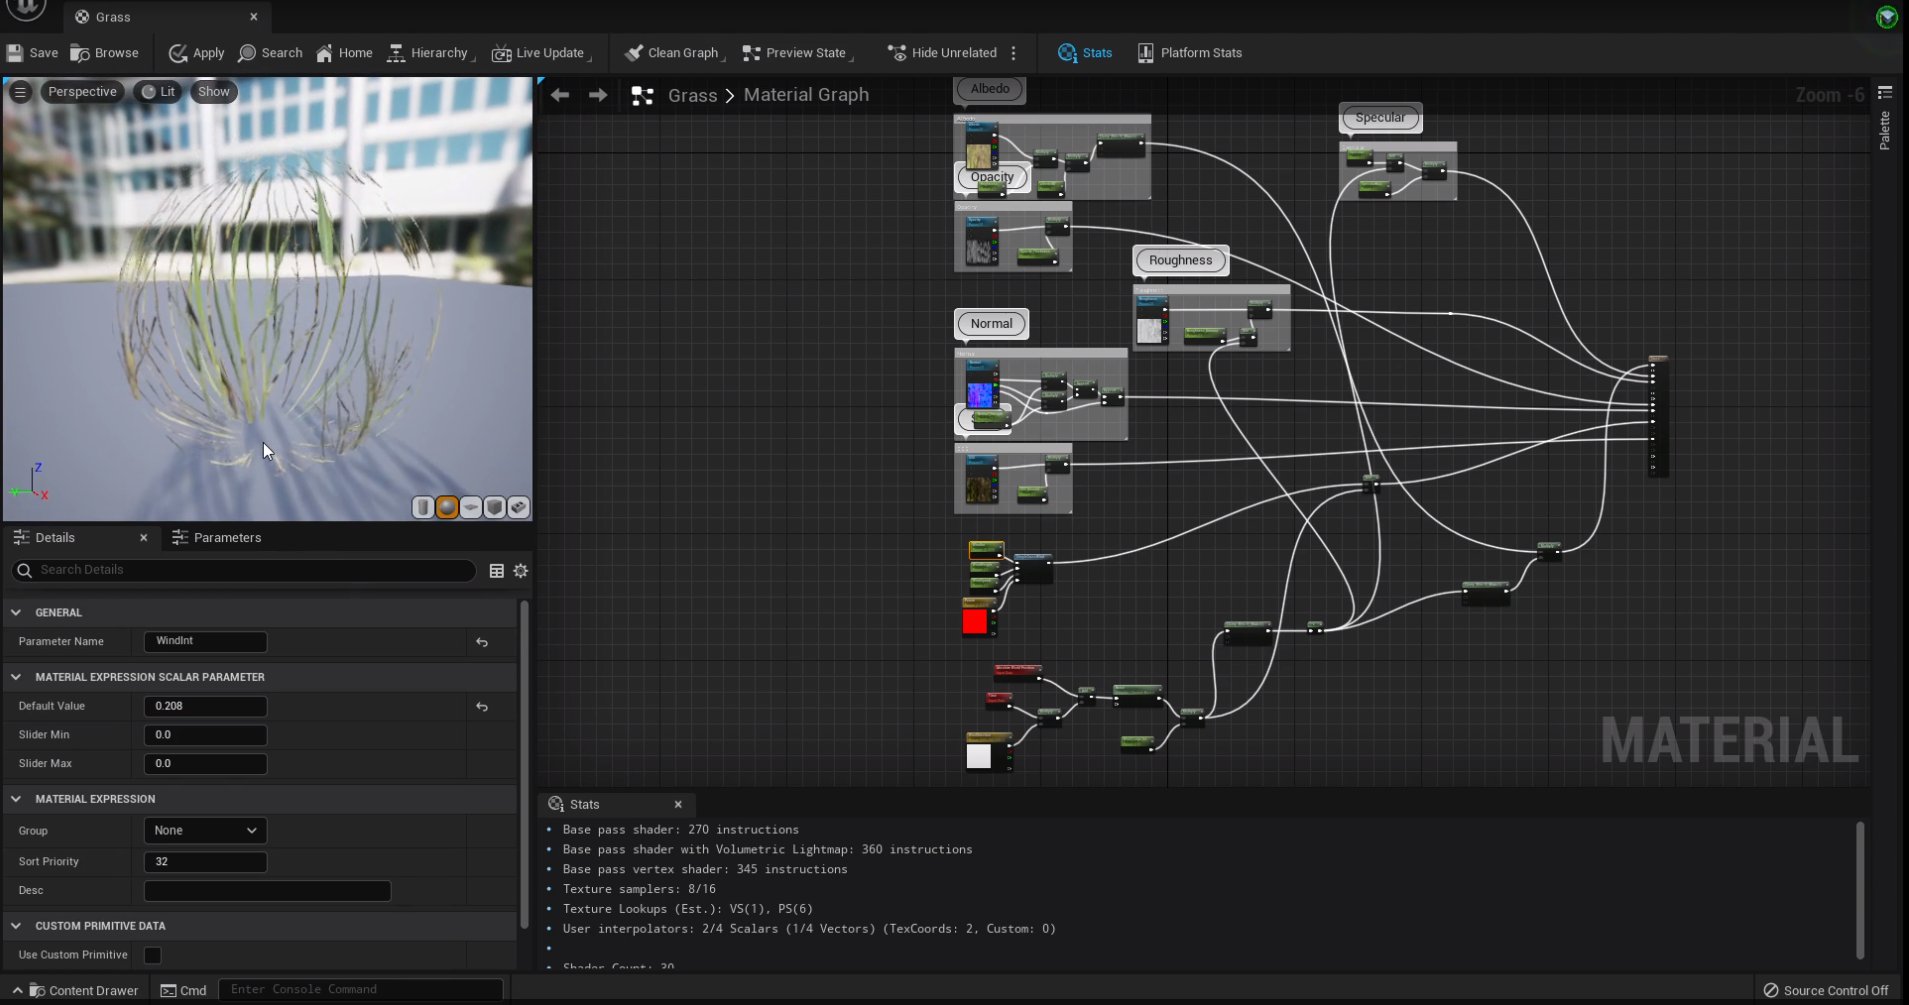
The material used for the grass that sticks up in the scene got its own wind node, this was because the wind parameters I used in the scene would not co-operate well with other things in the scene. Specifically, because of the flag and cape simulation, I had a fairly large wind multiplier in the scene. This gave me a nice simulation on the clothes in the scene, but not other things like the grass and trees. Therefore, it was better to animate the materials inside Unreal based on nodes. I did not find a solution to have multiple wind forces in the scene and decide which wind force should affect what. Therefore, this was my solution to the given problem:
This is how the crowd simulation looked inside Unreal Engine through Niagara. Here you can see that I used several component renders with different animations and asked the engine to choose what to spawn from 0-5, which is a total of 6 different animations.

Niagara was also used to create smoke and torch simulations. Many of the things were animated on the timeline inside Unreal where I just made some simple keyframes and animated them. A lot happened in UE5, but towards the end, another program almost got as many hours a day, namely Adobe Premiere Pro. This is a video editing program that I used for this project.
Everything from sound implementation to color grading and subtitles was done in that program.
Research:
To get the right feeling in the scene, I began to watch a lot of the "Lord of the Rings" fight scenes and how they were constructed. This project was heavily inspired by those movies, so some of my time went towards that. I spent a lot of time reading Unreal's own documentation pages where they explain various things that the program has to offer. Everything from lighting to particle systems, which was a great resource for understanding how the program works. Niagara, which is the name of Unreal's particle system, was difficult to learn. Much of the information available (at that time) does not go into much depth on how to achieve small things, but rather focuses on larger things such as how to optimize the particles used in the scene.
I used Niagara for my crowd simulation, which does not have much information available online. Most of it was people showing off what they were able to achieve and how optimized they were able to make it. It turns out that this program is very powerful, which worked well for me since I wanted to have many soldiers in my scene. I added different LODs to the knights to get the scene to render faster and not lag while I was working on it. All of the information I received was mostly through Unreal's own documentation of the program. Otherwise, there was a lot to be gained from YouTube with people who achieved advanced crowd simulations, but much of it was geared towards games so they went into depth on how the crowd simulation works rather than showing how it was set up. Fortunately, I was able to achieve the desired results thanks to information online and a lot of testing on my own.
Resources:
In this project, Unreal Engine 5 was used, which was in an early stage of development at that time. Unreal Engine is a powerful game engine that has focused a lot on the digital front in recent years when it comes to visualizations, games, etc. It is a free program that has a wealth of resources available online.
Here is a brief overview of the programs and tools:
The 3D program Blender was also used in this project, where I modeled spears, garments, etc.
Adobe's free Mixamo tool was used for characters & animations. This is a large library with many characters and animations, which helped a lot to get variation on characters and to populate the scene with characters.
The landscape was created in the Gaea program, which is a node-based program where you can get awesome landscapes with just a few nodes.
For textures, Adobe's Substance Painter and Photoshop were used, where I made the garments for the different "teams". I went for the standard "blue team against red team", since this creates a nice separation between the different strengths, I thought.
Quixel Megascans for all plants, stones and grass, fortunately they have a partnership with Unreal Engine that allows me to use it completely free.
SpeedTree for trees, this program was relatively easy to learn thanks to the good UI design of the program and that lecturers had good knowledge of this program. I had little to no knowledge of this program before this project.
Adobe Premiere was used for animatics where I put together the render with sound so that the message and feeling of the scene came much clearer. This was a program I learned to use thanks to this project.
Soundly helped a lot with sound for small things like flag sounds and small effects that were added. This library was super easy to use and took my animatics to a whole new level thanks to the sound.
Conclusion
Feedback:
Throughout the project, I was lucky enough to be able to show off what I had thanks to the real-time simulations of Unreal Engine, which allowed me to get finished renders in under 30 minutes. I took advantage of this by creating animatics with sound that I showed to friends, family, classmates, and lectures. I was very interested in feedback and what people thought when they saw my animatics. This helped me to see things from a different perspective than I had in my head. Everything from camera shots, simulations, assets and overall composition was adjusted to achieve the final result. I took all the feedback I received into consideration and changed a lot in the scene, while still maintaining the basic structure of the scene that was important for the message in the sequence.
Self-evaluation:
I am very satisfied with my own efforts, it often became long days, but the end product was worth it in my opinion. Now I have something really cool to show on my showreel and just in general. It is not often that I have been able to be so dedicated to a project, but fortunately I managed to do so during this project. If there was something I would change, it would be the torch simulation that I was not very satisfied with. I also made a tree in SpeedTree, which did not quite fit in the sequence. It would've been a lot more educational to involve other students in such a large project so that we could achieve more big things by delegating tasks.
Sources:
Special thanks to:
Ivar Kjellmo - Professor
Henning Birkeland - Professor
Brage Børtnes - Fellow student (Voice actor)
Friends & Family
https://docs.unrealengine.com/5.0/en-US/
https://www.youtube.com/watch?v=ATX7kmET4zE&t=2308s
https://www.youtube.com/watch?v=CqXKSyAPWZY
https://www.youtube.com/watch?v=Ar3vvygirLU
https://www.youtube.com/watch?v=Ar3vvygirLU&t=1s
https://www.youtube.com/watch?v=_a6kcSP8R1Y
https://www.youtube.com/watch?v=8e_p2fljUYA&t=383s
https://www.youtube.com/watch?v=UIycCZl4lYE&t=36s
Assets used:
https://www.cgtrader.com/free-3d-models/military/other/game-ready-medievalcatapult
https://www.cgtrader.com/free-3d-models/military/melee/viking-shieldc929fac0-30d7-402f-9974-6c7844c88dbe
https://www.cgtrader.com/free-3d-models/various/various-models/battle-shield
https://www.cgtrader.com/free-3d-models/military/armor/helm-no5
https://www.cgtrader.com/free-3d-models/architectural/engineering/watchtower0dc77443-ee4d-46a6-a780-0744d54da891
https://www.cgtrader.com/free-3d-models/architectural/other/h-55914ef6-5b8d42d4-a886-1c8c24e81916
https://free3d.com/3d-model/dmonic-sword-20872.html
https://sketchfab.com/3d-models/armored-horse98c3f1c40a6b422dba76bf5403e0a3d8


Comments (0)
This project doesn't have any comments yet.