
Musashi | Hiroyuki Sanada | West World
Here is my personal long-term project to create Musashi from "West World" played by actor Hiroyuki Sanada. He’s played in many great movies such as «Last Samurai», «41 Ronin», «Lost» and last but not least «Mortal Combat» as my favorite character - Scorpion.
Musashi | Hiroyuki Sanada | West World
Update - 2 Oct 2023
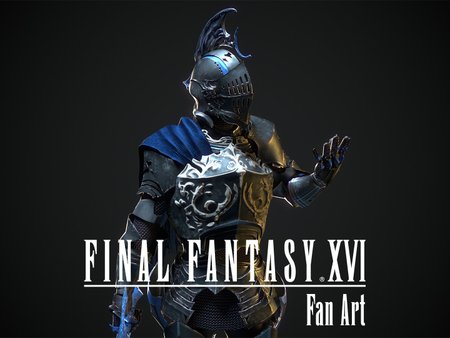
Final result
Musashi from The West World played by Hiroyuki Sanada. I started this project more than three years ago when I quit my job. I tried my best to grow my skills as a 3D character artist.
This project shows what I have achieved. At this point I see a lot of mistakes that I can handle on future projects. It’s not the best work, I know. But I got so many new skills. Now I can work with programs that are used in AAA game development and the best Hollywood movies.
This project was a milestone. And now I can move on, go to the next goal, follow my dream. Huge thanks to my family for all their support through these years. I'm very lucky to have you! And also thanks to you all guys. Art has no meaning without an audience. Your support gives me strength to move forward.


Used software
3Ds Max - retopology, modeling, unwrapping, rigging (CAT), animating, grooming (Ornatrix), lighting, shading, rendering (V-Ray)
ZBrush - sculpting, skin detailing
TexturingXYZ - maps for skin detailing
R3DS Wrap - projecting skin maps
Marmoset Toolbag - baking
Substance 3D Painter - texturing, body baking
Ornatrix - grooming
Marvelous Designer - cloth creation/simulation
V-Ray - rendering
Photoshop - compositing, color correction
Update - 23 Sep 2023
WIP 7: Rigging & Animation
The hardest thing was to work with the facial rig. Especially with the eyes. The fact is that when the eyes move, the eyelids also move. But when blinking, the whole functionality has to overlap. Since I didn’t use morphing for facial expressions, I had to create additional controllers for this mechanic.
Rigging the weapon was also not an easy task. At some point, the blade itself must link either to the sheath or to the hand. And states should change naturally, during the animation process.
But the greatest amount of pain came from simulating clothes. I spent months trying to get Marvelous Designer to do what I needed to do, but eventually I had to remove half of my clothes to make the simulation work.
Two morphing controllers were made for the simulation of clothes. The first controller controls the deformation of the armpits area and the second one controls the abdominal muscles.
Rig and animation was created using 3dsMax CAT.


Update - 17 Apr 2023
WIP 6: Wear
Musashi's costume from WestWorld based on Sharen Davis design. Making this wear was very interesting process. I made the Juban (underwear) and the Kimono (outerwear) in Marvelous Designer. Also, I modelled the Jika-Tabi (shoes) and the Kasa (headwear) in 3DsMax.
I'm not retopologized base clothes because I figured out that the best solution for simulation would have used triangulated mesh. Also, I'm not sculpted the details and not baked the base cloth because I decided that it would have pointlessly. Instead of this I added some details on the normal texture itself.
All texturing process was done in Substance Painter. The Jika-Tabi were detailed in zBrush and baked in Marmoset Toolbag.
The Jika-Tabi and the Kasa was rigged by myself, but the other clothes were simulated in Marvellous Designer.
For rendering process, vRay render was used.


Update - 10 Apr 2023
WIP 5: Katana
This is a replica of the Musashi katana from the West World series. And this is part of my long-term personal project. Previously, I already made a katana according to the concept. And compared to that model, I think that I have achieved a new level.
This time, the sculpting alone took an unimaginable amount of time. And working on sageo and tsuka (lace and winding) is a completely different story. And yes, while I was working on this model, I learned a lot of new names, such as sageo, tsuba, saya, habaki etc. I have gone through so much manuals and tutorials that it seems that I can already make a real katana.
This time I decided to use the Marmoset Toolbag for rendering. In general, everything I do for the Musashi project can be used in Real-Time engines. Except for the hair. For them, I used the production pipeline. But if desired, they can be modified for integration into the engine.


Update - 12 Jul 2022
WIP 4: Grooming
It was the most difficult stage of all that I’ve already gone through. Not so much because I made grooming for the first time, but because of the huge amount of bugs in ornatrix :( Not everything turned out as I planned. There’re still flaws. But this stage took an unreasonably long time. So, here is the result that I’ve achieved from a complete zero of knowledge in grooming.
Made in 3dsMax with using Ornatrix by Ephere. Rendered in vRay. Final image was made in Photoshop. Video created in VegasPro.


Update - 13 Jun 2021
WIP 1: Sculpting
This is the result of months of study and work. Hope you like it!
Sculpted in zBrush with using Texturingxyz maps and R3DS Wrap by Russian3dScanner. Final image was made in Photoshop. Video created in VegasPro.


WIP 2: Retop/Unwrap/Bake
After sculpting the base form, I retopologized the mesh and unwrapped it into 8 udims. When I started the project, the Substance painter wasn't working correctly with udims, so textures projecting was a real problem and I decided not to use many udims. I also decided to use a normal map instead of displacment. But now I see a deficit of surface quality in the close-up. I used the retopologized mesh to sculpt details and project a lot of @texturingxyz maps all over the body. When I was satisfied with the final result, I subdivided the retopologized mesh and baked it as SDiv 1 in Substance Painter.
Retopologized and unwrapped in 3dsMax. Baked in Substance Painter. Rendered in V-Ray (3dsMax). Final image was made in Photoshop.


WIP 3: Texturing/Shading
These are the final textures. I haven't been able to achieve a good result with Corona Render, so I decided to use VRay. I'm new to VRay so it was really hard to find a good result with sss materials and especially with transition geometry on eyes and teeth. Many hours of testing have been spent at this stage. I used "VRayAlsurfaceMtl" for skin with thikness map for SSS mix setup, "VRayFastSSS2" for teeth and eyeballs and "VRayMtl" for transparent objects such as transition geometry and cornea. I used the standard light setup with key light, fill light, 2 rim lights and hdri map. I have 2 texture sets for the first and second reflections. I also have a wet mask for more control over the reflections.
Textured in Substance Painter. Rendered in V-Ray with 3dsMax. Final image was made in Photoshop.


Thank you folks!
That's not all, so stay tuned for new updates of this project!


Comments (0)
This project doesn't have any comments yet.